TaskTree Demo
Demonstrates how different execution modes and workflow policies affect the complex TaskTree execution.
The TaskTree Demo shows how to construct a nested TaskTree recipe using timeoutTask, and demonstrates different execution modes and workflow policies. Its application provides a graphical overview of progress as the TaskTree executes the various work items making up the task.
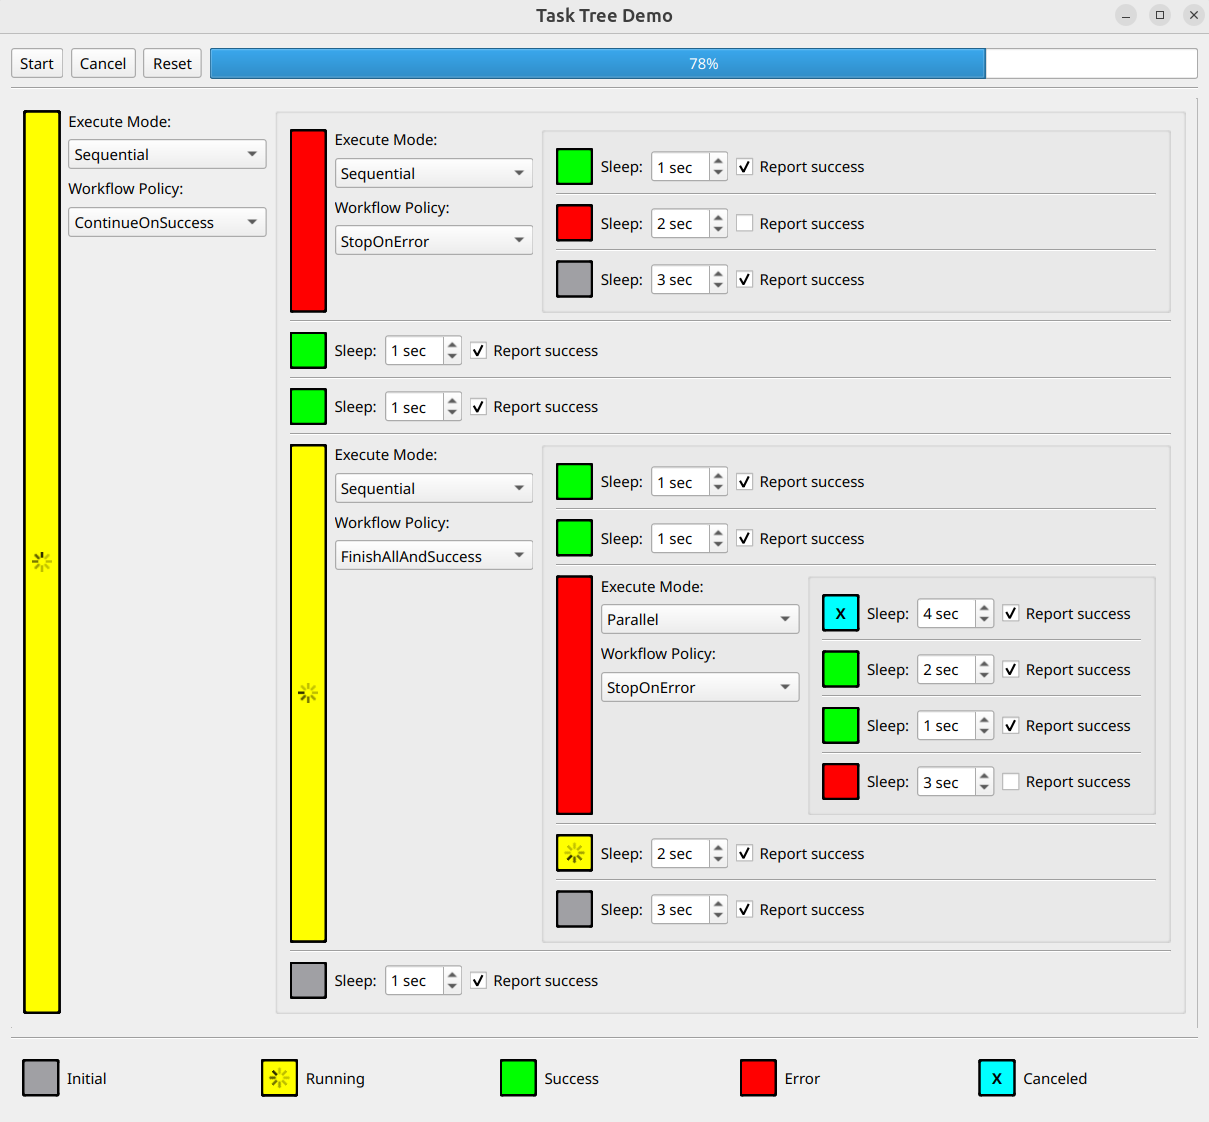
The demo application uses a single QWidget to display and manage a TaskTree hierarchy. Here's what you'll find in the interface:
- Tasks appear as leaf nodes on the right side of the tree.
For each task, you can set the execution duration and configure success or error completion states.
- Group nodes appear on the left and middle of the tree.
Each group can contain multiple child tasks or nested groups. You can configure execution modes and workflow policies for each group.
- Color indicators show the current execution state of each node.
The following sections describe more details of the example's code.
Helper Glue Classes
The GlueItem abstract class connects the user interface (UI) components with their corresponding TaskTree recipes. This design pattern enables clean separation between the UI and task logic.
class GlueItem
{
public:
    virtual ExecutableItem recipe() const = 0;
    virtual QWidget *widget() const = 0;
    virtual void reset() const = 0;

    virtual ~GlueItem() = default;
};
The GlueItem class defines three key virtual methods:
| Method | Purpose |
|---|---|
recipe() | Creates and returns a TaskTree recipe that defines the item's behavior |
widget() | Provides access to the associated UI component |
reset() | Restores the UI component to its initial state |
The GroupGlueItem class manages Group elements in your task hierarchy. Each group can hold other GlueItem elements as children, including nested GroupGlueItems or TaskGlueItems.
Here's how the recipe() method creates and configures a group:
ExecutableItem GroupGlueItem::recipe() const
{
    GroupItems childRecipes;
    for (GlueItem *child : m_children)
        childRecipes.append(child->recipe());

    return Group {
        m_groupWidget->executeModeItem(),
        m_groupWidget->workflowPolicyItem(),
        onGroupSetup([this] { m_groupWidget->setState(State::Running); }),
        childRecipes,
        onGroupDone([this](DoneWith result) { m_groupWidget->setState(resultToState(result)); })
    };
}
Key components of the implementation:
- Creates a new Group with child recipes
- Applies execution mode and workflow policy from UI settings
- Uses onGroupSetup() to update UI when execution begins
- Uses onGroupDone() to reflect execution results in the UI
The TaskGlueItem class implements leaf nodes in your task tree using timeoutTask.
Here's the recipe() implementation that creates the task:
ExecutableItem TaskGlueItem::recipe() const
{
    return Group {
        onGroupSetup([this] { m_taskWidget->setState(State::Running); }),
        timeoutTask(seconds(m_taskWidget->busyTime()), m_taskWidget->desiredResult()),
        onGroupDone([this](DoneWith result) { m_taskWidget->setState(resultToState(result)); })
    };
}
The implementation:
- Creates a Group that wraps a timeoutTask
- Uses UI settings to configure duration and expected outcome
- Updates UI state when task begins via onGroupSetup()
- Reflects task completion state via onGroupDone()
Building the task hierarchy
Two helper methods simplify the creation of task trees:
static GlueItem *group(const GroupSetup &groupSetup, const QList<GlueItem *> children)
{
    return new GroupGlueItem(groupSetup, children);
}

static GlueItem *task(int busyTime = 1, DoneResult result = DoneResult::Success)
{
    return new TaskGlueItem(busyTime, result);
}group(): Creates a newGroupGlueItemtask(): Creates a newTaskGlueItem
Defining the tree structure
The following code shows how you can build a complete task hierarchy:
    std::unique_ptr<GlueItem> tree {
        group({WorkflowPolicy::ContinueOnSuccess}, {
            group({}, {
                task(),
                task(2, DoneResult::Error),
                task(3)
            }),
            task(),
            task(),
            group({WorkflowPolicy::FinishAllAndSuccess}, {
                task(),
                task(),
                group({WorkflowPolicy::StopOnError, ExecuteMode::Parallel}, {
                    task(4),
                    task(2),
                    task(1),
                    task(3, DoneResult::Error)
                }),
                task(2),
                task(3)
            }),
            task()
        })
    };
You can modify the above construct to create different tree structures.
Connecting the UI with TaskTree
The final step connects the task tree with the application's UI controls:
    QSingleTaskTreeRunner taskTreeRunner;

    const auto resetTaskTree = [&] {
        taskTreeRunner.reset();
        tree->reset();
        progressBar->setValue(0);
        cancelButton->setEnabled(false);
    };

    const auto cancelTaskTree = [&] { taskTreeRunner.cancel(); };

    const auto startTaskTree = [&] {
        resetTaskTree();
        cancelButton->setEnabled(true);

        const auto onTaskTreeSetup = [progressBar](QTaskTree &taskTree) {
            progressBar->setMaximum(taskTree.progressMaximum());
            QObject::connect(&taskTree, &QTaskTree::progressValueChanged,
                             progressBar, &QProgressBar::setValue);
        };

        const auto onTaskTreeDone = [cancelButton] { cancelButton->setEnabled(false); };

        taskTreeRunner.start({tree->recipe()}, onTaskTreeSetup, onTaskTreeDone);
    };

    QObject::connect(startButton, &QAbstractButton::clicked, &app, startTaskTree);
    QObject::connect(cancelButton, &QAbstractButton::clicked, &app, cancelTaskTree);
    QObject::connect(resetButton, &QAbstractButton::clicked, &app, resetTaskTree);

    mainWidget.show();

    return app.exec();
This code:
- Creates a QSingleTaskTreeRunner to execute the task tree
- Sets up handlers for the Start, Cancel, and Reset buttons
- Connects the progress bar to track task execution
Running the Example
To run the example from Qt Creator, open the Welcome mode and select the example from Examples. For more information, see Qt Creator: Tutorial: Build and run.
© 2026 The Qt Company Ltd. Documentation contributions included herein are the copyrights of their respective owners. The documentation provided herein is licensed under the terms of the GNU Free Documentation License version 1.3 as published by the Free Software Foundation. Qt and respective logos are trademarks of The Qt Company Ltd. in Finland and/or other countries worldwide. All other trademarks are property of their respective owners.
