
Scene Graph - Simple Material
Shows how to define a scene graph material to fill a shape.
In this example, we will make use of the
QSGSimpleMaterialShaderclass to fill a shape in the scene graph. This is a convenience class intended to avoid a lot of the boilerplate code required when creating materials with theQSGMaterial,QSGMaterialShaderandQSGMaterialTypeclasses directly.A simple material consists of two parts: the material state and the material shader. The material shader has one instance per scene graph and contains the actual OpenGL shader program and information about which attributes and uniforms it uses. The material state is what we assign to each individual node; in this case to give them different colors.
struct State
{
    QColor color;

    int compare(const State *other) const {
        uint rgb = color.rgba();
        uint otherRgb = other->color.rgba();

        if (rgb == otherRgb) {
            return 0;
        } else if (rgb < otherRgb) {
            return -1;
        } else {
            return 1;
        }
    }
};
The first thing we do when creating custom materials with the simplified scheme is to create a state class. In this case the state class contains only one member, a
QColor. It also defines a compare function which the scene graph can use to reorder the node rendering.class Shader : public QSGSimpleMaterialShader<State> { QSG_DECLARE_SIMPLE_COMPARABLE_SHADER(Shader, State);Next we define the material shader, by subclassing a template instantiation of
QSGSimpleMaterialShaderwith ourState.Then we use the macro
QSG_DECLARE_SIMPLE_COMPARABLE_SHADER()which will generate some boilerplate code for us. Since ourStateclass has a compare function, we declare that the states can be compared. It would have been possible to remove theState::compare()function and instead declare the shader withQSG_DECLARE_SIMPLE_SHADER(), but this could then reduce performance in certain use cases.The state struct is used as a template parameter to automatically generate a
QSGMaterialTypefor us, so it is crucial that the pair of shader and state are made up of unique classes. Using the sameStateclass in multiple shaders will will lead to undefined behavior.public: const char *vertexShader() const override { return "attribute highp vec4 aVertex; \n" "attribute highp vec2 aTexCoord; \n" "uniform highp mat4 qt_Matrix; \n" "varying highp vec2 texCoord; \n" "void main() { \n" " gl_Position = qt_Matrix * aVertex; \n" " texCoord = aTexCoord; \n" "}"; } const char *fragmentShader() const override { return "uniform lowp float qt_Opacity; \n" "uniform lowp vec4 color; \n" "varying highp vec2 texCoord; \n" "void main () \n" "{ \n" " gl_FragColor = texCoord.y * texCoord.x * color * qt_Opacity; \n" "}"; }Next comes the declaration of the shader source code, where we define a vertex and fragment shader. The simple material assumes the presence of
qt_Matrixin the vertex shader andqt_Opacityin the fragment shader.QList<QByteArray> attributes() const override { return QList<QByteArray>() << "aVertex" << "aTexCoord"; }We reimplement the
attributesfunction to return the name of theaVertexandaTexCoordattributes. These attributes will be mapped to attribute indices 0 and 1 in the node’s geometry.void resolveUniforms() override { id_color = program()->uniformLocation("color"); } private: int id_color;Uniforms can be accessed either by name or by index, where index is faster than name. We reimplement the
resolveUniforms()function to find the index of thecoloruniform. We do not have to worry about resolvingqt_Opacityorqt_Matrixas these are handled by the baseclass.void updateState(const State *state, const State *) override { program()->setUniformValue(id_color, state->color); }The
updateState()function is called once for every unique state and we use it to update the shader program with the current color. The previous state is passed in as a second parameter so that the user can update only that which has changed. In our use case, where all the colors are different, the updateState() function will be called once for every node.class ColorNode : public QSGGeometryNode { public: ColorNode() : m_geometry(QSGGeometry::defaultAttributes_TexturedPoint2D(), 4) { setGeometry(&m_geometry); QSGSimpleMaterial<State> *material = Shader::createMaterial(); material->setFlag(QSGMaterial::Blending); setMaterial(material); setFlag(OwnsMaterial); } QSGGeometry m_geometry; };The
ColorNodeclass is supposed to draw something, so it needs to be a subclass ofQSGGeometryNode.Since our shader expects both a position and a texture coordinate, we use the default attribute set
defaultAttributes_TexturedPoint2D()and declare that the geometry consists of a total of four vertices. To avoid the allocation, we make theQSGGeometrya member of theQSGGeometryNode.When we used the macro
QSG_DECLARE_SIMPLE_COMPARABLE_SHADER()above, it defined thecreateMaterial()function which we use to instantiate materials for ourStatestruct.As we will be making use of opacity in our custom material, we need to set the
Blendingflag. The scene graph may use this flag to either disable or enableGL_BLENDwhen drawing the node or to reorder the drawing of the node.Finally, we tell the node to take ownership of the material, so we do not have to explicitly memory-manage it.
class SimpleMaterialItem : public QQuickItem
{
    Q_OBJECT

    Q_PROPERTY(QColor color READ color WRITE setColor NOTIFY colorChanged)
    QML_ELEMENT

public:

    SimpleMaterialItem() { setFlag(ItemHasContents, true); }

    void setColor(const QColor &color);
    QColor color() const { return m_color; }

signals:
    void colorChanged();

private:
  QColor m_color;

public:
    QSGNode *updatePaintNode(QSGNode *node, UpdatePaintNodeData *) override;
};
Since the Item is providing its own graphics to the scene graph, we set the flag
ItemHasContents. We also make sure the item is exposed to QML by adding theQML_ELEMENTmacro.QSGNode *SimpleMaterialItem::updatePaintNode(QSGNode *node, QQuickItem::UpdatePaintNodeData *) { ColorNode *n = static_cast<ColorNode *>(node); if (!node) n = new ColorNode(); QSGGeometry::updateTexturedRectGeometry(n->geometry(), boundingRect(), QRectF(0, 0, 1, 1)); static_cast<QSGSimpleMaterial<State>*>(n->material())->state()->color = m_color; n->markDirty(QSGNode::DirtyGeometry | QSGNode::DirtyMaterial); return n; }Whenever the Item has changed graphically, the
updatePaintNode()function is called.Note
The scene graph may be rendered in a different thread than the GUI thread and
updatePaintNode()is one of the few places where it is safe to access properties of the QML object. Any interaction with the scene graph from a customQQuickItemshould be contained within this function. The function is called on the rendering thread while the GUI thread is blocked.The first time this function is called for an
Iteminstance, the node will be 0, and so we create a new one. For every consecutive call, the node will be what we returned previously. There are scenarios where the scene graph will be removed and rebuilt from scratch however, so one should always check the node and recreate it if required.Once we have a
ColorNode, we update its geometry and material state. Finally, we notify the scene graph that the node has undergone changes to its geometry and material.int main(int argc, char **argv) { QGuiApplication app(argc, argv); QQuickView view; view.setResizeMode(QQuickView::SizeRootObjectToView); view.setSource(QUrl("qrc:///scenegraph/simplematerial/main.qml")); view.show(); return app.exec(); }The
main()function of the application opens up aQQuickViewwith our QML file.import QtQuick 2.0 import SimpleMaterial 1.0 Rectangle { width: 320 height: 480 color: "black"In the QML file, we import our custom type so we can instantiate it.
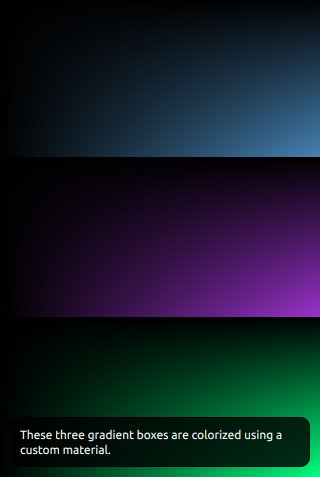
Column {
    anchors.fill: parent

    SimpleMaterialItem {
        width: parent.width;
        height: parent.height / 3;
        color: "steelblue"
    }

    SimpleMaterialItem {
        width: parent.width;
        height: parent.height / 3;
        color: "darkorchid"
    }

     SimpleMaterialItem {
        width: parent.width;
        height: parent.height / 3;
        color: "springgreen"
    }
}
Then we create a column containing three instances of our custom item, each with a different color.
    Rectangle {
        color: Qt.rgba(0, 0, 0, 0.8)
        radius: 10
        antialiasing: true
        border.width: 1
        border.color: "black"
        anchors.fill: label
        anchors.margins: -10
    }

    Text {
        id: label
        color: "white"
        wrapMode: Text.WordWrap
        text: "These three gradient boxes are colorized using a custom material."
        anchors.right: parent.right
        anchors.left: parent.left
        anchors.bottom: parent.bottom
        anchors.margins: 20
    }
}
And finally we overlay a short descriptive text.
© 2022 The Qt Company Ltd. Documentation contributions included herein are the copyrights of their respective owners. The documentation provided herein is licensed under the terms of the GNU Free Documentation License version 1.3 as published by the Free Software Foundation. Qt and respective logos are trademarks of The Qt Company Ltd. in Finland and/or other countries worldwide. All other trademarks are property of their respective owners.