
Qt Quick Examples - Views
This is a collection of QML model-view examples.
Views is a collection of small QML examples relating to model and view functionality. They demonstrate how to show data from a model using the Qt Quick view types. For more information, visit the Models and Views in Qt Quick page.
Running the Example
To run the example from Qt Creator , open the Welcome mode and select the example from Examples . For more information, visit Building and Running an Example.
Using GridView and PathView
GridView and PathView demonstrate usage of these types to display views.
GridView {
    anchors.fill: parent
    cellWidth: 100; cellHeight: 100
    focus: true
    model: appModel

    highlight: Rectangle { width: 80; height: 80; color: "lightsteelblue" }

    delegate: Item {
        required property string icon
        required property string name
        required property int index

        width: 100; height: 100

        Image {
            id: myIcon
            y: 20; anchors.horizontalCenter: parent.horizontalCenter
            source: parent.icon
        }
        Text {
            anchors { top: myIcon.bottom; horizontalCenter: parent.horizontalCenter }
            text: parent.name
        }
        MouseArea {
            anchors.fill: parent
            onClicked: parent.GridView.view.currentIndex = parent.index
        }
    }
}
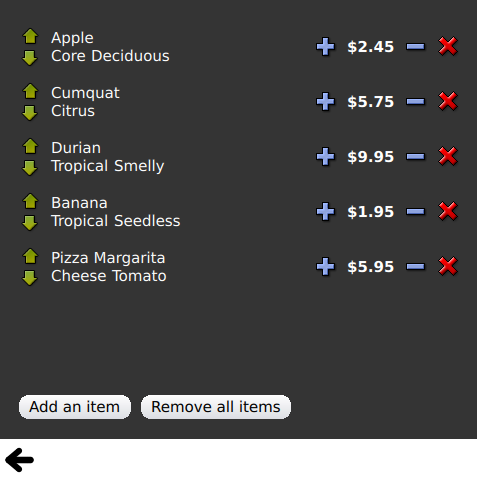
Using Dynamic List
Dynamic List demonstrates animation of runtime additions and removals to a ListView .
The ListView .onAdd signal handler runs an animation when new items are added to the view, and the ListView .onRemove another when they are removed.
Item {
    ListView.onAdd: SequentialAnimation {
        PropertyAction { target: delegateItem; property: "height"; value: 0 }
        NumberAnimation { target: delegateItem; property: "height"; to: 80; duration: 250; easing.type: Easing.InOutQuad }
    }

    ListView.onRemove: SequentialAnimation {
        PropertyAction { target: delegateItem; property: "ListView.delayRemove"; value: true }
        NumberAnimation { target: delegateItem; property: "height"; to: 0; duration: 250; easing.type: Easing.InOutQuad }

        // Make sure delayRemove is set back to false so that the item can be destroyed
        PropertyAction { target: delegateItem; property: "ListView.delayRemove"; value: false }
    }
}
Expanding Delegates
Expanding Delegates demonstrates delegates that expand when activated.
It has a complex delegate the size and appearance of which can change, displacing other items in the view.
Item {
    id: recipe

    required property string title
    required property string picture
    required property string ingredients
    required property string method

    // Create a property to contain the visibility of the details.
    // We can bind multiple element's opacity to this one property,
    // rather than having a "PropertyChanges" line for each element we
    // want to fade.
    property real detailsOpacity : 0
    MouseArea {
        anchors.fill: parent
        onClicked: recipe.state = 'Details';
    }

    // Lay out the page: picture, title and ingredients at the top, and method at the
    // bottom.  Note that elements that should not be visible in the list
    // mode have their opacity set to recipe.detailsOpacity.

    Row {
        id: topLayout
        x: 10; y: 10; height: recipeImage.height; width: parent.width
        spacing: 10

        Image {
            id: recipeImage
            width: 50; height: 50
            source: recipe.picture
        }
    Item {
        id: details
        x: 10; width: parent.width - 20

        anchors { top: topLayout.bottom; topMargin: 10; bottom: parent.bottom; bottomMargin: 10 }
        opacity: recipe.detailsOpacity
    }

    // A button to close the detailed view, i.e. set the state back to default ('').
    TextButton {
        y: 10
        anchors { right: background.right; rightMargin: 10 }
        opacity: recipe.detailsOpacity
        text: "Close"

        onClicked: recipe.state = '';
    }

    states: State {
        name: "Details"

        PropertyChanges { target: background; color: "white" }
        PropertyChanges { target: recipeImage; width: 130; height: 130 } // Make picture bigger
        PropertyChanges { target: recipe; detailsOpacity: 1; x: 0 } // Make details visible
        PropertyChanges { target: recipe; height: listView.height } // Fill the entire list area with the detailed view

        // Move the list so that this item is at the top.
        PropertyChanges { target: recipe.ListView.view; explicit: true; contentY: recipe.y }

        // Disallow flicking while we're in detailed view
        PropertyChanges { target: recipe.ListView.view; interactive: false }
    }

    transitions: Transition {
        // Make the state changes smooth
        ParallelAnimation {
            ColorAnimation { property: "color"; duration: 500 }
            NumberAnimation { duration: 300; properties: "detailsOpacity,x,contentY,height,width" }
        }
    }
}
Using Highlight
Highlight demonstrates adding a custom highlight to a ListView .
// Define a highlight with customized movement between items.
component HighlightBar : Rectangle {
    width: 200; height: 50
    color: "#FFFF88"
    y: listView.currentItem.y
    Behavior on y { SpringAnimation { spring: 2; damping: 0.1 } }
}

ListView {
    id: listView
    width: 200; height: parent.height
    x: 30

    model: PetsModel {}
    delegate: PetDelegate {}
    focus: true

    // Set the highlight delegate. Note we must also set highlightFollowsCurrentItem
    // to false so the highlight delegate can control how the highlight is moved.
    highlight: HighlightBar {}
    highlightFollowsCurrentItem: false
}
Using Highlight Ranges
Highlight Ranges shows the three different highlight range modes of ListView .
Rectangle {
    id: root
    property int current: 0
    property bool increasing: true
    // Example index automation for convenience, disabled on click or tap
    SequentialAnimation {
        id: anim
        loops: -1
        running: true
        ScriptAction {
            script: if (root.increasing) {
                        root.current++;
                        if (root.current >= aModel.count -1) {
                            root.current = aModel.count - 1;
                            root.increasing = !root.increasing;
                        }
                    } else {
                        root.current--;
                        if (root.current <= 0) {
                            root.current = 0;
                            root.increasing = !root.increasing;
                        }
                    }
        }

        PauseAnimation { duration: 500 }
    }
    ListView {
        id: list1
        height: 50; width: parent.width
        model: PetsModel {id: aModel}
        delegate: petDelegate
        orientation: ListView.Horizontal

        highlight: Rectangle { color: "lightsteelblue" }
        currentIndex: root.current
        onCurrentIndexChanged: root.current = currentIndex
        focus: true
    }

    ListView {
        id: list2
        y: 160
        height: 50; width: parent.width
        model: PetsModel {}
        delegate: petDelegate
        orientation: ListView.Horizontal

        highlight: Rectangle { color: "yellow" }
        currentIndex: root.current
        preferredHighlightBegin: 80; preferredHighlightEnd: 220
        highlightRangeMode: ListView.ApplyRange
    }

    ListView {
        id: list3
        y: 320
        height: 50; width: parent.width
        model: PetsModel {}
        delegate: petDelegate
        orientation: ListView.Horizontal

        highlight: Rectangle { color: "yellow" }
        currentIndex: root.current
        onCurrentIndexChanged: root.current = currentIndex
        preferredHighlightBegin: 125; preferredHighlightEnd: 125
        highlightRangeMode: ListView.StrictlyEnforceRange
    }
}
Using Sections
Sections demonstrates the various section headers and footers available to ListView .
// The delegate for each section header
Component {
    id: sectionHeading
    Rectangle {
        width: container.width
        height: childrenRect.height
        color: "lightsteelblue"

        required property string section

        Text {
            text: parent.section
            font.bold: true
            font.pixelSize: 20
        }
    }
}

ListView {
    id: view
    anchors.top: parent.top
    anchors.bottom: buttonBar.top
    width: parent.width
    model: animalsModel
    delegate: Text {
        required property string name
        text: name
        font.pixelSize: 18
    }

    section.property: "size"
    section.criteria: ViewSection.FullString
    section.delegate: sectionHeading
}
Using Packages
Packages use the Package type to transition delegates between two views.
It has a Package object which defines delegate items for each view and an item that can be transferred between delegates.
Package {
    id: delegate

    required property int upTo
    required property int index
    required property string display

    Text { id: listDelegate; width: parent.width; height: 25; text: 'Empty'; Package.name: 'list' }
    Text { id: gridDelegate; width: parent.width / 2; height: 50; text: 'Empty'; Package.name: 'grid' }

    Rectangle {
        id: wrapper
        width: parent.width; height: 25
        color: 'lightsteelblue'

        Text { text: delegate.display; anchors.centerIn: parent }
        state: delegate.upTo > delegate.index ? 'inGrid' : 'inList'
        states: [
            State {
                name: 'inList'
                ParentChange { target: wrapper; parent: listDelegate }
            },
            State {
                name: 'inGrid'
                ParentChange {
                    target: wrapper; parent: gridDelegate
                    x: 0; y: 0; width: gridDelegate.width; height: gridDelegate.height
                }
            }
        ]

        transitions: [
            Transition {
                ParentAnimation {
                    NumberAnimation { properties: 'x,y,width,height'; duration: 300 }
                }
            }
        ]
    }
}
A DelegateModel allows the individual views to access their specific items from the shared package delegate.
DelegateModel {
    id: visualModel
    delegate: Delegate {
        upTo: root.upTo
    }
    model: myModel
}

ListView {
    id: lv
    height: parent.height/2
    width: parent.width

    model: visualModel.parts.list
}
GridView {
    y: parent.height/2
    height: parent.height/2
    width: parent.width
    cellWidth: width / 2
    cellHeight: 50
    model: visualModel.parts.grid
}
Using ObjectModel
ObjectModel uses an ObjectModel for the model instead of a ListModel.
ObjectModel {
    id: itemModel

    Rectangle {
        width: view.width; height: view.height
        color: "#FFFEF0"
        Text { text: "Page 1"; font.bold: true; anchors.centerIn: parent }

        Component.onDestruction: if (root.printDestruction) print("destroyed 1")
    }
    Rectangle {
        width: view.width; height: view.height
        color: "#F0FFF7"
        Text { text: "Page 2"; font.bold: true; anchors.centerIn: parent }

        Component.onDestruction: if (root.printDestruction) print("destroyed 2")
    }
    Rectangle {
        width: view.width; height: view.height
        color: "#F4F0FF"
        Text { text: "Page 3"; font.bold: true; anchors.centerIn: parent }

        Component.onDestruction: if (root.activeFocusprintDestruction) print("destroyed 3")
    }
}

ListView {
    id: view
    anchors { fill: parent; bottomMargin: 30 }
    model: itemModel
    preferredHighlightBegin: 0; preferredHighlightEnd: 0
    highlightRangeMode: ListView.StrictlyEnforceRange
    orientation: ListView.Horizontal
    snapMode: ListView.SnapOneItem; flickDeceleration: 2000
    cacheBuffer: 200
}
Using Display Margins
Display Margins uses delegates to display items and implements a simple header and footer components.
© 2022 The Qt Company Ltd. Documentation contributions included herein are the copyrights of their respective owners. The documentation provided herein is licensed under the terms of the GNU Free Documentation License version 1.3 as published by the Free Software Foundation. Qt and respective logos are trademarks of The Qt Company Ltd. in Finland and/or other countries worldwide. All other trademarks are property of their respective owners.