
Part 3 - Navigating between Entries
Explains the code that enables navigating the contacts.
The address book is now about half complete. We should add the capability to navigate the contacts, but first we must decide what sort of a data structure we need for containing these contacts.
In the previous section, we used a
QMapof key-value pairs with the contact’s name as the key , and the contact’s address as the value . This works well for our case. However, in order to navigate and display each entry, a little bit of enhancement is needed.We enhance the
QMapby making it replicate a data structure similar to a circularly-linked list, where all elements are connected, including the first element and the last element. The figure below illustrates this data structure.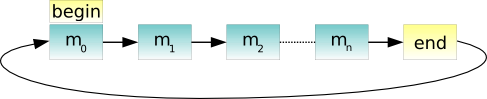
Defining the AddressBook Class
To add navigation functions to the address book, we must add two more slots to the
AddressBookclass:next()andprevious()to theaddressbook.hfile:void next(); void previous();We also require another two
QPushButtonobjects, so we declarenextButtonandpreviousButtonas private variables:QPushButton *nextButton; QPushButton *previousButton;
Implementing the AddressBook Class
In the
AddressBookconstructor inaddressbook.cpp, we instantiatenextButtonandpreviousButtonand disable them by default. This is because navigation is only enabled when there is more than one contact in the address book.nextButton = new QPushButton(tr("&Next")); nextButton->setEnabled(false); previousButton = new QPushButton(tr("&Previous")); previousButton->setEnabled(false);We then connect these push buttons to their respective slots:
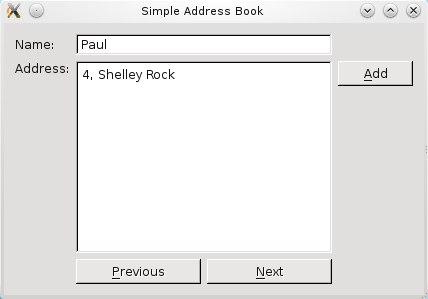
connect(nextButton, &QPushButton::clicked,
        this, &AddressBook::next);
connect(previousButton, &QPushButton::clicked,
        this, &AddressBook::previous);
The image below is the expected graphical user interface.
We follow basic conventions for
next()andprevious()functions by placing thenextButtonon the right and thepreviousButtonon the left. In order to achieve this intuitive layout, we useQHBoxLayoutto place the widgets side-by-side:QHBoxLayout *buttonLayout2 = new QHBoxLayout; buttonLayout2->addWidget(previousButton); buttonLayout2->addWidget(nextButton); QGridLayout *mainLayout = new QGridLayout; mainLayout->addWidget(nameLabel, 0, 0); mainLayout->addWidget(nameLine, 0, 1); mainLayout->addWidget(addressLabel, 1, 0, Qt::AlignTop); mainLayout->addWidget(addressText, 1, 1); mainLayout->addLayout(buttonLayout1, 1, 2); mainLayout->addLayout(buttonLayout2, 2, 1); setLayout(mainLayout); setWindowTitle(tr("Simple Address Book")); } void AddressBook::addContact() { oldName = nameLine->text(); oldAddress = addressText->toPlainText(); nameLine->clear(); addressText->clear(); nameLine->setReadOnly(false); nameLine->setFocus(Qt::OtherFocusReason); addressText->setReadOnly(false); addButton->setEnabled(false); nextButton->setEnabled(false); previousButton->setEnabled(false); submitButton->show(); cancelButton->show(); } void AddressBook::submitContact() { QString name = nameLine->text(); QString address = addressText->toPlainText(); if (name.isEmpty() || address.isEmpty()) { QMessageBox::information(this, tr("Empty Field"), tr("Please enter a name and address.")); return; } if (!contacts.contains(name)) { contacts.insert(name, address); QMessageBox::information(this, tr("Add Successful"), tr("\"%1\" has been added to your address book.").arg(name)); } else { QMessageBox::information(this, tr("Add Unsuccessful"), tr("Sorry, \"%1\" is already in your address book.").arg(name)); } if (contacts.isEmpty()) { nameLine->clear(); addressText->clear(); } nameLine->setReadOnly(true); addressText->setReadOnly(true); addButton->setEnabled(true); int number = contacts.size(); nextButton->setEnabled(number > 1); previousButton->setEnabled(number > 1); submitButton->hide(); cancelButton->hide(); } void AddressBook::cancel() { nameLine->setText(oldName); addressText->setText(oldAddress); if (contacts.isEmpty()) { nameLine->clear(); addressText->clear(); } nameLine->setReadOnly(true); addressText->setReadOnly(true); addButton->setEnabled(true); int number = contacts.size(); nextButton->setEnabled(number > 1); previousButton->setEnabled(number > 1); submitButton->hide(); cancelButton->hide(); } //! [next() function] void AddressBook::next() { QString name = nameLine->text(); QMap<QString, QString>::iterator i = contacts.find(name); if (i != contacts.end()) i++; if (i == contacts.end()) i = contacts.begin(); nameLine->setText(i.key()); addressText->setText(i.value()); } //! [next() function] //! [previous() function] void AddressBook::previous() { QString name = nameLine->text(); QMap<QString, QString>::iterator i = contacts.find(name); if (i == contacts.end()){ nameLine->clear(); addressText->clear(); return; } if (i == contacts.begin()) i = contacts.end(); i--; nameLine->setText(i.key()); addressText->setText(i.value()); } //! [previous() function]The
QHBoxLayoutobject,buttonLayout2, is then added tomainLayout.mainLayout->addLayout(buttonLayout2, 2, 1);The figure below shows the coordinates of the widgets in
mainLayout.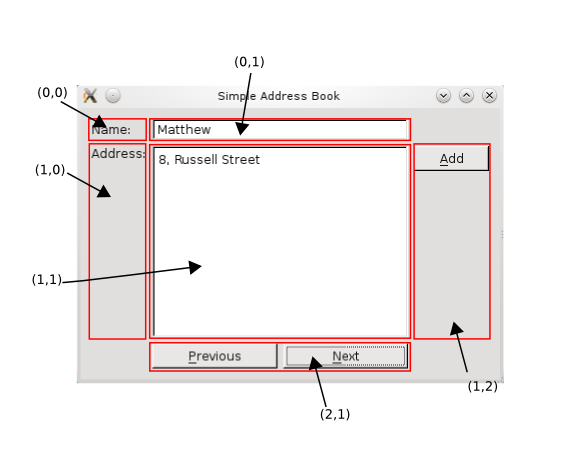
Within our
addContact()function, we have to disable these buttons so that the user does not attempt to navigate while adding a contact.nextButton->setEnabled(false); previousButton->setEnabled(false);Also, in our
submitContact()function, we enable the navigation buttons,nextButtonandpreviousButton, depending on the size ofcontacts. As mentioned earlier, navigation is only enabled when there is more than one contact in the address book. The following lines of code demonstrates how to do this:int number = contacts.size(); nextButton->setEnabled(number > 1); previousButton->setEnabled(number > 1);We also include these lines of code in the
cancel()function.Recall that we intend to emulate a circularly-linked list with our
QMapobject,contacts. So, in thenext()function, we obtain an iterator forcontactsand then:
If the iterator is not at the end of
contacts, we increment it by one.If the iterator is at the end of
contacts, we move it to the beginning ofcontacts. This gives us the illusion that ourQMapis working like a circularly-linked list.<Code snippet "tutorials/addressbook/part3/addressbook.cpp:next() function" not found>Once we have iterated to the correct object in
contacts, we display its contents onnameLineandaddressText.Similarly, for the
previous()function, we obtain an iterator forcontactsand then:
If the iterator is at the end of
contacts, we clear the display and return.If the iterator is at the beginning of
contacts, we move it to the end.We then decrement the iterator by one.
<Code snippet "tutorials/addressbook/part3/addressbook.cpp:previous() function" not found>Again, we display the contents of the current object in
contacts.
© 2022 The Qt Company Ltd. Documentation contributions included herein are the copyrights of their respective owners. The documentation provided herein is licensed under the terms of the GNU Free Documentation License version 1.3 as published by the Free Software Foundation. Qt and respective logos are trademarks of The Qt Company Ltd. in Finland and/or other countries worldwide. All other trademarks are property of their respective owners.