
Previous topic
Next topic
QML Application Tutorial
This tutorial provides a quick walk-through of a python application that loads a QML file. QML is a declarative language that lets you design UIs faster than a traditional language, such as C++. The QtQml and QtQuick modules provides the necessary infrastructure for QML-based UIs.
In this tutorial, you’ll also learn how to provide data from Python as a QML context property, which is then consumed by the ListView defined in the QML file.
Before you begin, install the following prerequisites:
The PySide2 Python packages.
Qt Creator v4.9 beta1 or later from http://download.qt.io.
The following step-by-step instructions guide you through application development process using Qt Creator:
Open Qt Creator and select File > New File or Project.. menu item to open following dialog:
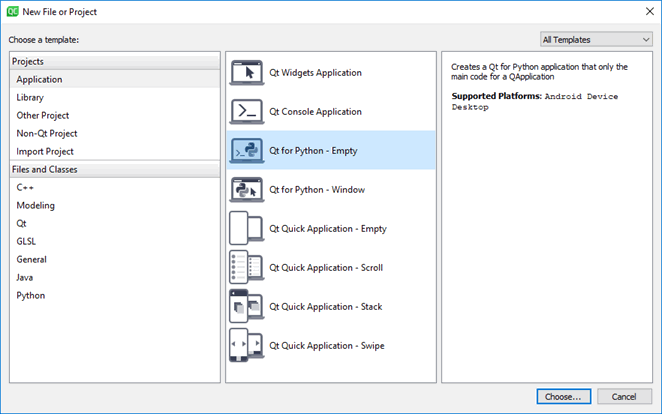
Select Qt for Python - Empty from the list of application templates and select Choose.
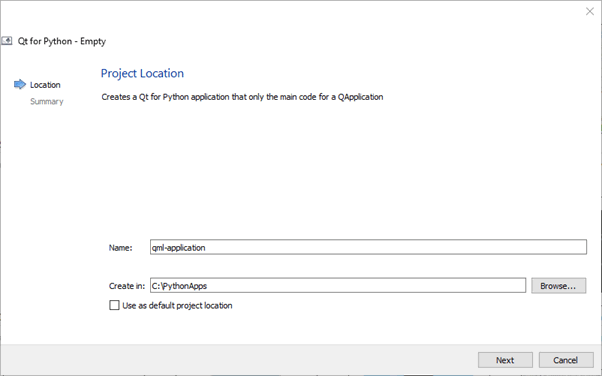
Give a Name to your project, choose its location in the filesystem, and select Finish to create an empty
main.pyandmain.pyproject.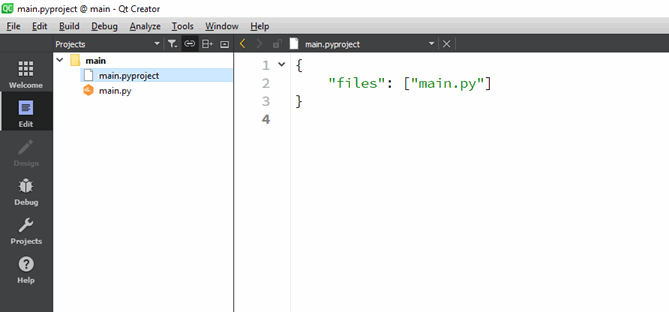
This should create a
main.pyand`main.pyprojectfiles for the project.Download
view.qmlandlogo.pngand move them to your project folder.Double-click on
main.pyprojectto open it in edit mode, and appendview.qmlandlogo.pngto the files list. This is how your project file should look after this change:{ "files": ["main.py", "view.qml", "logo.png"] }
Now that you have the necessary bits for the application, import the Python modules in your
main.py, and download country data and format it:1 2#!/usr/bin/env python 3# -*- conding: utf-8 -*- 4 5import os, sys, urllib.request, json 6import PySide2.QtQml 7from PySide2.QtQuick import QQuickView 8from PySide2.QtCore import QStringListModel, Qt, QUrl 9from PySide2.QtGui import QGuiApplication 10 11if __name__ == '__main__': 12 13 #get our data 14 url = "http://country.io/names.json" 15 response = urllib.request.urlopen(url) 16 data = json.loads(response.read().decode('utf-8')) 17 18 #Format and sort the data 19 data_list = list(data.values()) 20 data_list.sort() 21
Now, set up the application window using PySide2.QtGui.QGuiApplication, which manages the application-wide settings.
1 2#!/usr/bin/env python 3# -*- conding: utf-8 -*- 4 5import os, sys, urllib.request, json 6import PySide2.QtQml 7from PySide2.QtQuick import QQuickView 8from PySide2.QtCore import QStringListModel, Qt, QUrl 9from PySide2.QtGui import QGuiApplication 10 11if __name__ == '__main__': 12 13 #get our data 14 url = "http://country.io/names.json" 15 response = urllib.request.urlopen(url) 16 data = json.loads(response.read().decode('utf-8')) 17 18 #Format and sort the data 19 data_list = list(data.values()) 20 data_list.sort() 21 22 #Set up the application window 23 app = QGuiApplication(sys.argv) 24 view = QQuickView() 25 view.setResizeMode(QQuickView.SizeRootObjectToView) 26
Note
Setting the resize policy is important if you want the root item to resize itself to fit the window or vice-a-versa. Otherwise, the root item will retain its original size on resizing the window.
You can now expose the
data_listvariable as a QML context property, which will be consumed by the QML ListView item inview.qml.1 2#!/usr/bin/env python 3# -*- conding: utf-8 -*- 4 5import os, sys, urllib.request, json 6import PySide2.QtQml 7from PySide2.QtQuick import QQuickView 8from PySide2.QtCore import QStringListModel, Qt, QUrl 9from PySide2.QtGui import QGuiApplication 10 11if __name__ == '__main__': 12 13 #get our data 14 url = "http://country.io/names.json" 15 response = urllib.request.urlopen(url) 16 data = json.loads(response.read().decode('utf-8')) 17 18 #Format and sort the data 19 data_list = list(data.values()) 20 data_list.sort() 21 22 #Set up the application window 23 app = QGuiApplication(sys.argv) 24 view = QQuickView() 25 view.setResizeMode(QQuickView.SizeRootObjectToView) 26 27 #Expose the list to the Qml code 28 my_model = QStringListModel() 29 my_model.setStringList(data_list) 30 view.rootContext().setContextProperty("myModel",my_model) 31
Load the
view.qmlto theQQuickViewand callshow()to display the application window.1 2#!/usr/bin/env python 3# -*- conding: utf-8 -*- 4 5import os, sys, urllib.request, json 6import PySide2.QtQml 7from PySide2.QtQuick import QQuickView 8from PySide2.QtCore import QStringListModel, Qt, QUrl 9from PySide2.QtGui import QGuiApplication 10 11if __name__ == '__main__': 12 13 #get our data 14 url = "http://country.io/names.json" 15 response = urllib.request.urlopen(url) 16 data = json.loads(response.read().decode('utf-8')) 17 18 #Format and sort the data 19 data_list = list(data.values()) 20 data_list.sort() 21 22 #Set up the application window 23 app = QGuiApplication(sys.argv) 24 view = QQuickView() 25 view.setResizeMode(QQuickView.SizeRootObjectToView) 26 27 #Expose the list to the Qml code 28 my_model = QStringListModel() 29 my_model.setStringList(data_list) 30 view.rootContext().setContextProperty("myModel",my_model) 31 32 #Load the QML file 33 qml_file = os.path.join(os.path.dirname(__file__),"view.qml") 34 view.setSource(QUrl.fromLocalFile(os.path.abspath(qml_file))) 35 36 #Show the window 37 if view.status() == QQuickView.Error: 38 sys.exit(-1) 39 view.show() 40
Finally, execute the application to start the event loop and clean up.
1 2#!/usr/bin/env python 3# -*- conding: utf-8 -*- 4 5import os, sys, urllib.request, json 6import PySide2.QtQml 7from PySide2.QtQuick import QQuickView 8from PySide2.QtCore import QStringListModel, Qt, QUrl 9from PySide2.QtGui import QGuiApplication 10 11if __name__ == '__main__': 12 13 #get our data 14 url = "http://country.io/names.json" 15 response = urllib.request.urlopen(url) 16 data = json.loads(response.read().decode('utf-8')) 17 18 #Format and sort the data 19 data_list = list(data.values()) 20 data_list.sort() 21 22 #Set up the application window 23 app = QGuiApplication(sys.argv) 24 view = QQuickView() 25 view.setResizeMode(QQuickView.SizeRootObjectToView) 26 27 #Expose the list to the Qml code 28 my_model = QStringListModel() 29 my_model.setStringList(data_list) 30 view.rootContext().setContextProperty("myModel",my_model) 31 32 #Load the QML file 33 qml_file = os.path.join(os.path.dirname(__file__),"view.qml") 34 view.setSource(QUrl.fromLocalFile(os.path.abspath(qml_file))) 35 36 #Show the window 37 if view.status() == QQuickView.Error: 38 sys.exit(-1) 39 view.show() 40 41 #execute and cleanup 42 app.exec_() 43 del view
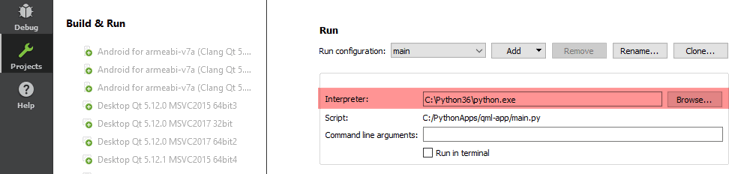
Your application is ready to be run now. Select Projects mode to choose the Python version to run it.
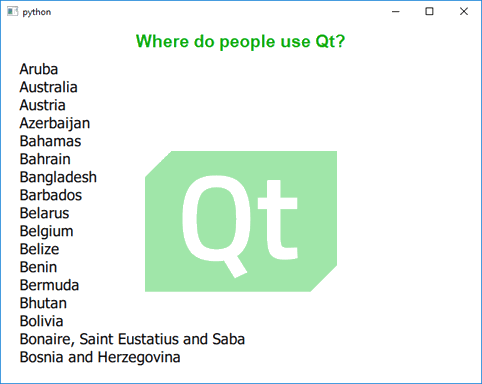
Run the application by using the CTRL+R keyboard shortcut to see if it
looks like this:
You could also watch the following video tutorial for guidance to develop this application:
© 2022 The Qt Company Ltd. Documentation contributions included herein are the copyrights of their respective owners. The documentation provided herein is licensed under the terms of the GNU Free Documentation License version 1.3 as published by the Free Software Foundation. Qt and respective logos are trademarks of The Qt Company Ltd. in Finland and/or other countries worldwide. All other trademarks are property of their respective owners.