QML Application Tutorial
This tutorial provides a quick walk-through of a python application that loads a QML file. QML is a declarative language that lets you design UIs faster than a traditional language, such as C++. The QtQml and QtQuick modules provides the necessary infrastructure for QML-based UIs.
In this tutorial, you’ll also learn how to provide data from Python as a QML initial property, which is then consumed by the ListView defined in the QML file.
Before you begin, install Qt Creator from https://download.qt.io.
Develop Qt for Python applications describes how Python installations are handled by Qt Creator. By default, Qt Creator will prompt you to install PySide6 at the appropriate places.
The following step-by-step instructions guide you through application development process using Qt Creator:
Open Qt Creator and select File > New File or Project.. menu item to open following dialog:
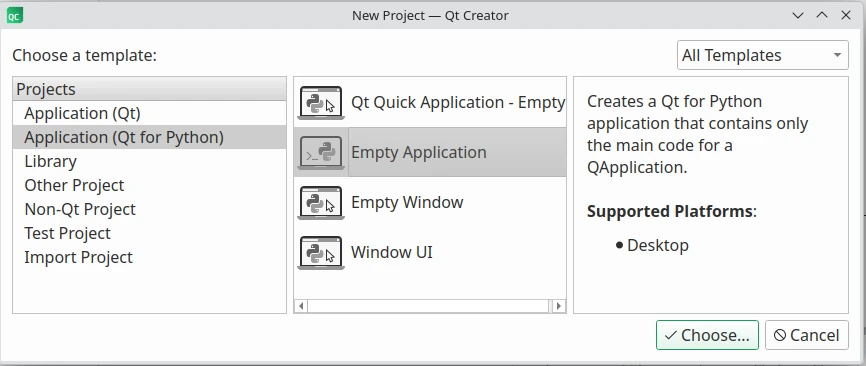
Select Qt for Python - Empty from the list of application templates and select Choose.
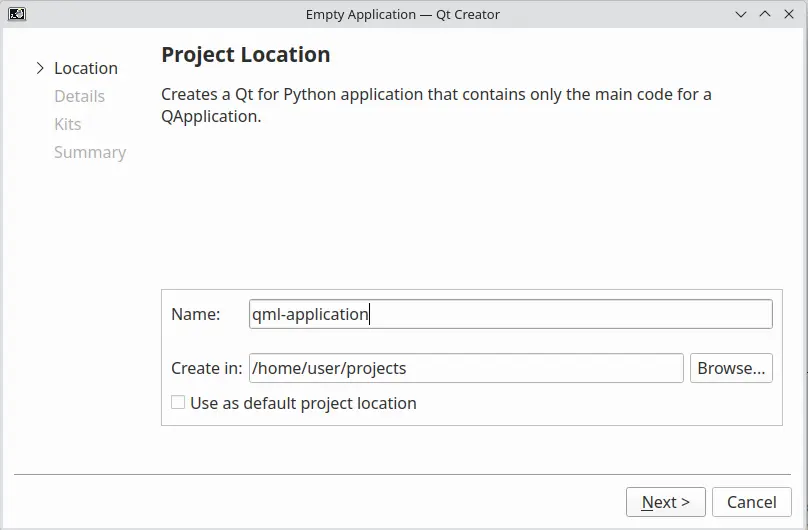
Give a Name to your project, choose its location in the filesystem, and select Finish to create an empty
main.pyandpyproject.toml.
This should create a
main.pyand`pyproject.tomlfiles for the project.Download
Main.qml,qmldirandlogo.pngand place them in a subdirectory named App in your project folder. This creates a basic QML module.Double-click on
pyproject.toml`to open it in edit mode, and appendview.qmlandlogo.pngto the files list. This is how your project file should look after this change:[project] name = "qml-application" [tool.pyside6-project] files = ["main.py", "App/Main.qml", "App/logo.png", "App/qmldir"]
Now that you have the necessary bits for the application, import the Python modules in your
main.py, and download country data and format it:1import sys 2import urllib.request 3import json 4 5from PySide6.QtQuick import QQuickView 6from PySide6.QtCore import QStringListModel 7from PySide6.QtGui import QGuiApplication 8 9 10if __name__ == '__main__': 11 12 # get our data 13 url = "http://country.io/names.json" 14 response = urllib.request.urlopen(url) 15 data = json.loads(response.read().decode('utf-8')) 16 17 # Format and sort the data 18 data_list = list(data.values()) 19 data_list.sort()
Now, set up the application window using PySide6.QtGui.QGuiApplication, which manages the application-wide settings.
1import sys 2import urllib.request 3import json 4 5from PySide6.QtQuick import QQuickView 6from PySide6.QtCore import QStringListModel 7from PySide6.QtGui import QGuiApplication 8 9 10if __name__ == '__main__': 11 12 # get our data 13 url = "http://country.io/names.json" 14 response = urllib.request.urlopen(url) 15 data = json.loads(response.read().decode('utf-8')) 16 17 # Format and sort the data 18 data_list = list(data.values()) 19 data_list.sort() 20 21 # Set up the application window 22 app = QGuiApplication(sys.argv) 23 view = QQuickView() 24 view.setResizeMode(QQuickView.ResizeMode.SizeRootObjectToView)
Note
Setting the resize policy is important if you want the root item to resize itself to fit the window or vice-a-versa. Otherwise, the root item will retain its original size on resizing the window.
You can now expose the
data_listvariable as a QML initial property, which will be consumed by the QML ListView item inview.qml.1import sys 2import urllib.request 3import json 4 5from PySide6.QtQuick import QQuickView 6from PySide6.QtCore import QStringListModel 7from PySide6.QtGui import QGuiApplication 8 9 10if __name__ == '__main__': 11 12 # get our data 13 url = "http://country.io/names.json" 14 response = urllib.request.urlopen(url) 15 data = json.loads(response.read().decode('utf-8')) 16 17 # Format and sort the data 18 data_list = list(data.values()) 19 data_list.sort() 20 21 # Set up the application window 22 app = QGuiApplication(sys.argv) 23 view = QQuickView() 24 view.setResizeMode(QQuickView.ResizeMode.SizeRootObjectToView) 25 26 # Expose the list to the Qml code 27 my_model = QStringListModel() 28 my_model.setStringList(data_list) 29 view.setInitialProperties({"myModel": my_model})
Load the
Main.qmlto theQQuickViewand callshow()to display the application window.1import sys 2import urllib.request 3import json 4 5from PySide6.QtQuick import QQuickView 6from PySide6.QtCore import QStringListModel 7from PySide6.QtGui import QGuiApplication 8 9 10if __name__ == '__main__': 11 12 # get our data 13 url = "http://country.io/names.json" 14 response = urllib.request.urlopen(url) 15 data = json.loads(response.read().decode('utf-8')) 16 17 # Format and sort the data 18 data_list = list(data.values()) 19 data_list.sort() 20 21 # Set up the application window 22 app = QGuiApplication(sys.argv) 23 view = QQuickView() 24 view.setResizeMode(QQuickView.ResizeMode.SizeRootObjectToView) 25 26 # Expose the list to the Qml code 27 my_model = QStringListModel() 28 my_model.setStringList(data_list) 29 view.setInitialProperties({"myModel": my_model}) 30 31 # Load the QML file 32 # Add the current directory to the import paths and load the main module. 33 view.engine().addImportPath(sys.path[0]) 34 view.loadFromModule("App", "Main") 35 36 # Show the window 37 if view.status() == QQuickView.Status.Error: 38 sys.exit(-1) 39 view.show()
Finally, execute the application to start the event loop and clean up.
1import sys 2import urllib.request 3import json 4 5from PySide6.QtQuick import QQuickView 6from PySide6.QtCore import QStringListModel 7from PySide6.QtGui import QGuiApplication 8 9 10if __name__ == '__main__': 11 12 # get our data 13 url = "http://country.io/names.json" 14 response = urllib.request.urlopen(url) 15 data = json.loads(response.read().decode('utf-8')) 16 17 # Format and sort the data 18 data_list = list(data.values()) 19 data_list.sort() 20 21 # Set up the application window 22 app = QGuiApplication(sys.argv) 23 view = QQuickView() 24 view.setResizeMode(QQuickView.ResizeMode.SizeRootObjectToView) 25 26 # Expose the list to the Qml code 27 my_model = QStringListModel() 28 my_model.setStringList(data_list) 29 view.setInitialProperties({"myModel": my_model}) 30 31 # Load the QML file 32 # Add the current directory to the import paths and load the main module. 33 view.engine().addImportPath(sys.path[0]) 34 view.loadFromModule("App", "Main") 35 36 # Show the window 37 if view.status() == QQuickView.Status.Error: 38 sys.exit(-1) 39 view.show() 40 41 # execute and cleanup 42 app.exec() 43 del view
Your application is ready to be run now. Select Projects mode to choose the Python version to run it.

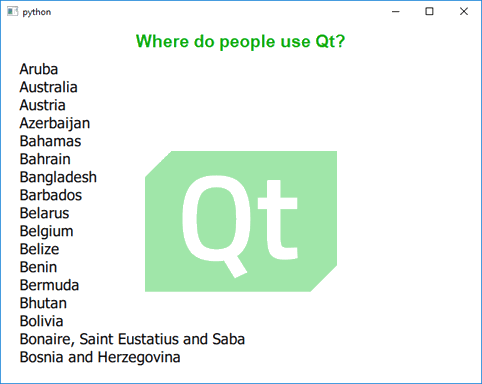
Run the application by using the CTRL+R keyboard shortcut to see if it
looks like this: