C
Toradex Guide
To successfully set up the Boot to Qt Software Stack, you must closely follow the instructions in this section and perform all the described tasks.
In case of problems, see Troubleshooting.
Note: After you have installed the Boot to Qt software stack and want to connect to the target device with SSH or a serial cable, you can access the device by using the user root and an empty password.
1. Requirements Related to Development Host
Before you install the Boot to Qt Software Stack, you should note the requirements related to the development hosts:
2. Installing Boot to Qt Software Stack
For the Toradex reference devices Apalis iMX6 and Colibri iMX6ULL, the Boot to Qt Software Stack is available from the Qt online installer and you can skip QBSP instructions by going directly to Install from Qt online installer. For other Toradex devices, a QBSP may be available from Qt Customer Portal.
On Linux, see General Installation Issues for Linux.
Install from QBSP
For your device, the Boot to Qt Software Stack is available via the QBSP file. Download the QBSP file via Qt Customer Portal:
- Select Downloads.
- In Select License, select your license.
- In Product, select Boot to Qt QBSP.
- Select the QBSP file for your device.
- Select Download.
You can install the QBSP via the Qt online installer.
- Launch the Qt online installer.
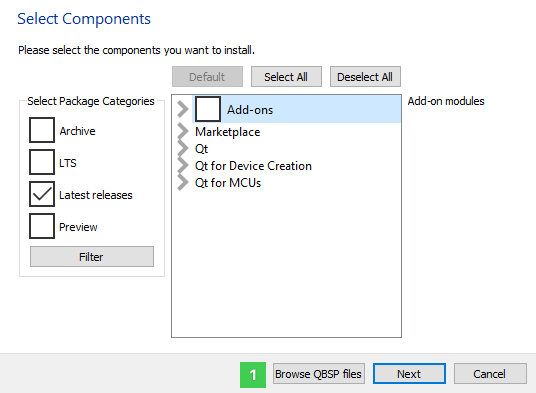
- Follow the instructions until you are in the Select components page.
- Click on Browse QBSP files (1) and select the QBSP file.

After this, the content of the QBSP file is available in the component selection tree.
Install from Qt online installer

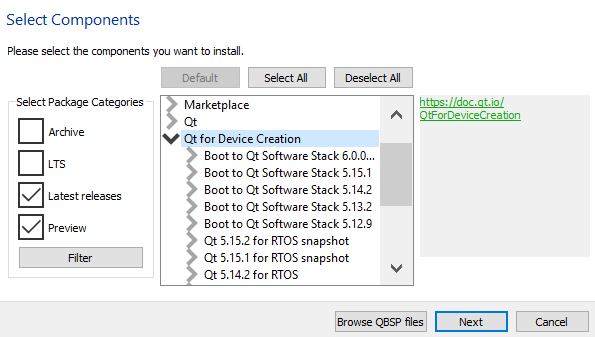
Select the Boot to Qt Software Stack for Toradex device with the following steps:
- Select Boot to Qt Software Stack.
- Select the Boot to Qt Software Stack version.
- Select correct Toradex device.
- Select Next.
To finish the installation, follow the instructions in the installer.
Installation Content
The Boot to Qt Software Stack provides a system image (<target-device> System) and a toolchain (<target-device> Toolchain) for each target device. The system image contains the Boot to Qt Software Stack and needs to be flashed to the SD card or directly to the target device (see 3. Installing Boot to Qt on Target Device). The toolchain is required for building and developing applications for the target devices.
General Installation Issues for Linux
On Linux, remember to allow the execution of the installer binary. You can do this by using one of the following methods:
- On the command line enter the
chmod +x <filename>command. - Right-click the file, and select Properties > Permissions > Allow executing file as program.
Note: Do not execute the installer as a root user or with sudo.
Installation Directory
The installer will let you select a directory where the Boot to Qt Software Stack will be installed. In this documentation, the installation directory is referred to as <INSTALL_DIR>. The default installation directories are:
~/Qton LinuxC:\Qton Windows~/Qton macOS
3. Installing Boot to Qt on Target Device
Before you can test your Qt applications on the target device, you must flash the target device with an image containing the Boot to Qt Software Stack. After you have successfully flashed your device, Boot to Qt Startup Screen automatically appears on the screen when you power on the device.
To flash the image, you can use either Toradex Easy Installer or Flashing Wizard from Qt Creator. With Toradex Easy Installer, the image is first written to an SD card or a USB flashdrive and then to the device's internal eMMC flash memory. With Flashing Wizard you can flash an SD card that is then used to boot the device, or you can use a USB connection to flash the image directly to the device's internal eMMC flash memory. Flashing Wizard does not update the device's boot loader (U-Boot) and if you have trouble booting the device, you may need to use Easy Installer to get the boot loader updated.
Flashing with Toradex Easy Installer
When Toradex Easy Installer is connected to the Internet, it automatically provides a Boot to Qt image in its image list but that is not necessarily compatible with your Boot to Qt installation. When you flash with Toradex Easy Installer, you should always use the *.tezi.tar package that is included into the Boot to Qt installation.
Flash the Boot to Qt image with Toradex Easy Installer as follows:
- If your target device does not have the pre-installed Toradex Easy Installer, follow instructions in Load Toradex Easy Installer to load Toradex Easy Installer.
- Your Boot to Qt installation has the *.tezi.tar package under <Qt installation directory>/<Qt version>/
Boot2Qt/<target>/images. Extract the package to an SD card or a USB flash drive. - Flash the image from the SD card or the USB flash drive with Toradex Easy Installer. See Install Images with Toradex Easy Installer.
Flashing with Qt's Flashing Wizard
Flash the Boot to Qt image to an SD card with Flashing Wizard as follows:
- Connect your SD card reader to the development host. Make sure that the SD card size is at least 2 GB.
- Launch Qt Creator.
- Select Tools > Flash Boot to Qt Device, and follow the instructions in Flashing Wizard.
Alternative you can flash the Boot to Qt image directly to the device's internal eMMC flash memory:
- Use the RS-232 or USB cable to access the serial terminal on the target device.
- Power on your device and press any key to stop the autoboot.
- Run the following command in U-Boot:
ums 0 mmc 0
- Connect your device to the development host using USB On-The-Go (OTG).
- Use Flashing Wizard to flash the image to the device:
- Launch Qt Creator.
- Select Tools > Flash Boot to Qt Device, and follow the instructions in Flashing Wizard.
- Press Ctrl+C in the U-Boot console and run the reset command.
Notes on Toradex Devices
For more information about the boot process on Toradex devices, see Toradex Linux Booting and Device Tree Overlays.
The Ixora carrier board has a USB 2.0 OTG interface available on a Micro-AB connector (X9). The jumper JP2 must be set to open position to enable the OTG mode and make Qt Creator communication via this USB interface possible. For more information about the jumper JP2 in the Ixora carrier board, see the chapter 3.5 in Ixora Datasheet.
4. Configuring a Device Kit in Qt Creator
After you have prepared the target device, you must set up the development tools in Qt Creator for your device. That is, you must configure your target device to be used for each build and run kit.
Connect your device to the development host via USB and launch Qt Creator. In Qt Creator:
- Select Edit > Preferences > Kits.
- Select one of the predefined kits starting with Boot to Qt... that matches the type of your device.
- Select the correct device in the Device field.
- Select OK.
You are now ready to start developing with Qt for your device. For detailed information about how to deploy Qt projects to the device, see Tutorial: Deploying Your First Project with Boot to Qt.
5. Powering on with Boot to Qt Startup Screen
After you have successfully flashed your device with Boot to Qt Software Stack, Boot to Qt Startup Screen automatically appears on the screen when you power on the device.
Available under certain Qt licenses.
Find out more.
