OAuth 2.0 Overview
RFC 6749 - The OAuth 2.0 Authorization Framework specifies a protocol for authorization of services by using a third-party application. OAuth 2.0 uses tokens to abstract the authorization from the service and users. This method is safer as the service owner does not need to deal with user credentials. It is a replacement for RFC 5849 OAuth 1.0.
The OAuth 2.0 framework defines two client types, public or confidential, and flows such as the authorization code flow, implicit code grant, and several others for authorization. A typical Qt application is considered a public native application. A public client application is an application that can't trusted to hold sensitive information, such as passwords, to be embedded within the shipped binary.
RFC 8252 OAuth 2.0 for Native Apps further defines the best practices for native applications. Specifically, RFC 8252 recommends the the authorization flow with the browser. Therefore, the QtNetworkAuth classes provide a concrete implementation of this flow.
New in Qt 6.9, QtNetworkAuth provides support for RFC 8628 - OAuth 2.0 Device Authorization Grant. This device flow is intended for devices that have limited or impractical input capabilities. For this flow, authorization grants use a secondary device such as smartphones instead of the device. Examples of these devices are televisions, media consoles, machine HMIs, and IoT devices. The user may then use an application on their smartphone to authorize the device.
The following table highlights the two OAuth 2.0 flows supported by Qt Network Authorization:
| Aspect | Authorization Code Flow | Device Authorization Flow |
|---|---|---|
| Network Connection | Yes | Yes |
| User Interaction | Browser / user-agent on the same device | Browser / user-agent on a different device |
| Redirect Handling Required | Yes | No |
| Input Capability On Device | Rich input capabilities | Limited or no input capability |
| Targets | Desktop and Mobile Apps | TVs, Consoles, HMIs, IoT Devices |
OAuth 2.0 requires using a user-agent which is typically a browser. For further information, refer to Qt OAuth2 Browser Support.
OAuth 2.0 classes
Qt Network Authorization provides both concrete and abstract OAuth 2.0 classes. The abstract classes are intended for implementing custom flows, while the concrete classes provide a concrete implementation.
For the list of C++ classes, refer to the QtNetworkAuth page.
Qt Network Authorization has two abstract classes for implementing OAuth 2.0 flows:
- An OAuth 2.0 flow implementation class provides the main API, and is the orchestrator of the flow. The abstract class is QAbstractOAuth2, and the concrete implementations are QOAuth2AuthorizationCodeFlow and QOAuth2DeviceAuthorizationFlow.
- A reply handler class which handles redirects and replies from an authorization server. The reply handler abstract class is QAbstractOAuthReplyHandler, and the concrete classes are QOAuthHttpServerReplyHandler and QOAuthUriSchemeReplyHandler. The main difference between the reply handlers is the type of redirects they handle. QOAuth2AuthorizationCodeFlow uses a reply handler to handle the redirects and QOAuth2DeviceAuthorizationFlow, which is not based on redirects, does not use reply handlers.
Authorization code flow
This section is an overview of the authorization code flow from RFC 6749 - Authorization Code and RFC 8252 - Authorization Request from a Native App for native applications.
Consider the following sample setup:
QOAuth2AuthorizationCodeFlow m_oauth;
QOAuthUriSchemeReplyHandler m_handler;

m_oauth.setAuthorizationUrl(QUrl(authorizationUrl));
m_oauth.setTokenUrl(QUrl(accessTokenUrl));
m_oauth.setClientIdentifier(clientIdentifier);
m_oauth.setRequestedScopeTokens({scope});

connect(&m_oauth, &QAbstractOAuth::authorizeWithBrowser, this, &QDesktopServices::openUrl);
connect(&m_oauth, &QAbstractOAuth::granted, this, [this]() {
    // Here we use QNetworkRequestFactory to store the access token
    m_api.setBearerToken(m_oauth.token().toLatin1());
    m_handler.close();
});

m_handler.setRedirectUrl(QUrl{"com.example.myqtapp://oauth2redirect"_L1});
m_oauth.setReplyHandler(&m_handler);

// Initiate the authorization
if (m_handler.listen()) {
    m_oauth.grant();
}
Authorization flow stages
The RFC 6749 Authorization Code Flow has two main stages: resource authorization (including any necessary user authentication) followed by an access token request. These are optionally followed by access token usage and access token refreshing. The following figure illustrates these stages:
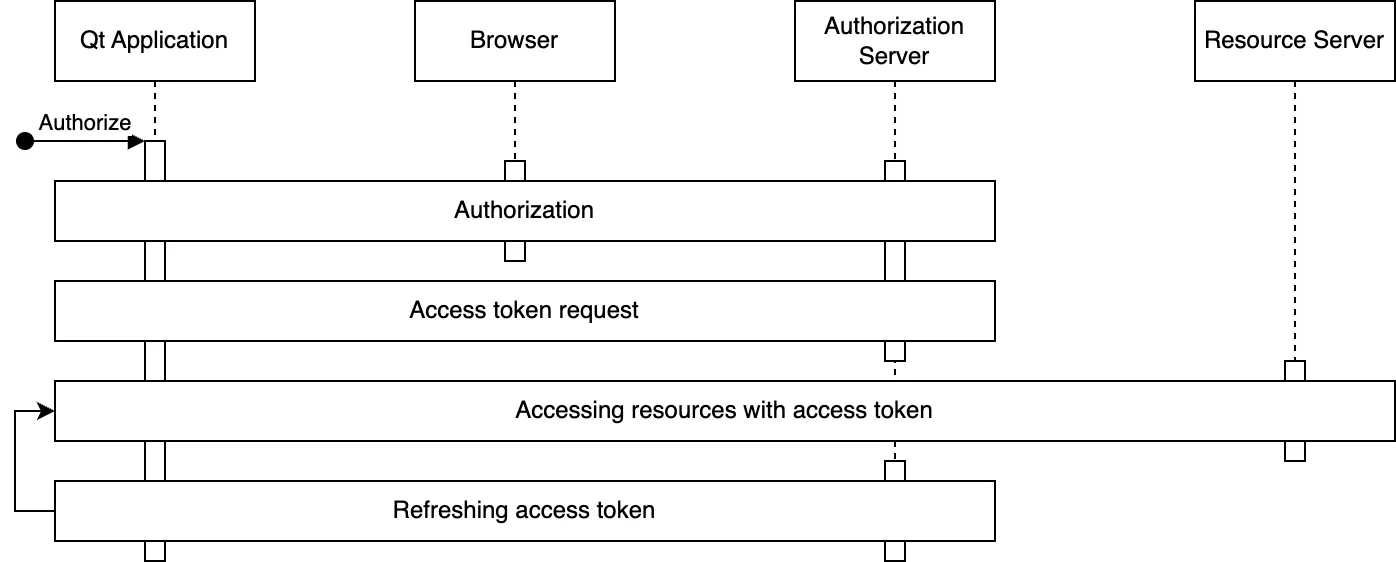
- In authorization stage, the user is authenticated, and the user authorizes the access to resources. This requires browser interaction by the user.
- After the authorization the received authorization code is used to request an access token, and optionally a refresh token.
- Once the access token is acquired, the application uses it to access the resources of interest. The access token is included in the resource requests, and it is up to the resource server to verify the token's validity. There are several ways to include the token as part of the requests with bearer tokens. Including the token in the HTTP
Authorizationheader is arguably the most common. - Access token refreshing. Access tokens typically expire relatively quickly, for example, after one hour. If the application received a refresh token in addition to the access token, the refresh token can be used to request a new access token. Applications can persist longer-lived refresh tokens to avoid the need for a new authorization stage (and thus another browser interaction).
Details and customization
OAuth 2.0 flows are dynamic and implementing the specifications can be tricky at first. The figure below illustrates the main details of a successful authorization code flow.
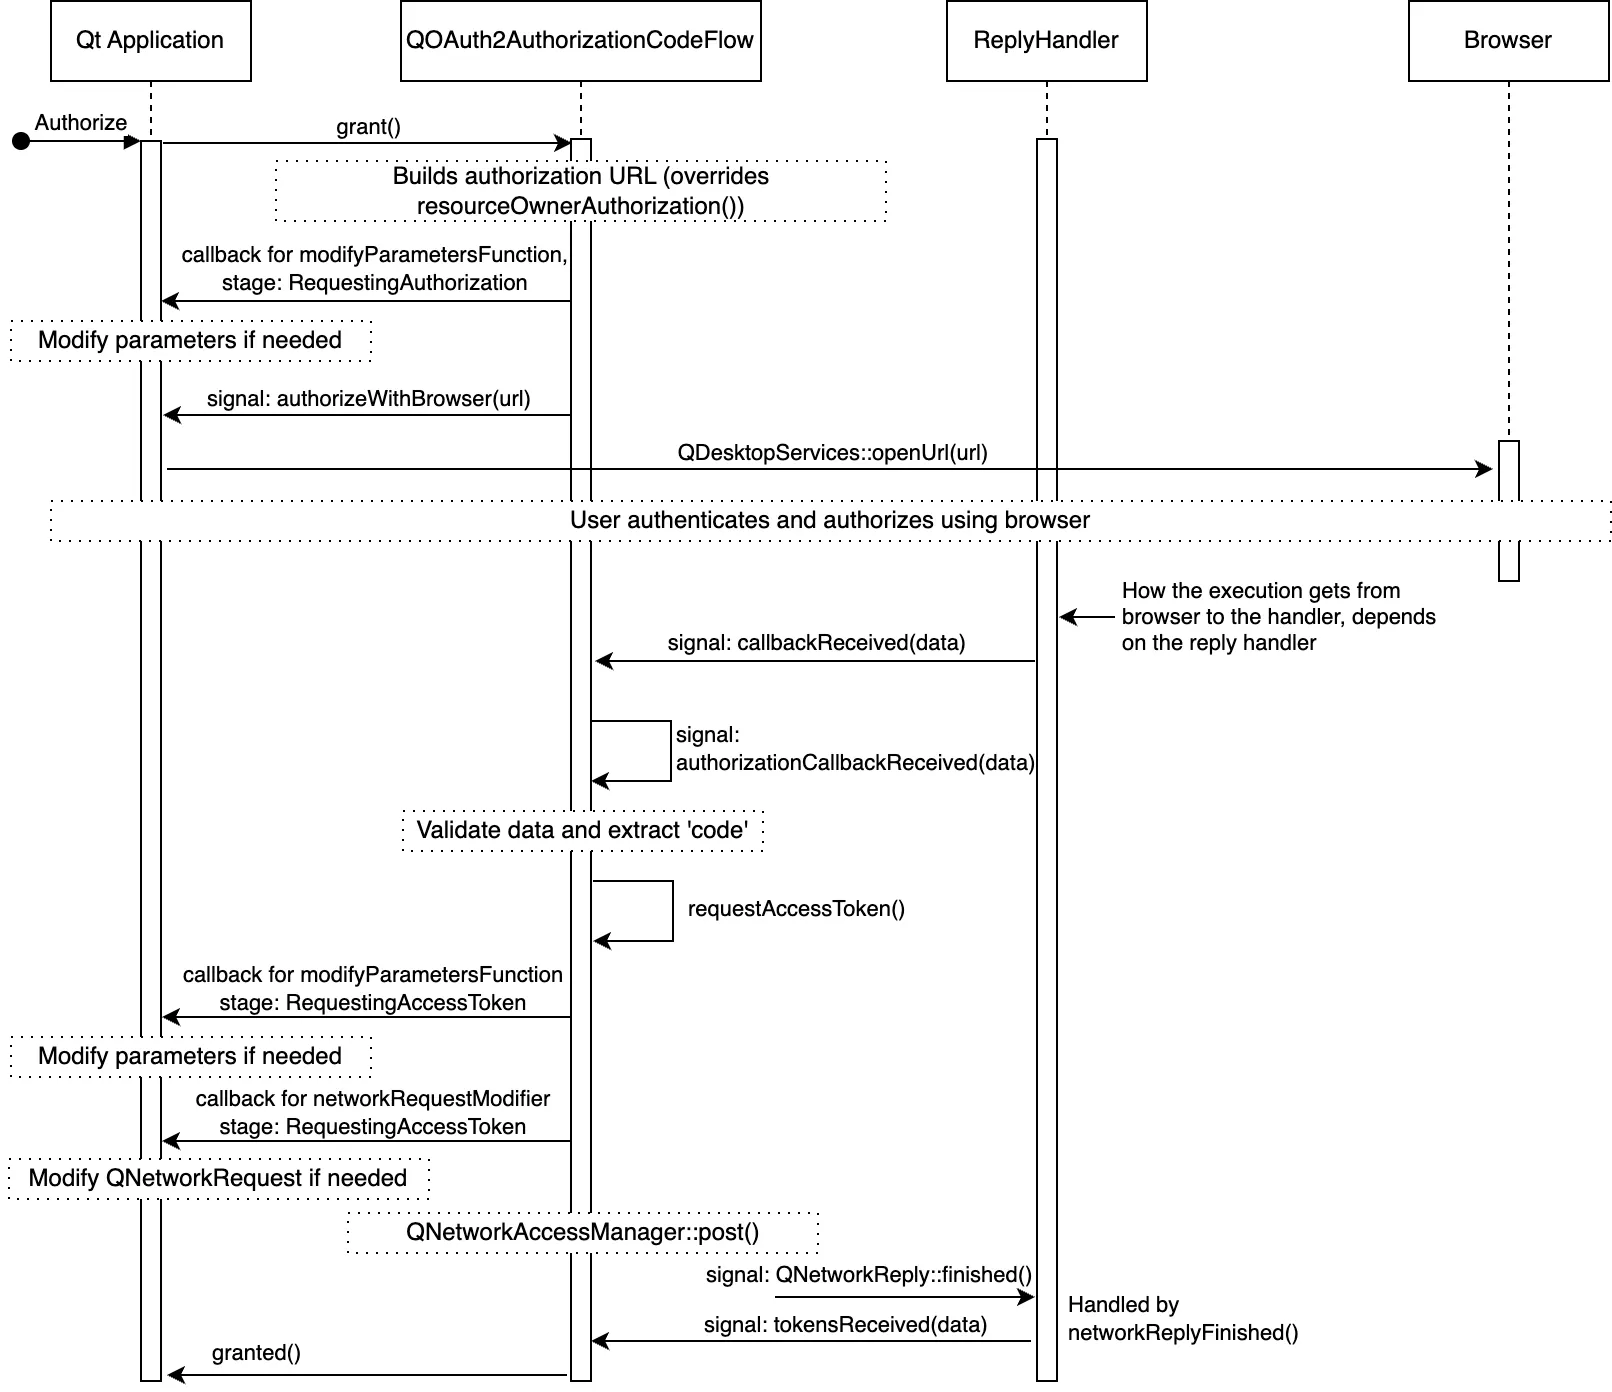
For clarity, the figure omits some signals, but altogether illustrates the details and main customization points. The customization points are the various signals and slots the application can use, as well as the callbacks which are settable with QAbstractOAuth::setModifyParametersFunction() and QAbstractOAuth2::setNetworkRequestModifier().
Choosing a reply handler
Deciding which handler to use depends on the redirect_uri element. The redirect_uri is set to where the browser is redirected upon concluding the authorization stage.
For receiving the authorization response in native applications, RFC 8252 specifies three main types of response URI schemes: private-use, loopback, and https.
- Private-use URIs: Can be used if the OS allows an application to register a custom URI scheme. An attempt to open an URL with such custom scheme will open the related native application. See QOAuthUriSchemeReplyHandler.
- HTTPS URIs: Can be used if the OS allows the application to register a custom HTTPS URL. An attempt to open this URL will open the related native application. This scheme is recommended if the OS supports it. See QOAuthUriSchemeReplyHandler.
- Loopback Interfaces: These are commonly used for desktop applications, and applications during development. The QOAuthHttpServerReplyHandler is designed to handle these URIs by setting up a local server to handle the redirection.
The choice depends on several factors such as:
- Redirect URIs supported by the authorization server vendor. The support varies from vendor to vendor, and is often specific to a particular client type and operating system. Also, the support may vary depending on whether the application is published or not.
- Redirect URI schemes supported by the target platform(s).
- Application-specific usability, security, and other requirements.
RFC 8252 recommends using the https scheme for security and usability advantages over the other methods.
OAuth 2.0 Device Authorization Grant
RFC 8628 OAuth 2.0 Device Authorization Grant is intended for connected devices that are limited in terms of input capabilities, or where user-agent-browser usage is not practical. Example devices that use this flow are smart appliances that need external devices for authorization.
Consider the following sample setup:
m_deviceFlow.setAuthorizationUrl(QUrl(authorizationUrl));
m_deviceFlow.setTokenUrl(QUrl(accessTokenUrl));
m_deviceFlow.setRequestedScopeTokens({scope});
m_deviceFlow.setClientIdentifier(clientIdentifier);
// The need for a client secret depends on the authorization server
m_deviceFlow.setClientIdentifierSharedKey(clientSecret);

connect(&m_deviceFlow, &QOAuth2DeviceAuthorizationFlow::authorizeWithUserCode, this,
    [](const QUrl &verificationUrl, const QString &userCode, const QUrl &completeVerificationUrl) {
        if (completeVerificationUrl.isValid()) {
            // If the authorization server provided a complete URL
            // that already contains the necessary data as part of the URL parameters,
            // you can choose to use that
            qDebug() << "Complete verification uri:" << completeVerificationUrl;
        } else {
            // Authorization server provided only verification URL; use that
            qDebug() << "Verification uri and usercode:" << verificationUrl << userCode;
        }
    }
);

connect(&m_deviceFlow, &QAbstractOAuth::granted, this, [this](){
    // Here we use QNetworkRequestFactory to store the access token
    m_api.setBearerToken(m_deviceFlow.token().toLatin1());
});
m_deviceFlow.grant();
Device Authorization Grant stages
The Device Authorization Grant flow has three main stages: initializing the authorization, polling for tokens, and completing the authorization. These are optionally followed by token usage and token refreshing. The following figure illustrates these stages:
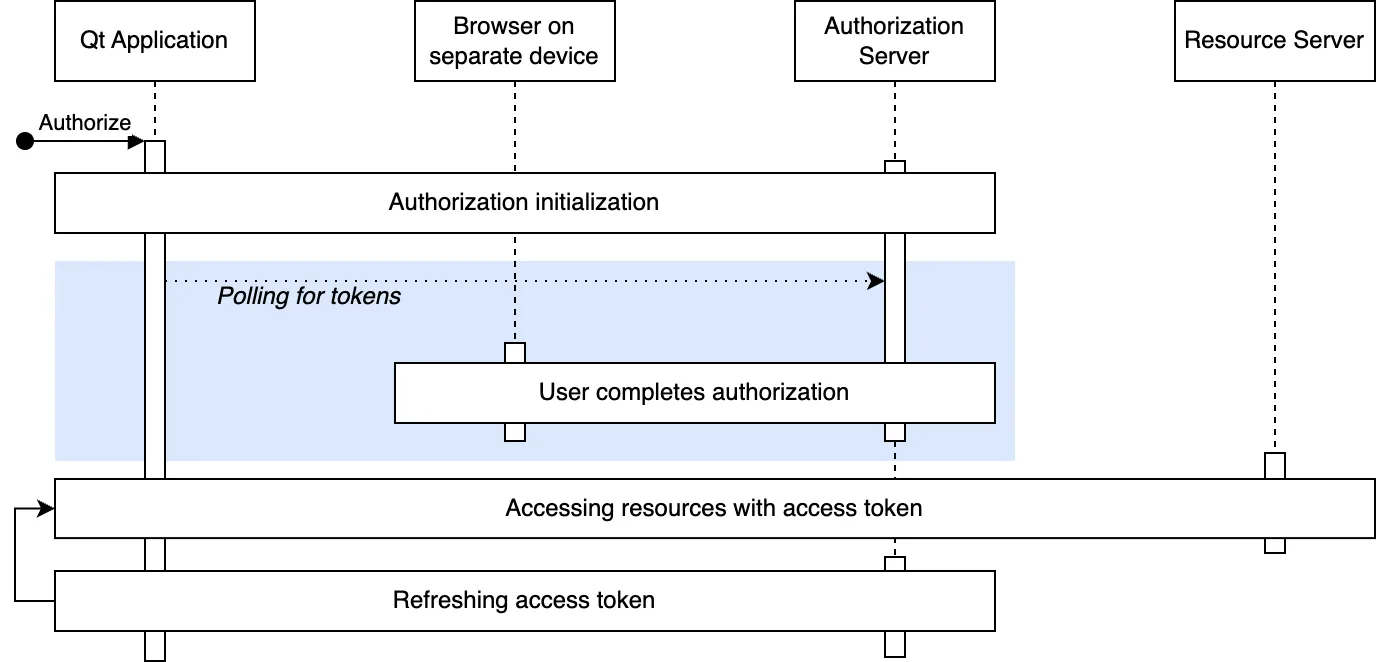
- Authorization is initialized by sending a HTTP request to the authorization server. The authorization server provides a user code, verification URLs, and a device code in response.
- After authorization is initialized, the user is provided with a user code and verification URL(s) for completing the authorization. The mechanism for the end user varies: it can be a visible URL on the screen, QR code, an email, and so on. Refer to RFC 8628 - User Interaction for more information.
- While waiting for the end user to complete the authorization, the device flow polls the authorization server for tokens. The device code received in the previous step is used to match the authorization session. The poll interval is decided by the authorization server, and is typically 5 seconds.
- Once the end user has accepted or denied the authorization, the authorization server responds to a poll request with the requested tokens or an error code if denied, and the authorization is complete.
Details and customization
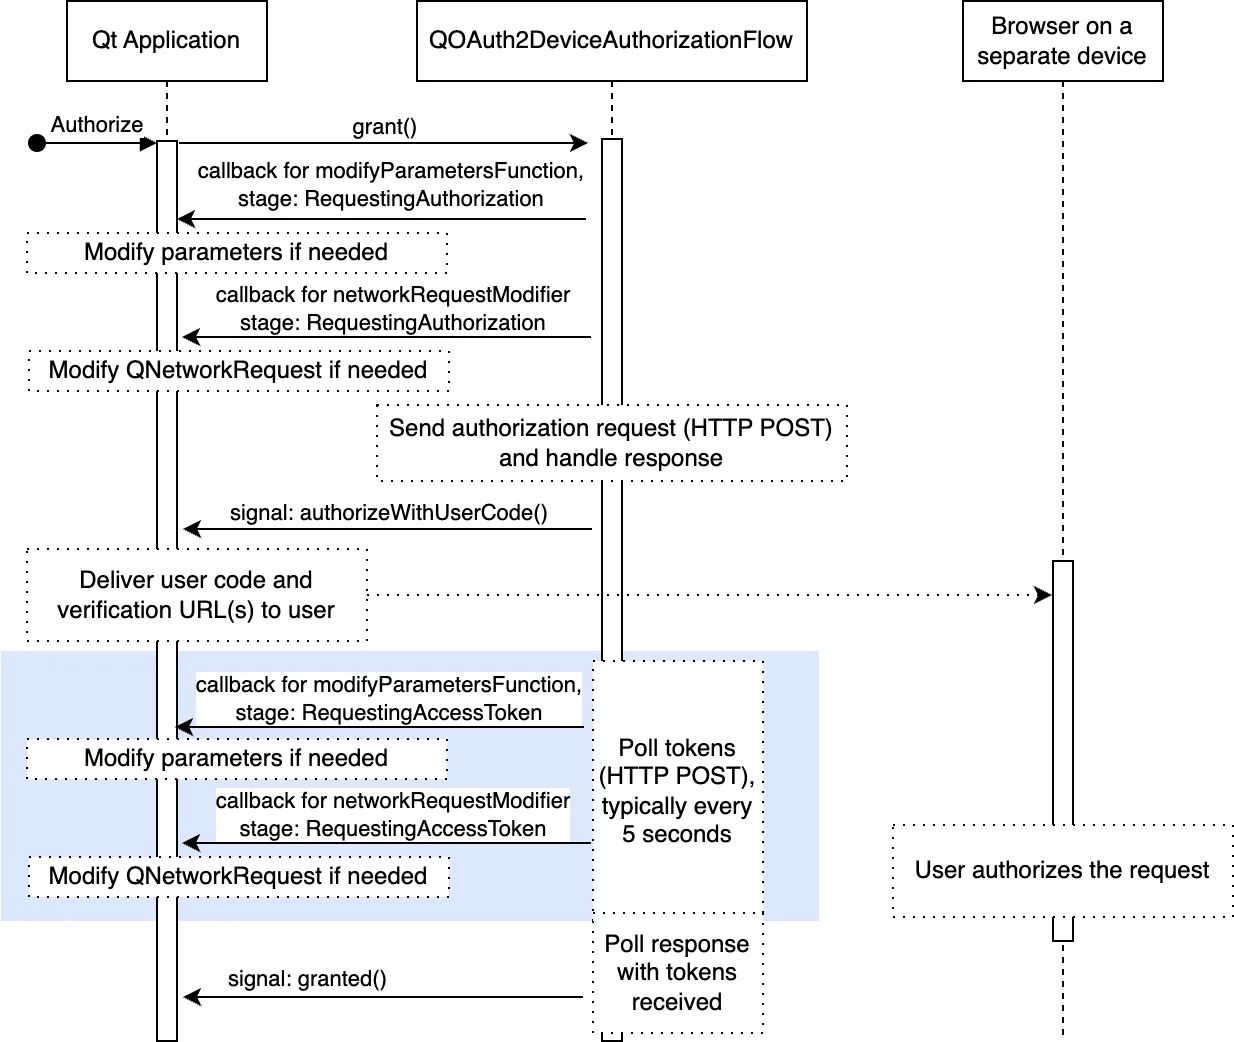
The following figure illustrates the device authorization grant flow in more detail. The figure shows the main customization points, which are sometimes necessary. For example, proprietary parameters, or additional authentication credentials.
Refresh tokens
Refreshing tokens require that the authorization server provide a refresh token during authorization. Providing a refresh token is up to the authorization server: some servers may choose to always provide it, some may never provide it, and some provide it if a specific scope was present in the authorization request.
The following figure illustrates the token refresh in more detail:
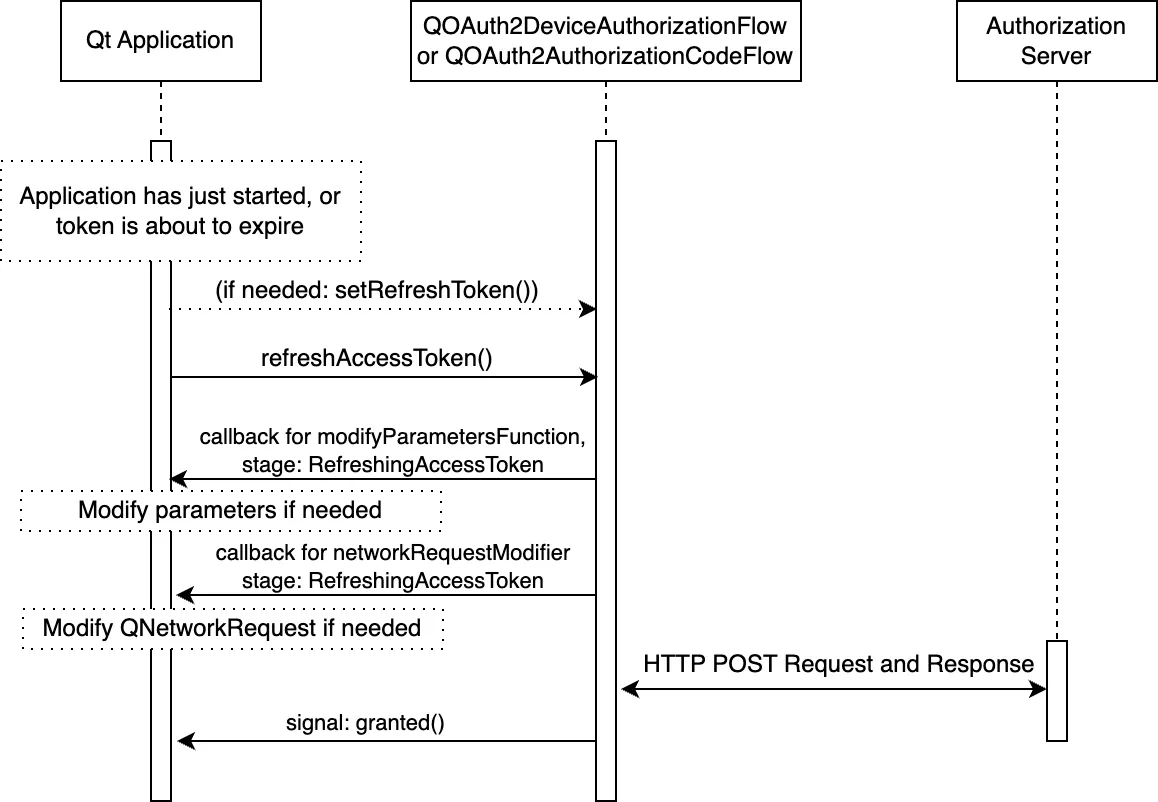
As shown in the figure above, the usual customization points are also available when refreshing tokens.
To refresh the tokens after an application startup, the application needs to persist the refresh token securely, and set it with QAbstractOAuth2::setRefreshToken. QAbstractOAuth2::refreshTokens can then be called to request new tokens.
New in Qt 6.9, applications can automatically refresh the tokens - see QAbstractOAuth2::accessTokenAboutToExpire, QAbstractOAuth2::autoRefresh, and QAbstractOAuth2::refreshLeadTime.
The expiration time for a refresh token is generally not indicated by the authorization server (apart from the server's documentation). Their validity can range from days, months, or longer. Furthermore, as with other tokens, refresh tokens can be revoked by the user and thus invalidated at any time. Therefore, it is important to properly detect a failed refresh attempt with QAbstractOAuth::requestFailed or QAbstractOAuth2::serverReportedErrorOccurred.
OAuth 2.0 flows require many user interaction, which can be intrusive to the user experience. To minimize these interactions, tokens can be silently refreshed for the user. Refer to the RFC 6749 - Refreshing Access Tokens for more information.
Qt OpenID Connect support
OpenID Connect (OIDC) is a simple identity layer on top of OAuth 2.0. OIDC can use an authorization server for authenticating the identity of a user. Accessing simple user profile information is also possible with OIDC.
Qt's support for OIDC is at the moment limited to getting ID tokens. An ID token is a JSON Web Token (JWT) that contains claims about the authentication event.
Note: ID token validation or ID token decryption is currently not implemented. You must use a third-party JWT library for JWT token signing or verification.
Assuming the application is able to validate the received tokens, the token can be used to establish the identity of the user reliably (so long as the OIDC provider itself is trusted).
ID tokens are sensitive information and should be kept as a secret and are not the same as access tokens. ID tokens are not intended for sending out in API calls - the access token is intended for that purpose. Note that some vendors may use the same JWT format for access tokens, but that is not to be confused with actual ID tokens which use the same format. With ID tokens, the client receiving the token is responsible for verifying the token, whereas with access tokens it's the resource server accepting the token that is responsible for verification.
Getting an ID token
Getting an ID token is similar to getting an access token. First, we need to set the appropriate scope. The authorization Server vendor may support additional scope specifiers such as profile and email, but all OIDC requests must include openid scope:
m_oauth.setRequestedScopeTokens({"openid"});
For OIDC, it is strongly recommended to use nonce parameter. This is done by ensuring that appropriate NonceMode is set.
// This is for illustrative purposes, 'Automatic' is the default mode
m_oauth.setNonceMode(QAbstractOAuth2::NonceMode::Automatic);
As the last step, we can listen for either QAbstractOAuth2::granted signal or the QAbstractOAuth2::idTokenChanged directly:
connect(&m_oauth, &QAbstractOAuth2::idTokenChanged, this, [this](const QString &token) {
    Q_UNUSED(token); // Handle token
});
Validating an ID token
Validating the received ID Token is a critical part of the authentication flow, and when fully implemented, a somewhat complicated task. Refer to the full at OpenID Connect ID Validation.
As a small summary, validation consists of these steps:
- Decrypting the token if needed (see JWE)
- Extracting the token header, payload, and signature
- Validating the signature
- Validating the fields of the payload (such as
aud, iss, exp, nonce, iat)
Qt currently doesn't provide support for ID token validation, but there are Third-party JWT libraries, such as jwt-cpp.
ID Token Verification example
This section illustrates a simple verification example. As prerequisites, the development environment needs to have OpenSSL libraries, and jwt-cpp in the include folder under the application project's source directory.
In application project's CMakeLists.txt file, we first check that the pre-requisities are met:
find_package(OpenSSL 1.0.0 QUIET)
set(JWT_CPP_INCLUDE_DIR "${CMAKE_SOURCE_DIR}/include")
if(OPENSSL_FOUND AND EXISTS "${JWT_CPP_INCLUDE_DIR}/jwt-cpp/jwt.h")
Then we add necessary includes and libraries:
    target_include_directories(networkauth_oauth_snippets PRIVATE "${JWT_CPP_INCLUDE_DIR}")
    target_link_libraries(networkauth_oauth_snippets PRIVATE OpenSSL::SSL OpenSSL::Crypto)
    target_compile_definitions(networkauth_oauth_snippets PRIVATE JWT_CPP_AVAILABLE)
In the application source files, include the verification library:
#ifdef JWT_CPP_AVAILABLE
#include "jwt-cpp/jwt.h"
#endif
Once the application receives an ID token, it's time to verify it. First we find a matching key from JSON Web Key Sets (JWKS), see OpenID Connect Discovery).
try {
    const auto jwt = jwt::decode(m_oauth.idToken().toStdString());
    const auto jwks = jwt::parse_jwks(m_jwks->toJson(QJsonDocument::Compact).toStdString());
    const auto jwk = jwks.get_jwk(jwt.get_key_id());
And then we do the actual verification:
    // Here we use modulus and exponent to derive the key
    const auto n = jwk.get_jwk_claim("n").as_string(); // modulus
    const auto e = jwk.get_jwk_claim("e").as_string(); // exponent
    if (n.empty() || e.empty()) {
        qWarning() << "Modulus or exponent empty";
        return false;
    }
    if (jwt.get_algorithm() != "RS256") { // This example only supports RS256
        qWarning() << "Unsupported algorithm:" << jwt.get_algorithm();
        return false;
    }
    if (jwk.get_jwk_claim("kty").as_string() != "RSA") {
        qWarning() << "Unsupported key type:" << jwk.get_jwk_claim("kty").as_string();
        return false;
    }
    if (jwk.has_jwk_claim("use") && jwk.get_jwk_claim("use").as_string() != "sig") {
        qWarning() << "Key not for signature" << jwk.get_jwk_claim("use").as_string();
        return false;
    }
    // Simple minimal verification (omits special cases and eg. 'sub' verification).
    // jwt-cpp does check also 'exp', 'iat', and 'nbf' if they are present.
    const auto keyPEM = jwt::helper::create_public_key_from_rsa_components(n, e);
    auto verifier = jwt::verify()
                        .allow_algorithm(jwt::algorithm::rs256(keyPEM))
                        .with_claim("nonce", jwt::claim(m_oauth.nonce().toStdString()))
                        .with_issuer(m_oidcConfig->value("issuer"_L1).toString().toStdString())
                        .with_audience(std::string(clientIdentifier.data()))
                        .leeway(60UL);
    verifier.verify(jwt);
    qDebug() << "ID Token verified successfully";
    return true;
} catch(const std::exception &e) {
    // Handle error. Alternatively pass error parameter to jwt-cpp calls
    qWarning() << "ID Token verification failed" << e.what();
    return false;
}
Reading ID token values
The ID token is in JSON Web Token (JWT) format and consists of a header, payload, and signature parts, separated by dots ..
Reading the values of the ID token is straightforward. As an example, assume that there is a struct:
struct IDToken {
    QJsonObject header;
    QJsonObject payload;
    QByteArray signature;
};
And a function:
std::optional<IDToken> parseIDToken(const QString &token) const;
The token can be extracted with:
if (token.isEmpty())
    return std::nullopt;

QList<QByteArray> parts = token.toLatin1().split('.');
if (parts.size() != 3)
    return std::nullopt;

QJsonParseError parsing;

QJsonDocument header = QJsonDocument::fromJson(
    QByteArray::fromBase64(parts.at(0), QByteArray::Base64UrlEncoding), &parsing);
if (parsing.error != QJsonParseError::NoError || !header.isObject())
    return std::nullopt;

QJsonDocument payload = QJsonDocument::fromJson(
    QByteArray::fromBase64(parts.at(1), QByteArray::Base64UrlEncoding), &parsing);
if (parsing.error != QJsonParseError::NoError || !payload.isObject())
    return std::nullopt;

QByteArray signature = QByteArray::fromBase64(parts.at(2), QByteArray::Base64UrlEncoding);

return IDToken{header.object(), payload.object(), signature};
In some cases the token may be encrypted as JSON Web Encryption (JWE) which internally contains a JWT token. In this case, the token must be decrypted first.
OpenID Connect Discovery
OpenID Connect Discovery defines the means to discover needed OpenID provider details, in order to interact with it. This includes information such as authorization_endpoint and token_endpoint URLs.
While these provider details can be statically configured in the application, discovering the details at runtime may provide more flexibility and robustness in interacting with various providers.
Getting the discovery document is a simple HTTP GET request. The document is typically located in https://<domain name>/.well-known/openid_configuration.
m_network->get(request, this, [this](QRestReply &reply) {
    if (reply.isSuccess()) {
        if (auto doc = reply.readJson(); doc && doc->isObject())
            m_oidcConfig = doc->object(); // Store the configuration
    }
});
Notably, for token validation, the jwks_uri field provides a link for accessing the current (public) security credentials. Using that removes the need to hard-code such credentials in the application directly. This also helps with key rotation; the vendors may change the used keys from time to time, and therefore ensuring an up-to-date key is important.
Getting the keys is similarly a simple HTTP GET request:
m_network->get(request, this, [this](QRestReply &reply) {
    if (reply.isSuccess()) {
        if (auto doc = reply.readJson(); doc && doc->isObject())
            m_jwks = doc; // Use the keys later to verify tokens
    }
});
The key set typically contains several keys. The correct key is indicated in the JWT header (care must be taken to match the keys properly, just checking the key id, kid, field is not adequate).
OpenID UserInfo Endpoint
An alternative way to access user information is to use OpenID Connect UserInfo Endpoint, if the OIDC provider supports it. The URL for the userinfo is in userinfo_endpoint field of the OpenID Connect Discovery document.
The UserInfo endpoint does not use the ID token, but is accessed with the access token. Accessing the UserInfo is similar to accessing any other resource with an access token.
Assuming the access token is received and set for example by:
QNetworkRequestFactory userInfoApi(url);
userInfoApi.setBearerToken(m_oauth.token().toLatin1());
Then accessing the UserInfo is a HTTP GET request:
m_network->get(userInfoApi.createRequest(), this, [this](QRestReply &reply) {
    if (reply.isSuccess()) {
        if (auto doc = reply.readJson(); doc && doc->isObject())
            qDebug() << doc->object(); // Use the userinfo
    }
});
© 2026 The Qt Company Ltd. Documentation contributions included herein are the copyrights of their respective owners. The documentation provided herein is licensed under the terms of the GNU Free Documentation License version 1.3 as published by the Free Software Foundation. Qt and respective logos are trademarks of The Qt Company Ltd. in Finland and/or other countries worldwide. All other trademarks are property of their respective owners.
