Getting Started programming with Qt Quick: An Alarm Application
A tutorial for Qt Quick based on an alarms application.
This tutorial shows how to develop a simple alarm application as an introduction to Qt Quick and Qt Quick Controls.
In this tutorial you can enter, edit, or delete alarms. An alarm can trigger on a given date, and you can set it to repeat on a series of subsequent days. This application is similar to the alarm application usually found on an Android phone.
Running the Example
You can run the example from:
- Qt Creator
Open the Welcome mode and select the example from Examples. For more information, see Qt Creator: Tutorial: Build and run.
- Qt Extension for Visual Studio Code
Run the Qt: Open Qt examples command from the Command Palette, and select the example from the list. For more information, see Qt Extension for Visual Studio Code: Tutorial: Build and run.
Creating the Alarms Project
This section shows how to create the project in Qt Creator. It discusses the files generated automatically by Qt Creator, and the two files the programmer has to create in Qt Creator or some other editor. The latter two files are included with the source code for this tutorial.
Note: The UI text in Qt Creator and the contents of the generated files depend on the Qt Creator version that you use.
Qt Creator
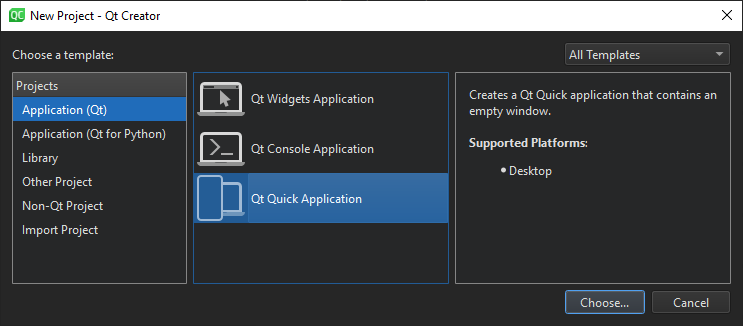
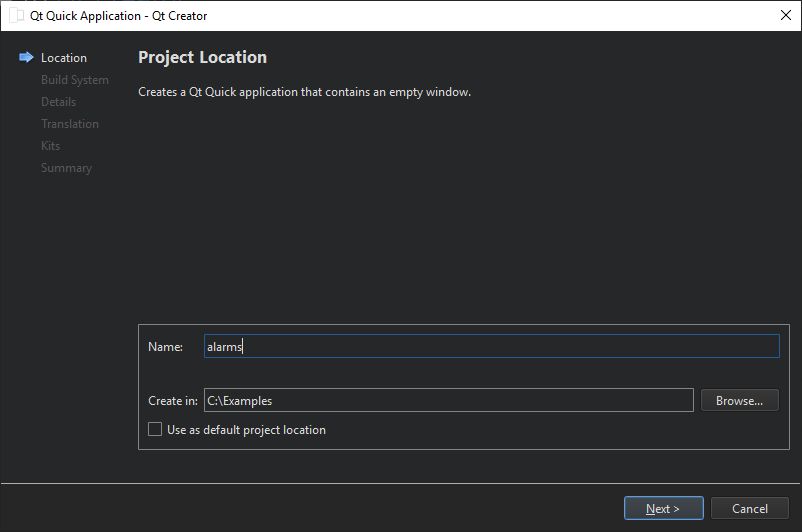
Setting up a new project in Qt Creator is aided by a wizard that guides you step-by-step through the project creation process. The wizard prompts you to enter the settings needed for that particular type of project and creates the project for you.
To create the Alarms project, select File > New Project > Application (Qt) > Qt Quick Application > Choose. Type alarms in the Name field, and follow the instructions of the wizard. Use Qt Quick Application (compact) if you want to use other build systems than CMake or Qt versions lower than 6.
The Qt Quick application wizard creates a project that contains the following source files:
| Source file | Purpose |
|---|---|
| CMakeLists.txt | The project file |
| main.cpp | The main C++ code file for the application. |
| Main.qml | The main QML code file for the application. We will instantiate our custom QML types (AlarmDialog, AlarmModel, AlarmDelegate, and TumblerDelegate) in this file. |
The wizard generates the code in the main.cpp file below. This code block enables High DPI scaling and declares app and engine. The engine then loads our main QML file.
int main(int argc, char *argv[])
{
    QGuiApplication app(argc, argv);

    QQmlApplicationEngine engine;
    QObject::connect(
            &engine, &QQmlApplicationEngine::objectCreationFailed, &app,
            []() { QCoreApplication::exit(-1); }, Qt::QueuedConnection);
Additional source files
| Source file | Purpose |
|---|---|
qtquickcontrols2.conf | Selects the Material style with the Dark theme. |
AlarmDialog.qml | Defines the dialog for adding new alarms. |
AlarmDelegate.qml | Defines the layout of the main screen of the app. |
AlarmModel.qml | Defines the ListModel used for storing the alarms' data. |
TumblerDelegate.qml | Defines the graphical layout of the Tumblers. |
qml.qrc | The resource file, which contains the names of the source files, except main.cpp and the project file. |
qtquickcontrols2.conf
The following snippet shows how to set the Dark theme in the Material style:
[Controls]
Style=Material
[Material]
Theme=Dark
Accent=Red
Main.qml
mainWindow, an ApplicationWindow QML type, is the root item in this app.
ApplicationWindow {
    id: window
    width: 400
    height: 500
    visible: true
The ListView alarmListView combines the data from alarmModel with the layout defined in alarmDelegate.
    ListView {
        id: alarmListView
        anchors.fill: parent
        model: AlarmModel {}
        delegate: AlarmDelegate {}
    }
New alarms can be added by clicking RoundButton addAlarmButton. Clicking it opens a Dialog screen alarmDialog.
    RoundButton {
        id: addAlarmButton
        text: "+"
        anchors.bottom: alarmListView.bottom
        anchors.bottomMargin: 8
        anchors.horizontalCenter: parent.horizontalCenter
        onClicked: alarmDialog.open()
    }

    AlarmDialog {
        id: alarmDialog
        x: Math.round((parent.width - width) / 2)
        y: Math.round((parent.height - height) / 2)
        alarmModel: alarmListView.model
    }
AlarmDialog.qml
This dialog screen has a RowLayout with a Tumbler each for hours and minutes, and another RowLayout with a Tumbler each for day, month, and year.
    contentItem: RowLayout {
        RowLayout {
            id: rowTumbler

            Tumbler {
                id: hoursTumbler
                model: 24
                delegate: TumblerDelegate {
                    text: alarmDialog.formatNumber(modelData)
                }
            }
            Tumbler {
                id: minutesTumbler
                model: 60
                delegate: TumblerDelegate {
                    text: alarmDialog.formatNumber(modelData)
                }
            }
        }

        RowLayout {
            id: datePicker

            Layout.leftMargin: 20

            readonly property var days: [31, 29, 31, 30, 31, 30, 31, 31, 30, 31, 30, 31]

            Tumbler {
                id: dayTumbler

                function updateModel() {
                    // Populate the model with days of the month. For example: [0, ..., 30]
                    var previousIndex = dayTumbler.currentIndex
                    var array = []
                    var newDays = datePicker.days[monthTumbler.currentIndex]
                    for (let i = 1; i <= newDays; ++i)
                        array.push(i)
                    dayTumbler.model = array
                    dayTumbler.currentIndex = Math.min(newDays - 1, previousIndex)
                }

                Component.onCompleted: updateModel()

                delegate: TumblerDelegate {
                    text: alarmDialog.formatNumber(modelData)
                }
            }
            Tumbler {
                id: monthTumbler

                onCurrentIndexChanged: dayTumbler.updateModel()

                model: 12
                delegate: TumblerDelegate {
                    text: alarmDialog.locale.standaloneMonthName(modelData, Locale.ShortFormat)
                }
            }
            Tumbler {
                id: yearTumbler

                // This array is populated with the next three years. For example: [2018, 2019, 2020]
                readonly property var years: (function() {
                    var currentYear = new Date().getFullYear()
                    return [0, 1, 2].map(function(value) { return value + currentYear; })
                })()

                model: years
                delegate: TumblerDelegate {
                    text: alarmDialog.formatNumber(modelData)
                }
            }
        }
    }
}
If you click on OK in the dialog, the entered data will be added to alarmModel:
    onAccepted: {
        alarmModel.append({
            "hour": hoursTumbler.currentIndex,
            "minute": minutesTumbler.currentIndex,
            "day": dayTumbler.currentIndex + 1,
            "month": monthTumbler.currentIndex + 1,
            "year": yearTumbler.years[yearTumbler.currentIndex],
            "activated": true,
            "label": "",
            "repeat": false,
            "daysToRepeat": [
                { "dayOfWeek": 0, "repeat": false },
                { "dayOfWeek": 1, "repeat": false },
                { "dayOfWeek": 2, "repeat": false },
                { "dayOfWeek": 3, "repeat": false },
                { "dayOfWeek": 4, "repeat": false },
                { "dayOfWeek": 5, "repeat": false },
                { "dayOfWeek": 6, "repeat": false }
            ],
        })
    }
    onRejected: alarmDialog.close()
AlarmDelegate.qml
Each alarm in the main screen is an ItemDelegate. The ItemDelegate root contains all fields on the main screen and the detail screen. The detail screen's fields are only visible after an alarm has been clicked on, i.e. when root.checked is true.
ItemDelegate {
    id: root
    width: parent.width
    checkable: true

    required property int index
    required property int hour
    required property int minute
    required property int day
    required property int month
    required property int year
    required property bool activated
    required property string label
    required property bool repeat
    required property list<var> daysToRepeat

    onClicked: ListView.view.currentIndex = index

    contentItem: ColumnLayout {
        spacing: 0

        RowLayout {
            ColumnLayout {
                id: dateColumn

                readonly property date alarmDate: new Date(
                    root.year, root.month - 1, root.day, root.hour, root.minute)

                Label {
                    id: timeLabel
                    font.pixelSize: (Qt.application as Application).font.pixelSize * 2
                    text: dateColumn.alarmDate.toLocaleTimeString(root.locale, Locale.ShortFormat)
                }
                RowLayout {
                    Label {
                        id: dateLabel
                        text: dateColumn.alarmDate.toLocaleDateString(root.locale, Locale.ShortFormat)
                    }
                    Label {
                        id: alarmAbout
                        text: "⸱ " + root.label
                        visible: root.label.length > 0 && !root.checked
                    }
                }
            }
            Item {
                Layout.fillWidth: true
            }
            Switch {
                checked: root.activated
                Layout.alignment: Qt.AlignTop
                onClicked: root.activated = checked
            }
        }
        CheckBox {
            id: alarmRepeat
            text: qsTr("Repeat")
            checked: root.repeat
            visible: root.checked
            onToggled: root.repeat = checked
        }
        Flow {
            visible: root.checked && root.repeat
            Layout.fillWidth: true

            Repeater {
                id: dayRepeater
                model: root.daysToRepeat
                delegate: RoundButton {
                    required property int dayOfWeek
                    required property bool repeat
                    text: Qt.locale().dayName(dayOfWeek, Locale.NarrowFormat)
                    flat: true
                    checked: repeat
                    checkable: true
                    Material.background: checked ? Material.accent : "transparent"
                    onToggled: repeat = checked
                }
            }
        }

        TextField {
            id: alarmDescriptionTextField
            placeholderText: qsTr("Enter description here")
            cursorVisible: true
            visible: root.checked
            text: root.label
            onTextEdited: root.label = text
        }
        Button {
            id: deleteAlarmButton
            text: qsTr("Delete")
            visible: root.checked
            onClicked: root.ListView.view.model.remove(root.ListView.view.currentIndex, 1)
        }
    }
}
AlarmModel.qml
This QML file contains the definition of alarmModel, the ListModel that manages the alarm data.
It creates five ListElements with example alarms.
import QtQuick

// Populate the model with some sample data.
ListModel {
    id: alarmModel

    ListElement {
        hour: 6
        minute: 0
        day: 2
        month: 8
        year: 2018
        activated: true
        label: "Wake up"
        repeat: true
        daysToRepeat: [
            ListElement { dayOfWeek: 0; repeat: false },
            ListElement { dayOfWeek: 1; repeat: false },
            ListElement { dayOfWeek: 2; repeat: false },
            ListElement { dayOfWeek: 3; repeat: false },
            ListElement { dayOfWeek: 4; repeat: false },
            ListElement { dayOfWeek: 5; repeat: false },
            ListElement { dayOfWeek: 6; repeat: false }
        ]
    }
    ListElement {
        hour: 6
        minute: 0
        day: 3
        month: 8
        year: 2018
        activated: true
        label: "Wake up"
        repeat: true
        daysToRepeat: [
            ListElement { dayOfWeek: 0; repeat: true },
            ListElement { dayOfWeek: 1; repeat: true },
            ListElement { dayOfWeek: 2; repeat: true },
            ListElement { dayOfWeek: 3; repeat: true },
            ListElement { dayOfWeek: 4; repeat: true },
            ListElement { dayOfWeek: 5; repeat: false },
            ListElement { dayOfWeek: 6; repeat: false }
        ]
    }
    ListElement {
        hour: 7
        minute: 0
        day: 3
        month: 8
        year: 2018
        activated: false
        label: "Exercise"
        repeat: true
        daysToRepeat: [
            ListElement { dayOfWeek: 0; repeat: true },
            ListElement { dayOfWeek: 1; repeat: true },
            ListElement { dayOfWeek: 2; repeat: true },
            ListElement { dayOfWeek: 3; repeat: true },
            ListElement { dayOfWeek: 4; repeat: true },
            ListElement { dayOfWeek: 5; repeat: true },
            ListElement { dayOfWeek: 6; repeat: true }
        ]
    }
    ListElement {
        hour: 5
        minute: 15
        day: 1
        month: 9
        year: 2018
        activated: true
        label: ""
        repeat: false
        daysToRepeat: [
            ListElement { dayOfWeek: 0; repeat: false },
            ListElement { dayOfWeek: 1; repeat: false },
            ListElement { dayOfWeek: 2; repeat: false },
            ListElement { dayOfWeek: 3; repeat: false },
            ListElement { dayOfWeek: 4; repeat: false },
            ListElement { dayOfWeek: 5; repeat: false },
            ListElement { dayOfWeek: 6; repeat: false }
        ]
    }
    ListElement {
        hour: 5
        minute: 45
        day: 3
        month: 9
        year: 2018
        activated: false
        label: ""
        repeat: false
        daysToRepeat: [
            ListElement { dayOfWeek: 0; repeat: false },
            ListElement { dayOfWeek: 1; repeat: false },
            ListElement { dayOfWeek: 2; repeat: false },
            ListElement { dayOfWeek: 3; repeat: false },
            ListElement { dayOfWeek: 4; repeat: false },
            ListElement { dayOfWeek: 5; repeat: false },
            ListElement { dayOfWeek: 6; repeat: false }
        ]
    }
}
TumblerDelegate.qml
TumblerDelegate defines the graphical properties of the Tumblers.
import QtQuick
import QtQuick.Controls
import QtQuick.Controls.Material

Text {
    required property int modelData
    required property int index
    text: modelData
    color: Tumbler.tumbler.Material.foreground
    font: Tumbler.tumbler.font
    opacity: 1.0 - Math.abs(Tumbler.displacement) / (Tumbler.tumbler.visibleItemCount / 2)
    horizontalAlignment: Text.AlignHCenter
    verticalAlignment: Text.AlignVCenter
}
Entering new alarms
At the bottom of the startup screen, you can see a Button for adding alarms. Click it to open the Add new alarm dialog.
    RoundButton {
        id: addAlarmButton
        text: "+"
        anchors.bottom: alarmListView.bottom
        anchors.bottomMargin: 8
        anchors.horizontalCenter: parent.horizontalCenter
        onClicked: alarmDialog.open()
    }
The dialog for new alarms:
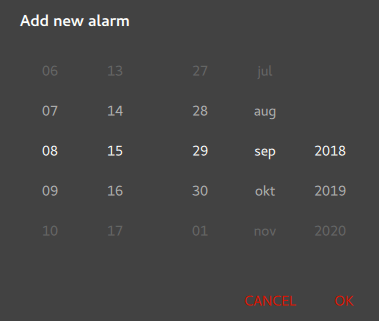
All fields are entered using Tumbler QML types. If you press OK, the values selected in the Tumblers are written to alarmModel.
    contentItem: RowLayout {
        RowLayout {
            id: rowTumbler

            Tumbler {
                id: hoursTumbler
                model: 24
                delegate: TumblerDelegate {
                    text: alarmDialog.formatNumber(modelData)
                }
            }
            Tumbler {
                id: minutesTumbler
                model: 60
                delegate: TumblerDelegate {
                    text: alarmDialog.formatNumber(modelData)
                }
            }
        }

        RowLayout {
            id: datePicker

            Layout.leftMargin: 20

            readonly property var days: [31, 29, 31, 30, 31, 30, 31, 31, 30, 31, 30, 31]

            Tumbler {
                id: dayTumbler

                function updateModel() {
                    // Populate the model with days of the month. For example: [0, ..., 30]
                    var previousIndex = dayTumbler.currentIndex
                    var array = []
                    var newDays = datePicker.days[monthTumbler.currentIndex]
                    for (let i = 1; i <= newDays; ++i)
                        array.push(i)
                    dayTumbler.model = array
                    dayTumbler.currentIndex = Math.min(newDays - 1, previousIndex)
                }

                Component.onCompleted: updateModel()

                delegate: TumblerDelegate {
                    text: alarmDialog.formatNumber(modelData)
                }
            }
            Tumbler {
                id: monthTumbler

                onCurrentIndexChanged: dayTumbler.updateModel()

                model: 12
                delegate: TumblerDelegate {
                    text: alarmDialog.locale.standaloneMonthName(modelData, Locale.ShortFormat)
                }
            }
            Tumbler {
                id: yearTumbler

                // This array is populated with the next three years. For example: [2018, 2019, 2020]
                readonly property var years: (function() {
                    var currentYear = new Date().getFullYear()
                    return [0, 1, 2].map(function(value) { return value + currentYear; })
                })()

                model: years
                delegate: TumblerDelegate {
                    text: alarmDialog.formatNumber(modelData)
                }
            }
        }
    }
}
Editing alarms
If you click on a particular alarm, you can edit it in the detail screen.
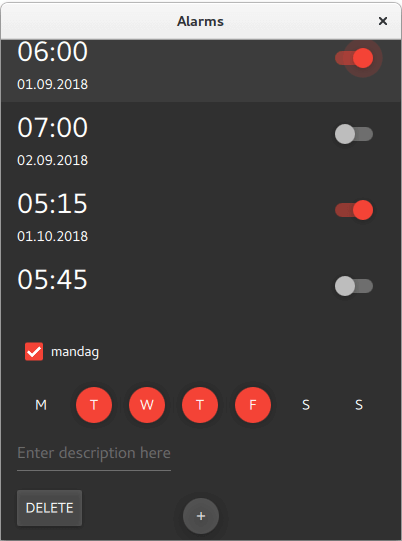
Clicking on an alarm sets root.checked to true, which makes visible the fields of the detail screen.
visible: root.checkedIf you want the alarm to trigger also on other days, check alarmRepeat. The Repeater will display a checkable RoundButton for each day of the week.
        Flow {
            visible: root.checked && root.repeat
            Layout.fillWidth: true

            Repeater {
                id: dayRepeater
                model: root.daysToRepeat
                delegate: RoundButton {
                    required property int dayOfWeek
                    required property bool repeat
                    text: Qt.locale().dayName(dayOfWeek, Locale.NarrowFormat)
                    flat: true
                    checked: repeat
                    checkable: true
                    Material.background: checked ? Material.accent : "transparent"
                    onToggled: repeat = checked
                }
            }
        }
If you modify the description of the alarm, it will be reflected in the main screen afterwards.
        TextField {
            id: alarmDescriptionTextField
            placeholderText: qsTr("Enter description here")
            cursorVisible: true
            visible: root.checked
            text: root.label
            onTextEdited: root.label = text
        }
Deleting alarms
The detail screen (see above) has a Button for deleting alarms. When onClicked is emitted, the current ListElement is deleted from alarmModel.
        Button {
            id: deleteAlarmButton
            text: qsTr("Delete")
            visible: root.checked
            onClicked: root.ListView.view.model.remove(root.ListView.view.currentIndex, 1)
        }
Next Steps
The app has no code for adding sound or vibration to the alarm, nor does it store the alarms in any format or database. Challenge yourself by adding these features to the project. Storing the data could be done in JSON format.
Source files
See also JSON Support in Qt, All Qt Examples, and Qt Quick Examples and Tutorials.
© 2026 The Qt Company Ltd. Documentation contributions included herein are the copyrights of their respective owners. The documentation provided herein is licensed under the terms of the GNU Free Documentation License version 1.3 as published by the Free Software Foundation. Qt and respective logos are trademarks of The Qt Company Ltd. in Finland and/or other countries worldwide. All other trademarks are property of their respective owners.
