Virtual Assistant
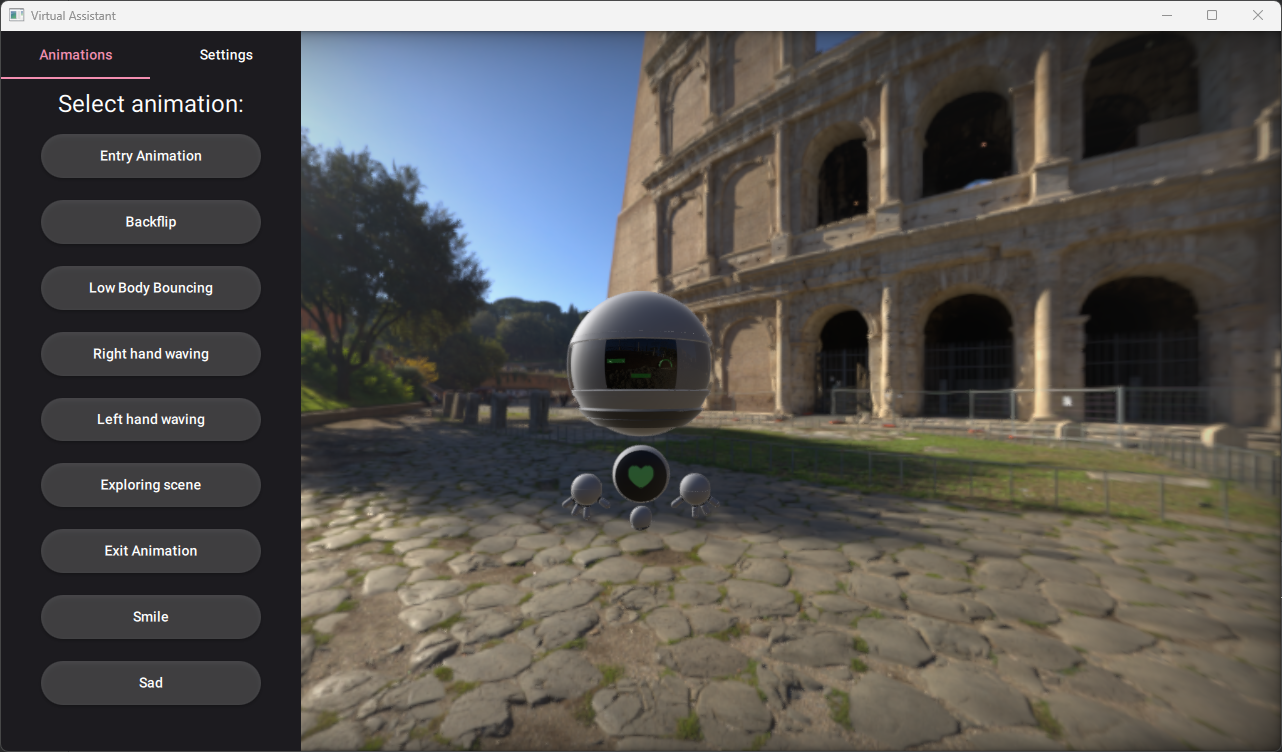
Qt Quick application that presents a 3D model of a virtual assistant with dynamic animations created using QML and timelines.

The Virtual Assistant example demonstrates how to bring a 3D model of a virtual assistant to life through timeline animations, increasing user engagement and interaction.
Importing 3D Model
To load the model in Qt Design Studio, it is enough to import the .gltf file to the project. Qt Design Studio then automatically creates a QML file that represents the object. It also generates the necessary assets. Without Qt Design Studio, you must manually run the Balsam tool. In this example, the generated QML file was modified to introduce the states, animations, and additional invisible models that allow picking specific parts of the Virtual Assistant.
Preparing Scene Environment
The scene uses HDR images to create a skybox and to provide natural lighting.
        environment: ExtendedSceneEnvironment {
            backgroundMode: SceneEnvironment.SkyBox
            lightProbe: Texture { source: Constants.sceneName }
            antialiasingMode: SceneEnvironment.MSAA
            antialiasingQuality: SceneEnvironment.VeryHigh
            fxaaEnabled: true
            probeExposure: 0.6
            probeOrientation: Qt.vector3d(0, settingsPanel.skyboxRotation, 0)
            specularAAEnabled: true
            tonemapMode: SceneEnvironment.TonemapModeLinear
            vignetteEnabled: true
            vignetteRadius: 0.15
        }
Camera Options
Camera properties can be changed from the Settings panel. You can manipulate the field of view (FOV) and skybox rotation using sliders. The checkbox enables an OrbitCameraController that allows you to also interactively change camera position and rotation.
Animations
The animations are created using multiple Timeline timelines and Keyframe keyframes. Each Timeline is connected with a different state of the Virtual Assistant. When the state changes, the connected animations start playing immediately. At the end of each animation, the object returns to the default state and restores the default values, such as position and rotation of the model nodes. The animations change the properties values of the nodes in our skeleton and modify the weight of different morph targets to animate the face elements (eyes, mouth).
Use the buttons on the Animations panel to run the animations. You also click on specific model elements like hands, lower body, and face to activate animation related to that part of the model.
Skeleton Animations
- Entry animation
- Exit animation
- Exploring scene animation
- Backflip animation
- Low body bouncing animation
- Right and left hand waving animation
Morph Target Animations
- Face animations (Happy and Sad)
Sample implementation of the waving animation on the model's left hand:
Timeline {
    id: leftHandWavingTimeline
    animations: [
        TimelineAnimation {
            id: leftHandWavingAnimation
            onFinished: node.restoreDefaults()
            running: false
            loops: 1
            duration: 2000
            to: 2000
            from: 0
        }
    ]
    startFrame: 0
    endFrame: 2000
    enabled: false

    KeyframeGroup {
        target: hand_l
        property: "x"
        Keyframe {
            value: 2.89
            frame: 400
        }

        Keyframe {
            value: 2.89
            frame: 1600
        }

        Keyframe {
            value: 1.89
            frame: 2000
        }
    }

    KeyframeGroup {
        target: hand_l
        property: "y"
        Keyframe {
            value: 1
            frame: 400
        }

        Keyframe {
            value: 1
            frame: 1600
        }

        Keyframe {
            value: 0.5
            frame: 2000
        }
    }

    KeyframeGroup {
        target: hand_l
        property: "z"
        Keyframe {
            value: 1
            frame: 400
        }

        Keyframe {
            value: 1
            frame: 1600
        }

        Keyframe {
            value: -0.1
            frame: 2000
        }
    }

    KeyframeGroup {
        target: hand_l
        property: "eulerRotation.x"
        Keyframe {
            value: -15
            frame: 400
        }

        Keyframe {
            value: -5
            frame: 700
        }

        Keyframe {
            value: -15
            frame: 1000
        }

        Keyframe {
            value: -5
            frame: 1300
        }

        Keyframe {
            value: -15
            frame: 1600
        }

        Keyframe {
            value: -0.18
            frame: 2000
        }
    }

    KeyframeGroup {
        target: hand_l
        property: "eulerRotation.y"
        Keyframe {
            value: -15
            frame: 400
        }

        Keyframe {
            value: -30
            frame: 1600
        }

        Keyframe {
            value: -145
            frame: 2000
        }

        Keyframe {
            value: -40
            frame: 700
        }
    }

    KeyframeGroup {
        target: hand_l
        property: "eulerRotation.z"
        Keyframe {
            value: -88
            frame: 400
        }

        Keyframe {
            value: -30
            frame: 700
        }

        Keyframe {
            value: -86.05
            frame: 1000
        }

        Keyframe {
            value: -30
            frame: 1300
        }

        Keyframe {
            value: -86.05
            frame: 1600
        }

        Keyframe {
            value: -178.92
            frame: 2000
        }
    }

    KeyframeGroup {
        target: morphTarget38
        property: "weight"
        Keyframe {
            value: 1
            frame: 0
        }

        Keyframe {
            value: 0.25
            frame: 400
        }

        Keyframe {
            value: 0.25
            frame: 1600
        }

        Keyframe {
            value: 1
            frame: 2000
        }
    }

    KeyframeGroup {
        target: morphTarget42
        property: "weight"
        Keyframe {
            value: 0
            frame: 2000
        }

        Keyframe {
            value: 0.75
            frame: 1600
        }

        Keyframe {
            value: 0.75
            frame: 400
        }

        Keyframe {
            value: 0
            frame: 0
        }
    }

    KeyframeGroup {
        target: morphTarget27
        property: "weight"
        Keyframe {
            value: 0
            frame: 0
        }

        Keyframe {
            value: 1
            frame: 400
        }

        Keyframe {
            value: 1
            frame: 1600
        }

        Keyframe {
            value: 0
            frame: 2000
        }
    }

    KeyframeGroup {
        target: morphTarget28
        property: "weight"
        Keyframe {
            value: 1
            frame: 2000
        }

        Keyframe {
            value: 0
            frame: 1600
        }

        Keyframe {
            value: 0
            frame: 400
        }

        Keyframe {
            value: 1
            frame: 0
        }
    }
}
© 2025 The Qt Company Ltd. Documentation contributions included herein are the copyrights of their respective owners. The documentation provided herein is licensed under the terms of the GNU Free Documentation License version 1.3 as published by the Free Software Foundation. Qt and respective logos are trademarks of The Qt Company Ltd. in Finland and/or other countries worldwide. All other trademarks are property of their respective owners.

