Edit Android manifest files
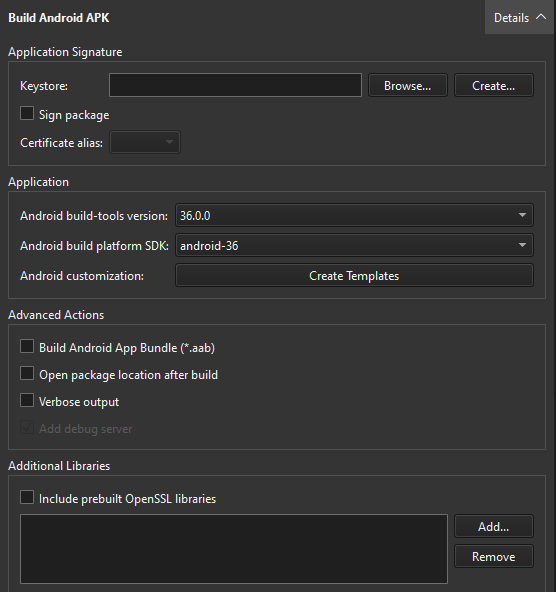
You can use the configuration options in Projects > Build Settings > Build Android APK to specify all the settings you need for the androiddeployqt tool during application development.
You only need an Android manifest file to specify Android-specific settings, such as the application icon or a splash screen.
However, you need the manifest file to publish the package in the Play Store.
If you use CMake as the build system, you must specify the Android package source directory, QT_ANDROID_PACKAGE_SOURCE_DIR, in the CMakeList.txt file.
Create a manifest file
To use Qt Creator to create an Android manifest file:
- Go to Projects > Build Settings > Build Android APK, and select Create Templates.
- Check the path in Android package source directory.
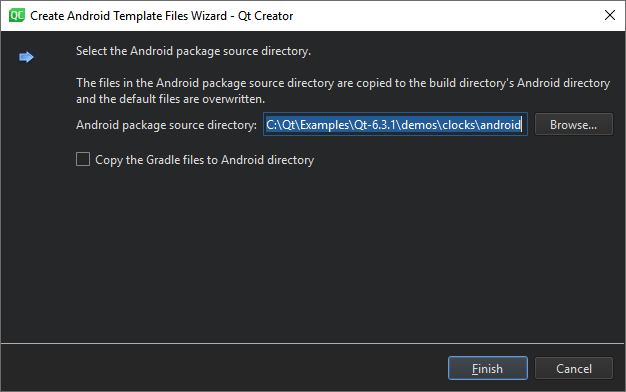
- Select Copy the Gradle files to Android directory if you plan to extend the Java part of your Qt application.
- Select Finish to copy the template files to the
androiddirectory and to open the manifest file in text format for editing.
Set manifest file options
To edit the manifest file:
- In Projects, select the manifest file.
- Go to Tools > Android > Manifest XML Source.
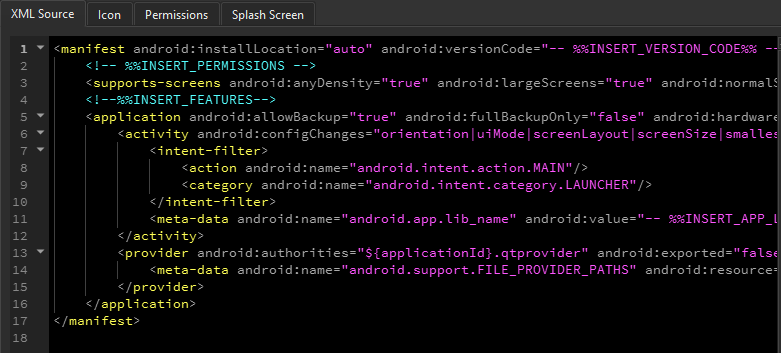
For more information about setting options in Android manifest files, see Qt for Android Manifest File Configuration.
You can use editors to set application icons, splash screens, and permissions.
Screen orientation
In the <activity> section, set the android:screenOrientation option to determine screen orientation depending on sensor readings or user preferences. The default value is unspecified.
Screen orientation options
| Orientation | Description |
|---|---|
unspecified | The system chooses the orientation. The policy it uses, and therefore the choices made in specific contexts may differ from device to device. |
behind | Use the same orientation as the activity that's immediately beneath it in the activity stack. |
landscape | Landscape orientation, where the display width is larger than its height. |
portrait | Portrait orientation, where the display height is larger than its width. |
reverseLandscape | Landscape orientation in the opposite direction of normal landscape. |
reversePortrait | Portrait orientation in the opposite direction of normal portrait. |
sensorLandscape | Landscape orientation, but it can be either normal or reverse landscape based on the device sensor. The sensor is used even if the user has locked sensor-based rotation. |
sensorPortrait | Portrait orientation, but it can be either normal or reverse portrait based on the device sensor. The sensor is used even if the user has locked sensor-based rotation. |
userLandscape | Landscape orientation, but it can be either normal or reverse landscape based on the device sensor and the user's preference. |
userPortrait | Portrait orientation, but it can be either normal or reverse portrait based on the device sensor and the user's preference. |
sensor | The orientation is determined by the device orientation sensor. The orientation of the display depends on how the user is holding the device. It changes when the user rotates the device. Some devices, however, will not rotate to all four possible orientations by default. To allow all four orientations, select the full sensor option. The sensor is used even if the user locked sensor-based rotation. |
fullSensor | The orientation is determined by the device orientation sensor for any of the four orientations. This is similar to the sensor option, except it allows any of the four possible screen orientations, regardless of what the device usually does. For example, some devices won't normally use reverse portrait or reverse landscape, but this option enables them. |
noSensor | The orientation is determined without reference to a physical orientation sensor. The sensor is ignored, so the display will not rotate based on how the user moves the device. |
user | The user's current preferred orientation. |
fullUser | If the user has locked sensor-based rotation, this option behaves in the same way as the user option. Otherwise, it behaves the same as the full sensor option and allows any of the four possible screen orientations. |
locked | Locks the orientation to its current rotation, whatever that is. |
Icons
To set images to use as application icons depending on screen density, go to Tools > Android > Icon.
![]()
You can set different images to be shown as application icons and splash screens on low, medium, high, and extra high DPI displays. The following list summarizes the DPI values typically associated with each category:
- Low-density (LDPI): ~120dpi
- Medium-density (MDPI): ~160dpi
- High-density (HDPI): ~240dpi
- Extra-high-density (XHDPI): ~320dpi
- Extra-extra-high-density (XXHDPI): ~480dpi
- Extra-extra-extra-high-density (XXXHDPI): ~640dpi
To generate a set of icons at the appropriate resolution for each pixel density from an image, select Select Master Icon.
To clear icons, select Clear Icon.
Splash screens
To specify settings for splash screens, go to Tools > Android > Splash Screen.
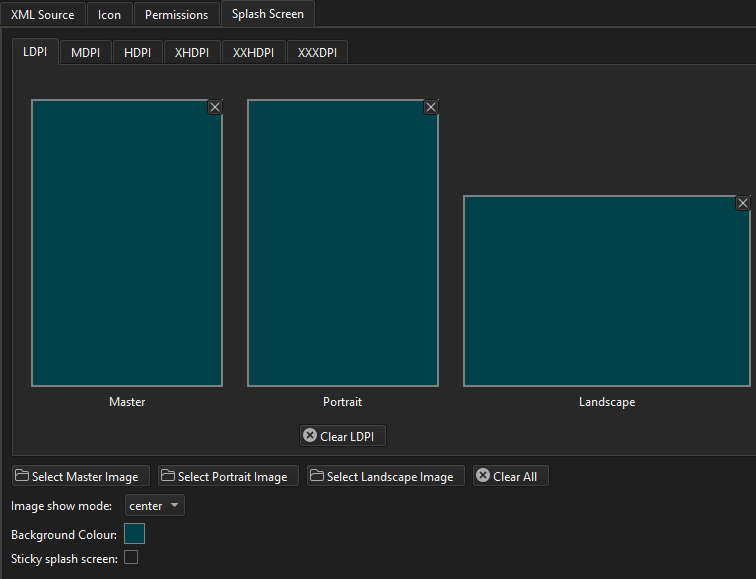
Select images to display as splash screens depending on the device orientation and screen resolution.
Select the images with the highest resolution in Select Master Image, Select Portrait Image, and Select Landscape Image.
In Image show mode, select whether to center the splash screen on the device display or scale it to fill the display.
Set a background color in Background color.
By default, drawing an activity hides the splash screen. To keep it visible until QNativeInterface::QAndroidApplication::hideSplashScreen() is called, select Sticky splash screen.
Select Clear All to reset all settings or remove all images.
Permissions
Starting from Android 6.0 (API 23), applications have to request permissions at runtime (see QCoreApplication::requestPermission()). Users must grant these permissions when installing the application for lower Android API levels. The Android OS then grants the application access to the appropriate data and features.
To set permissions:
- Go to Tools > Android > Permissions.
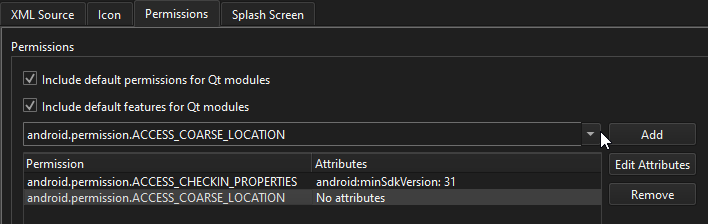
- Select a permission in the drop-down list, and then select Add to add it to the Permission list.
- Select the permission, and then select Edit Attributes to set attributes for the permission.
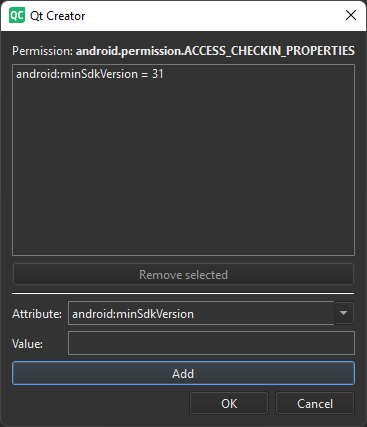
- In Attribute, select an attribute.
- In Value, enter a value for the attribute.
- Select Add to set the attribute and value.
- Select OK to add the attribute to the permission.
Select Include default permissions for Qt modules and Include default features for Qt modules to add the permissions needed by Qt libraries, such as android.permission.ACCESS_BACKGROUND_LOCATION for Qt Positioning.
See also How to: Develop for Android, Developing for Android, and Qt for Android Manifest File Configuration.
Copyright © The Qt Company Ltd. and other contributors. Documentation contributions included herein are the copyrights of their respective owners. The documentation provided herein is licensed under the terms of the GNU Free Documentation License version 1.3 as published by the Free Software Foundation. Qt and respective logos are trademarks of The Qt Company Ltd in Finland and/or other countries worldwide. All other trademarks are property of their respective owners.
