Use the ACP Client
With the ACP Client extension, you can chat with AI agents that understand your codebase and perform actions on your behalf, such as editing files, running commands, or triggering builds.
This topic walks you through setting up and using the ACP Client extension from activating the extension to having a productive chat session with an agent.
Prerequisites
- Activate the ACP Client extension in the Extensions mode. For more information about extensions, see Activate extensions.
- Recommended: Activate and set up the MCP Server extension if you want the agent to trigger Qt Creator actions such as building or running your project. For more information, see Set up Qt Creator MCP server.
Configure an agent
Before opening a chat, select an agent in Preferences. You can either pick one of the preconfigured agents or define a custom one.
Preconfigured agents
To set up a preconfigured agent:
- Go to Preferences > AI > ACP Servers.
- Select Add.
- In Template, select a preconfigured agent to use it with its default settings.
- Select Apply to save.
Custom agents
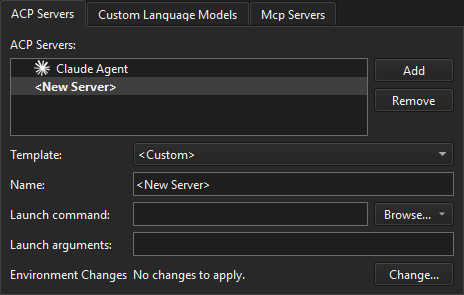
To set up a custom agent:
- Install the AI agent on the computer or network and check the connection to it.
- Go to Preferences > AI > ACP Servers.
- Select Add.
- In Template, select Custom.
- In Name, specify a name for your agent configuration.
- In Executable, specify the executable to launch the ACP server process.
- In Arguments, specify command-line arguments to pass when launching the ACP server process.
- In Environment Changes, select Change to add any environment variable changes needed for the agent process.
- Select Apply to save.
Connect to agents
The contents of the ACP registry determine the method to connect to a particular agent:
binarypackages are used directly without dependencies.npxNode.js packages require that you install Node.js.uvxPython packages require that you install the uv package manager and Python.
Note: Restart Qt Creator after you install dependencies.
npx
To check that you have Node.js, enter node --version on the command line.
If the AI agent cannot find the npx binary it uses to run the Claude agent even though the folder is in the PATH, add the npx directory to the path in Preferences > Environment > System. In Environment, select Change and add PATH+=<full-path-to-folder).
Claude CLI
You might need to install more dependencies to use some agents. For example, to authenticate to Claude, you must also install Claude Code CLI. To check that you have it, enter claude --version on the command line.
Open the ACP chat window
In Edit mode, you can open the ACP chat window in the following ways:
- Go to Tools > ACP Client > Show Agentic AI Chat in Side Panel.
- Select
") Agentic AI Chat in Side Panel" /> (Show Agentic AI Chat in Side Panel) in the editor toolbar when you have a file open.
Agentic AI Chat in Side Panel" /> (Show Agentic AI Chat in Side Panel) in the editor toolbar when you have a file open.
Connect to an ACP server
After you open the chat window for a project, connect to an ACP server.
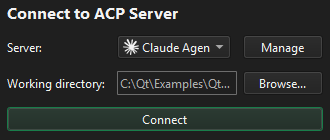
To connect to the ACP server:
- Select the agent you configured.
- Select Connect.
If an agent is not listed in Choose AI Agent, select Manage Agents to add it.
Qt Creator starts the agent process and establishes the ACP connection.
To start a new session, select  Add Chat and connect to a server.
Inspect ACP communication
An ACP Client extension sends messages (requests) to an ACP server and receives responses that have the requested information if the server is capable of handling the requests. To inspect the communication between the extension and ACP servers, go to Tools > ACP Client > Inspect ACP Client.
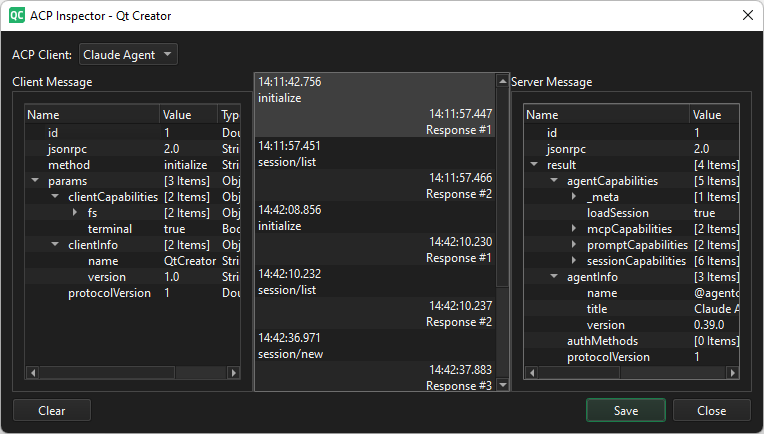
In ACP Client, select an ACP server to show a list of events. Select an event to view the client request in Client Message and the server response in Server Message.
To remove old entries, select Clear.
To save messages as a file, select Save.
Chat window toolbar
Once connected, the toolbar at the bottom of the chat window shows controls that you can adjust at any time during a session.

The different configuration options in the toolbar depend on the selected agent. To view more information about an option, hover over it to see its tooltip.
Chat with the agent
Type your message in the input field at the bottom of the chat window and select Send or Enter.
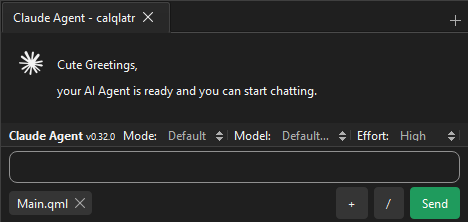
To insert a command to your message, select / and select a command from the list.
Context in messages
Qt Creator automatically attaches the current editor context to every message, so you can use natural references such as:
- Explain the current code.
- Refactor the selected block to use a range-based for loop.
- Why does the build fail? Fix it.
Note: This requires the MCP server extension so the agent can invoke the build system and read compiler output.
- Add unit tests for the function at the cursor.
- Review the visible code and suggest improvements.
To add more context to your message manually, select > Add file or Add remote file in Context.
Agent's responses
The agent's reply appears in the chat window.
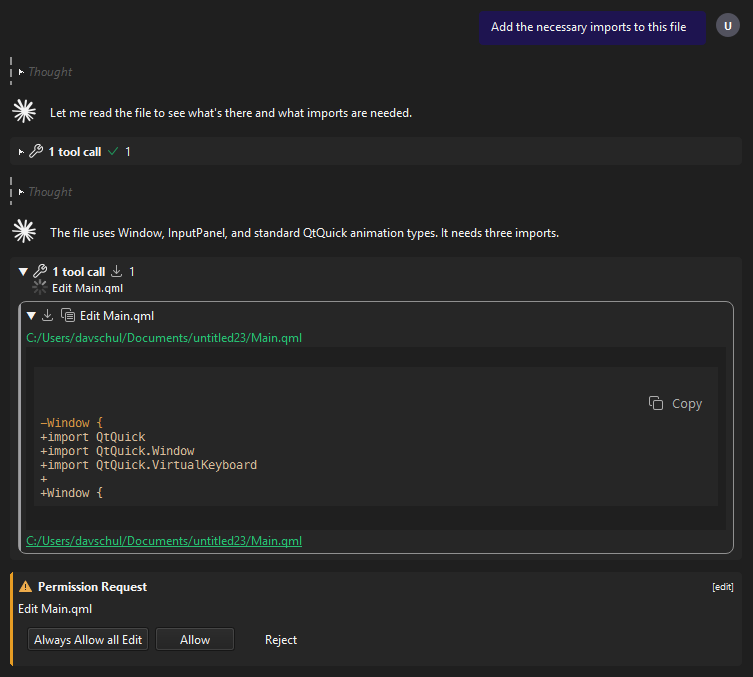
If the agent proposes file edits, you can review them in the chat window. Depending on the selected Mode, you might need to allow the agent to apply them.
Typical workflows
You can use the ACP Client for a wide range of tasks. Here are some example workflows to get you started.
Explain and explore
- Open any source file.
- Set Mode to Plan Mode to prevent accidental edits.
- Ask: Walk me through what this class does and identify any potential issues.
- Read the agent's analysis in the chat history.
Refactor with review
- Select the code you want to change.
- Set Mode to Default.
- Ask: Extract the selected code into a separate function called
processInput. - Review the proposed changes.
Build and fix
- Make sure both the ACP Client and the MCP Server extensions are active.
- Set Mode to Accept Edits.
- Ask: Build the project and fix any compiler errors.
- The agent triggers a build through the MCP server, reads the output, and applies fixes. Watch the progress in the chat history.
See also Activate extensions, How to: Use AI, and Qt for Python.
Copyright © The Qt Company Ltd. and other contributors. Documentation contributions included herein are the copyrights of their respective owners. The documentation provided herein is licensed under the terms of the GNU Free Documentation License version 1.3 as published by the Free Software Foundation. Qt and respective logos are trademarks of The Qt Company Ltd in Finland and/or other countries worldwide. All other trademarks are property of their respective owners.
