Tutorial: Creating an Installer
This tutorial describes how to create a simple installer for a small project:
This section describes the following tasks that you must carry out to create the installer:
- Create a package directory that will have all the configuration files and installable packages.
- Create a configuration file that has information about how to build the installer binaries and online repositories.
- Create a package information file that has information about the installable components.
- Create installer content and copy it to the package directory.
- Use the
binarycreatortool to create the installer.To create the installer pages, use the information set in the configuration and package information file.
You can find the example files in the examples\tutorial directory in the Qt Installer Framework repository.
Creating a Package Directory
Create a directory structure that reflects the design of the installer and allows for future extension. The directory must contain subdirectories called config and packages.
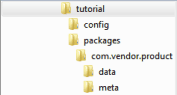
For more information about the package directory, see Package Directory.
Creating a Configuration File
In the config directory, create a file called config.xml with the following contents:
<?xml version="1.0" encoding="UTF-8"?>
<Installer>
<Name>Your application</Name>
<Version>1.0.0</Version>
<Title>Your application Installer</Title>
<Publisher>Your vendor</Publisher>
<StartMenuDir>Super App</StartMenuDir>
<TargetDir>@HomeDir@/InstallationDirectory</TargetDir>
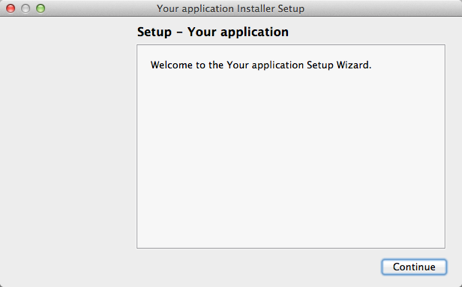
</Installer>The configuration file includes the following information for the introduction page:
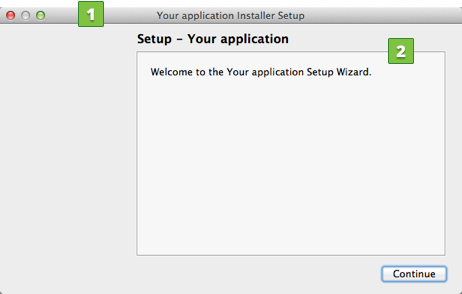
- The
<Title>element sets the installer name and displays it on the title bar (1). - The
<Name>element sets the application name and adds it to the page number and introduction text (2).
The other elements customize the behavior of the installer:
- The
<Version>element sets the application version number. - The
<Publisher>element sets the publisher of the software (as shown in the Windows Control Panel, for example). - The
<StartMenuDir>element sets the name of the default program group for the product in the Windows Start menu. - The
<TargetDir>element sets and displaysInstallationDirectoryin the home directory of the current user as the default target directory displayed to users (because it uses the predefined variable@HomeDir@as part of the value). For more information, see Predefined Variables.
For more information about the configuration file format and the available elements, see Configuration File.
Creating a Package Information File
In this easy scenario, the installer handles only one component, com.vendor.product. To give the installer information about the component, create a file called package.xml with the following contents and place it in the meta directory:
<?xml version="1.0" encoding="UTF-8"?>
<Package>
    <DisplayName>The root component</DisplayName>
    <Description>Install this example.</Description>
    <Version>0.1.0-1</Version>
    <ReleaseDate>2010-09-21</ReleaseDate>
    <Licenses>
        <License name="Beer Public License Agreement" file="license.txt" />
    </Licenses>
    <Default>script</Default>
    <Script>installscript.qs</Script>
    <UserInterfaces>
        <UserInterface>page.ui</UserInterface>
    </UserInterfaces>
</Package>
Below is a more detailed description of the elements in the example file. For more information about the package information file, see Package Information File Syntax.
Specifying Component Information
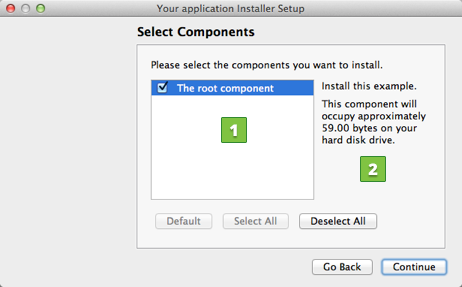
The component selection page displays information from the following elements:
- The
<DisplayName>element sets the name of the component in the component list (1). - The
<Description>element sets and displays text based on the selected component (2).
Specifying Installer Version
The <Version> element offers updates to users when they become available.
Adding Licenses
The <License> element sets the name of the file, which has the license agreement text (1). The license check page displays this license text.

Selecting Default Contents
The <Default> element specifies whether the selected component is a default value. The value true sets the component as selected. This example uses the value script to resolve the value during runtime. The <Script> element sets the name of the JavaScript script file, installscript.qs.
Creating Installer Content
The data directory of a component can store content available for installation. As there is only one component, place the data in the packages/com.vendor.product/data directory. The example already has a file for testing purposes, but you can place basically any files in the directory.
For more information about packaging rules and options, see Data Directory.
Creating the Installer Binary
You are now ready to create your first installer. Switch to the examples\tutorial directory on the command line. To create an installer called YourInstaller.exe that has the packages identified by com.vendor.product, enter the following command:
- On Windows:
..\..\bin\binarycreator.exe -c config\config.xml -p packages YourInstaller.exe
- On Linux or macOS:
../../bin/binarycreator -c config/config.xml -p packages YourInstaller
Qt Installer Framework creates the installer in the current directory and you can deliver it to end users.
For more information about using the binarycreator tool, see binarycreator.
Note: If an error message appears when you run the tutorial installer, check that you used a statically built Qt to create the installer. For more information, see Configuring Qt.
© 2021 The Qt Company Ltd. Documentation contributions included herein are the copyrights of their respective owners. The documentation provided herein is licensed under the terms of the GNU Free Documentation License version 1.3 as published by the Free Software Foundation. The Qt Company, Qt and their respective logos are trademarks of The Qt Company Ltd in Finland and/or other countries worldwide. All other trademarks are property of their respective owners.
