Qt Quick How-tos
This page aims to provide an easily discoverable, useful reference that shows the simplest and best way of performing specific tasks in Qt Quick. Each solution provides QML and/or C++ code snippets where applicable, and every snippet is automatically tested by Qt to ensure they remain functional.
How do I:
- Call a C++ function from QML when a Button is clicked
- See which item has active focus
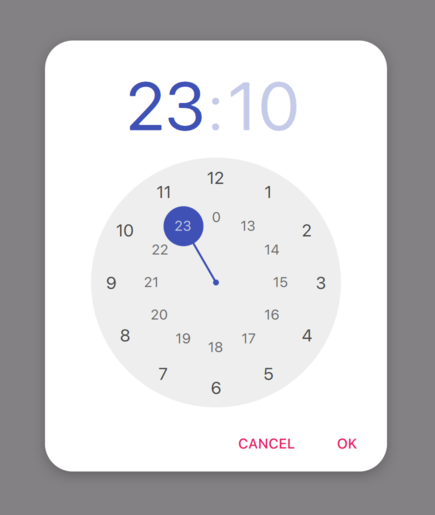
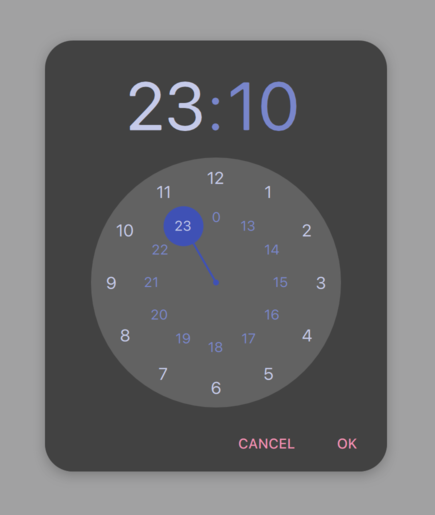
- Create a time picker like Android's TimePickerDialog
- Use a C++ enum in JavaScript
- Create a Gauge
Call a C++ function from QML when a Button is clicked
Assuming that the C++ type should be globally available to the QML files in the application, the simplest way is to make it a QML singleton with QML_SINGLETON. For example, in the header file, backend.h:
#include <QObject>
#include <QQmlEngine>

class Backend : public QObject
{
    Q_OBJECT
    QML_ELEMENT
    QML_SINGLETON

public:
    Q_INVOKABLE void doStuff();
};backend.cpp:
#include "backend.h"

#include <QDebug>

void Backend::doStuff()
{
    qDebug() << "Did stuff!";
}
You can then call that function from any QML file:
import QtQuick.Controls

import MyModule

ApplicationWindow {
    width: 400
    height: 400
    title: qsTr("C++ Button example")

    Button {
        text: qsTr("Click me")
        onClicked: Backend.doStuff()
    }
}
If the C++ type only needs to be available to a small set of QML files, consider using QML_ELEMENT. For more ways of exposing C++ types to QML, see Choosing the Correct Integration Method Between C++ and QML.
This example assumes that the Backend type is available in a QML module. With CMake, this is done via qt_add_qml_module. For an example that demonstrates this in detail, see Building a QML application.
See which item has active focus
Write a property change signal handler for the window's activeFocusItem property:
import QtQuick
import QtQuick.Controls

ApplicationWindow {
    width: 400
    height: 400
    visible: true
    title: qsTr("Active focus debugging example")

    onActiveFocusItemChanged: print("activeFocusItem: " + activeFocusItem)

    Row {
        TextField {
            objectName: "textField1"
        }
        TextField {
            objectName: "textField2"
        }
    }
}
This will print the item which currently has active focus to the console. To ensure that the output is useful, give each item a descriptive objectName.
Create a time picker like Android's TimePickerDialog
We've prepared an example that consists of a few QML files which demonstrate how to do this. They can be used in your application in the following manner:
import QtQuick
import QtQuick.Layouts
import QtQuick.Controls.Material

ApplicationWindow {
    id: window
    width: 600
    height: 600
    visible: true
    title: qsTr("Time Picker Example")

    Material.theme: darkThemeSwitch.checked ? Material.Dark : Material.Light

    // Shows the selected time and opens the dialog.
    TimeComponentLabel {
        id: openDialogLabel
        width: parent.width - 80
        anchors.centerIn: parent
        font.pixelSize: Qt.application.font.pixelSize * 8
        renderTypeQuality: Text.VeryHighRenderTypeQuality
        interactive: !timePickerDialog.opened

        text: Qt.formatTime(new Date(1970, 1, 1, timePickerDialog.hours, timePickerDialog.minutes), "hh:mm")

        onTapped: timePickerDialog.openWithMode(TimePicker.Mode.Hours)
    }

    ColumnLayout {
        // We always want the openDialogLabel to be centered in the window, not us.
        // For that reason, we use anchors rather than putting the root items into a ColumnLayout.
        anchors.horizontalCenter: parent.horizontalCenter
        anchors.top: openDialogLabel.bottom
        anchors.topMargin: 24
        spacing: 12

        Switch {
            id: is24HourSwitch
            text: qsTr("24 Hour")
            checked: timePickerDialog.is24Hour
        }
        Switch {
            id: darkThemeSwitch
            text: qsTr("Dark")
        }
    }

    TimePickerDialog {
        id: timePickerDialog
        anchors.centerIn: parent
        is24Hour: is24HourSwitch.checked

        onTimeAccepted: print("A time was chosen - do something here!")
    }
}
TimePickerDialog in its light theme. |
TimePickerDialog in its dark theme. |
Use a C++ enum in JavaScript
To expose a C++ enum to JavaScript (that is, QJSEngine, not QQmlEngine or QQmlApplicationEngine), use newQMetaObject() and registerModule():
    QJSEngine engine;
    engine.installExtensions(QJSEngine::AllExtensions);

    QJSValue metaObjects = engine.newObject();
    const QJSValue backendJsMetaObject = engine.newQMetaObject(&Backend::staticMetaObject);
    metaObjects.setProperty("Backend", backendJsMetaObject);
    // Repeat the two lines above for other types as needed.
    engine.registerModule("MyApp", metaObjects);

    Backend backend(&engine);
    const bool loaded = backend.load();
The enum can then be used from JavaScript:
export function backendStatusUpdate(backendStatus) {
    if (backendStatus === Backend.Error) {
        console.warn("Error!")
        return
    }

    console.log("Backend loaded successfully")
}
When using QQmlEngine or QQmlApplicationEngine, there are easier options; see Choosing the Correct Integration Method Between C++ and QML for more information.
backend.h:
#include <QObject>
#include <QJSEngine>

class Backend : public QObject
{
    Q_OBJECT

public:
    Backend(QJSEngine *engine);

    enum Status {
        Unknown,
        Error,
        Loading,
        Loaded
    };

    Q_ENUM(Status)

    bool load();

private:
    QJSEngine *mEngine = nullptr;
};backend.cpp:
#include "backend.h"

Backend::Backend(QJSEngine *engine) :
    mEngine(engine)
{
}

bool Backend::load()
{
    // Do some loading here...

    const QJSValue module = mEngine->importModule(":/script.mjs");
    if (module.isError()) {
        qWarning() << "Error loading script.mjs:" << module.toString();
        return false;
    }

    const QJSValue function = module.property("backendStatusUpdate");
    if (!function.isCallable()) {
        qWarning() << "backendStatusUpdate script function is not callable!";
        return false;
    }

    const QJSValue functionResult = function.call(QJSValueList() << Loaded);
    if (functionResult.isError()) {
        qWarning() << "backendStatusUpdate script function had errors:" << functionResult.toString();
        return false;
    }

    return true;
}
For more information, see QObject Integration.
Create a Gauge
We've prepared an example that consists of a few C++ and QML files which demonstrate how to do this. They can be used in your application in the following manner:
import QtQuick.Controls

import GaugeHowTo

ApplicationWindow {
    width: 400
    height: 400
    title: qsTr("Gauge example")

    Gauge {
        minimumValue: 0
        value: 75
        maximumValue: 100
    }
}
© 2026 The Qt Company Ltd. Documentation contributions included herein are the copyrights of their respective owners. The documentation provided herein is licensed under the terms of the GNU Free Documentation License version 1.3 as published by the Free Software Foundation. Qt and respective logos are trademarks of The Qt Company Ltd. in Finland and/or other countries worldwide. All other trademarks are property of their respective owners.


