Annotate layers
 Development
 Figma to Qt converts Figma layers into QML types. You can annotate layers to fine-tune the conversion process for design elements that are not part of the Figma file, such as 3D models or a map view. Typically, designers use an image of the external element in Figma to show developers where to implement it in the final application.
You can specify advanced layer settings to instruct the plugin on how to convert layers that refer to external elements. To change the advanced settings, you must know QML. Usually, you don't need to change them and can safely use the default values.
The effects the settings take depend on whether you preview or download the converted code:
- When you select
 (Preview), the plugin converts the layer into an Image. It does not add import statements or properties because the live preview might not have access to the specified QML modules and types.
 - When you select
 (Download), the plugin converts the layer into the QML type that you specify and adds the necessary import statement. Also, it adds the properties that you specify.
Set the QML type to use
The plugin analyzes the design and determines which QML types to convert each layer into based on the results of the analysis.
To override the decision of the plugin and always convert a layer into a particular QML type:
- In Figma, select a single layer.
- In the plugin, select
 (Home) > Advanced layer settings.
 - In Custom QML type, enter the name of the QML type to convert the layer into.
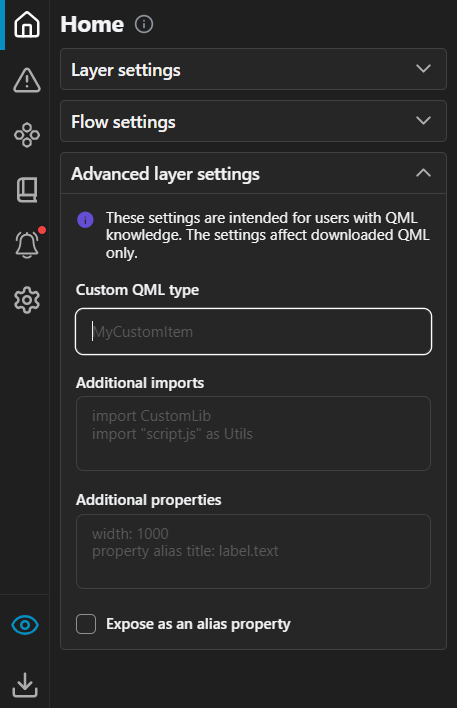
Advanced layer settings on the plugin Home page.
- In Additional imports, enter the import statement for the QML module that contains the selected QML type.
For example, to use a web view in an application, enter WebView as the type name and import QtWebView as the import statement.
The specified types take precedence if type names conflict.
Import QML modules
When the plugin converts the design into QML, it imports the QML modules that contain the QML types it needs. Usually, you can see the following import statement at the top of a QML file in the live preview code view: import QtQuick.
If you add QML properties or use QML types from modules that the plugin does not implicitly import, you can declare the required imports as annotations. You can import QML modules from Qt, as well as your own custom modules.
To add import statements:
- In Figma, select a single layer.
- In the plugin, select (Home) > Advanced layer settings.
- In Additional imports, add import statements to import one or several QML modules.
Note: This setting takes no effect if you skip this layer or its parent.
Add QML properties
Each QML type has a set of properties that you can specify values for. You can add custom properties that would not otherwise exist for a particular type.
Developers can bind the properties to dynamic expressions to define global properties for a component that can be read by other components. For example, you can specify global properties for the root component that you can use in the child components.
Similarly, you can add custom properties for your own components that are based on QML types.
Any content that is data-driven should be exported as a public property (alias property) of the relevant component.
To add custom properties:
- In Figma, select a single layer.
- In the plugin, select (Home) > Advanced layer settings.
- In Additional properties, enter the name and value type of each property.
For more information about supported value types, see Qt: QML Value Types.
Note: This setting takes no effect if you skip this layer or its parent.
Examples of properties
To add a property that sets the value of a counter as an integer number, with the default value 5, enter:
property int counter: 5To add a property that sets a string as label text, with the default value OK, enter:
property string label: "OK"To add a property that sets antialiasing to true, enter:
antialiasing : trueTo add a property that sets the width of a component to half the width of its parent, enter:
width: parent.width / 2Developers can use the properties also to add the UI logic. For example, a speedometer should have an int or real property for speed to which the UI is bound.
Expose a component as an alias
In QML, components often encapsulate complex hierarchies of child components. To allow external code to access or modify child components that are deeply nested within the component's internal structure, you can export a QML type as a property alias of the parent component. The plugin creates an alias of the QML type generated from the selected layer in its parent component.
To expose a child component as if it were a part of the parent component's public interface:
- In Figma, select a single layer.
- In the plugin, select (Home) > Advanced layer settings.
- Select Expose as an alias property.
An example of a property alias
The following alias refers to a button component instance within an item component instance:
property alias button: item.buttonSee also Download converted designs and Preview converted designs.
© 2026 The Qt Company Ltd. Documentation contributions included herein are the copyrights of their respective owners. The documentation provided herein is licensed under the terms of the GNU Free Documentation License version 1.3 as published by the Free Software Foundation. Qt and respective logos are trademarks of The Qt Company Ltd in Finland and/or other countries worldwide. All other trademarks are property of their respective owners.
