
Getting Started with Qt ROS2
Qt ROS2 Bridge lets a Qt application join a ROS 2 graph and exchange messages directly from QML. This page takes you from a clean machine to a running application that publishes a topic.
Note: This documentation describes a build against ROS 2 Jazzy. The commands below name that distribution explicitly. If you install a different one, substitute its name. See the ROS 2 Jazzy documentation.
Prerequisites
- Ubuntu 24.04 or 26.04.
- ROS 2 Jazzy.
- Qt 6.8 or later, including the Qt Quick and Qt Qml modules.
- A C++ toolchain, CMake, Git, and Ninja.
Install the toolchain packages first:
sudo apt update
sudo apt install -y build-essential cmake git ninja-build
Installing ROS 2
Add the ROS 2 apt repository by following the installation instructions in the ROS 2 Jazzy documentation, then install the desktop and development packages:
sudo apt install -y ros-jazzy-desktop ros-dev-toolsSource the ROS 2 environment in every shell that builds or runs Qt ROS2:
source /opt/ros/jazzy/setup.bashInstalling Qt
Install Qt 6.8 or later with the online installer from qt.io. Select the Desktop gcc 64-bit component together with the Qt Quick and Qt Qml modules.
Building the module
Qt ROS2 builds as a Qt module with qt-configure-module. CMake has to find the ROS 2 libraries, and there are two ways to arrange that.
The first way sources the ROS 2 environment, which is the option to prefer for day-to-day development:
source /opt/ros/jazzy/setup.bash

mkdir -p ~/qtros_build && cd ~/qtros_build
~/Qt/6.12.0/gcc_64/bin/qt-configure-module /path/to/qtros

cmake --build . --parallel
cmake --install .
The second way passes the path explicitly, which suits continuous integration and any environment where sourcing a shell script is awkward:
mkdir -p ~/qtros_build && cd ~/qtros_build
~/Qt/6.12.0/gcc_64/bin/qt-configure-module /path/to/qtros \
    -DROS2_PATH=/opt/ros/jazzy

cmake --build . --parallel
cmake --install .
Adjust the Qt path to match your installation.
Note: cmake --install . applies to prefix builds, which means any build against an installed Qt. An in-tree build, where this module builds as part of a Qt source tree, needs no install step because the files land in the build tree already.
Setting up an application project
An application links the Ros2Core module and declares which ROS 2 capabilities and message modules it needs:
find_package(Qt6 REQUIRED COMPONENTS Quick Ros2Core)

qt_standard_project_setup(REQUIRES 6.8)

qt_add_executable(apphello main.cpp)

qt_add_qml_module(apphello
    URI hello
    QML_FILES
        Main.qml
)

qt_ros2_configure_target(apphello
    CAPABILITIES PUBLISHER
    MODULES QtRos2GeometryMessages
)

target_link_libraries(apphello PRIVATE Qt6::Quick)
qt_ros2_configure_target takes three lists:
CAPABILITIESdeclares what the application does. Valid values areMESSAGES,PUBLISHER,SUBSCRIBER,SERVICE,SERVER, andACTION.MODULESnames the generated message modules to link, such asQtRos2GeometryMessagesorQtRos2StandardServices.IMPORT_PACKAGESnames third-party ROS 2 interface packages to wrap, for packages that Qt ROS2 does not ship a module for.
Writing your first publisher
Everything that faces ROS 2 lives inside a Node. A publisher is a child of the node, and the node owns the underlying rclcpp publisher and tears it down for you:
import QtQuick
import QtQuick.Controls
import QtRos2.GeometryMsgs

Window {
    width: 400
    height: 200
    visible: true

    Node {
        id: rosNode
        nodeName: "hello_node"

        PoseStampedPublisher {
            id: posePublisher
            topic: "/hello_pose"
        }
    }

    Button {
        anchors.centerIn: parent
        text: "Publish"
        enabled: rosNode.initialized
        onClicked: posePublisher.publish({
            header: { frameId: "map" },
            pose: {
                position:    { x: 1.0, y: 2.0, z: 0.5 },
                orientation: { x: 0.0, y: 0.0, z: 0.0, w: 1.0 }
            }
        })
    }
}
Three details matter here:
- Message value types are constructible from plain JavaScript objects, so you never build a message imperatively. Field names use Qt's
camelCasespelling, soframeIdrather thanframe_id. rosNode.initializedguards the button, so the application cannot publish before the ROS 2 context is ready.PoseStampedPublisheris a stamped publisher, so it fillsheader.stampfrom the ROS 2 node clock at publish time. That is why the snippet leaves the stamp unset.
A QML application does not declare a context. Declaring a Node initializes the process-wide context on demand. A C++ application that creates entities before loading any QML, or that forwards ROS 2 command-line arguments, calls QRos2Context::init() from main() instead.
Running the application
- Source the ROS 2 environment in the shell you run from.
- Build and run the application.
- Watch the topic from a second, ROS-sourced terminal:
ros2 topic echo /hello_pose
Each press of the button prints one message in the second terminal.
Developing with Qt Creator
Launch Qt Creator from a shell that has already sourced the ROS 2 environment, so it inherits the paths to the ROS 2 libraries and the generated QML modules:
source /opt/ros/jazzy/setup.bash
~/Qt/Tools/QtCreator/bin/qtcreator
Rebuild the module after you change Ros2Core, change a generator template, or wrap a new message package. Application development against the generated types needs no rebuild of the module.
Next steps
Simple Publisher is the next step up from the snippet above: the same publisher, wrapped in a UI that lets you edit the topic and frame, watch the subscriber count, and see each message as you send it.
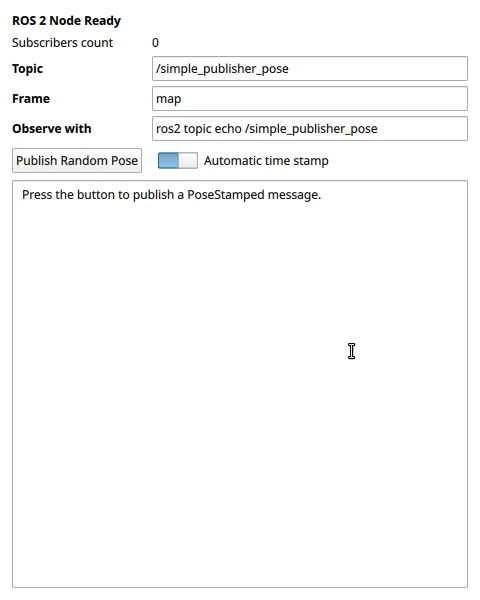
- Simple Publisher and Simple Subscriber show both ends of a topic in two windows.
- Choosing a Communication Pattern explains when to reach for a topic, a service, an action, or a parameter.
- Qt ROS2 Examples lists every example.
- Qt ROS2 QML Types is the API reference.
See also Qt ROS2 Examples and Choosing a Communication Pattern.
© 2026 The Qt Company Ltd. Documentation contributions included herein are the copyrights of their respective owners. The documentation provided herein is licensed under the terms of the GNU Free Documentation License version 1.3 as published by the Free Software Foundation. Qt and respective logos are trademarks of The Qt Company Ltd. in Finland and/or other countries worldwide. All other trademarks are property of their respective owners.
