Qt Interface Framework Simulation System
When you develop new APIs, a service that the API requires may not exist yet. This is because, the API is already designed but the service itself is still being developed. For example, with new concepts like Autonomous Driving, the UI interaction and its API are designed, but the Autonomous Drive Service is not yet completed. This development cycle requires the need to separate the API development from the service. The Dynamic Backend System provides the architecture to enable this separation.
Once we have this separation in place, the next step for developing the API is a way to simulate its behavior to mirror the original service. The Qt Interface Framework Simulation System enables the following use cases:
- An easy to define simulation logic in QML.
- A flexible system to provide simulation for any C++ API.
- A clear split between simulation data and simulation logic.
- An override mechanism to change the simulation at runtime; useful for auto-tests.
- An integration with the Qt Interface Framework Generator tools.
Architecture
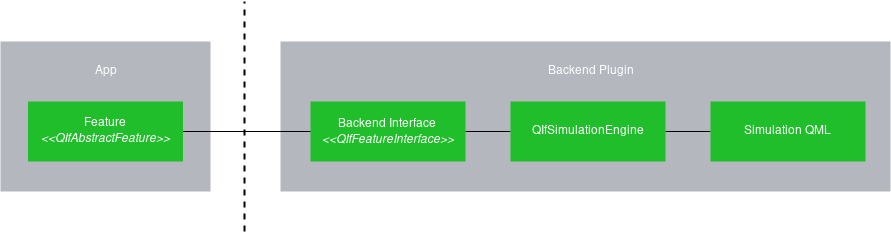
Since the simulation system builds on top of the Dynamic Backend System, the API split follows the same schema:
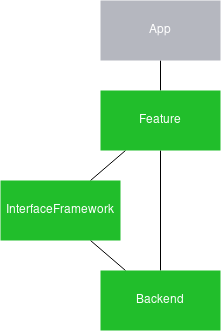
Each back-end plugin needs to implement the back-end interface to provide the necessary functionality to the front end. For example, the QIfClimateControlBackendInterface class for the QIfClimateControl front-end API.
In the back end, every call from the front end is forwarded to QML, where we can script simulation behavior.
QML API
The core of the Qt Interface Framework Simulation System is the QIfSimulationEngine. This engine extends QQmlApplicationEngine and provides the extra functionality to connect C++ and QML logic together.
Each back end uses its own simulation engine to separate the front-end code from the back-end QML code. To provide a binding between QML and C++ objects, the C++ instance must be registered with the QIfSimulationEngine under a certain name. For each registered C++ instance, the engine creates a proxy object and exposes it as a QML type. These QML types can be used to provide the behavior for functions or to update properties.
For example, suppose your feature has a function called increment() and a property called counter. The actual behavior for increment() is implemented in the back end:
void increment() {
    counter++;
}
When we auto-generate classes, the actual behavior of increment() cannot be auto-generated, because there's no way to tell the autogenerator the kind of behavior this function should have. To define this behavior, you need to implement a complete back end in C++.
The QIfSimulationEngine makes this task more flexible: It utilizes scripting to forward all of the C++ calls to QML, allowing you to use QML to define the behavior. Consequently, you can override the behavior and also script a default behavior without touching any of the C++ code.
For more information on working with the simulation engine, see QIfSimulationEngine.
Separating Data from Logic
The simulation system makes it possible to separate the simulation business logic from the simulation data. The simulation data is stored in JSON files. This is required for the QIfSimulationEngine::loadSimulationData() function to load. Once the simulation data is loaded, the IfSimulator global object provides the content to all QML simulation files. More information about the Data format can be found here
For example, you can use the IfSimulator::findData function to read the data for a specific interface only:
property var settings : IfSimulator.findData(IfSimulator.simulationData, "QIfClimateControl")Boundary Checks
The IfSimulator global object also provides functions to make boundary checks easier. The property boundaries are defined in the JSON files, while the QML code stays generic, to work with multiple different boundary checks:
function setAirConditioningEnabled(airConditioningEnabled) {
    if (IfSimulator.checkSettings(airConditioningEnabled, settings["airConditioningEnabled"])) {
        console.log("SIMULATION airConditioningEnabled changed to: " + airConditioningEnabled);
        backend.airConditioningEnabled = airConditioningEnabled
    } else {
        setError("SIMULATION changing airConditioningEnabled is not possible: provided: " + airConditioningEnabled + " constraint: " + IfSimulator.constraint_string(settings["airConditioningEnabled"]));
    }
}
Use the IfSimulator::checkSettings() function to check the specified airConditioningEnabled value against the boundaries defined in the JSON file. If the value is within the boundaries, then it is updated; otherwise an error is returned together with the constraint in a human-readable form.
For more information about simulation and the data format, see IfSimulator.
Override Mechanism
For app development or unit testing, it is often useful to trigger a certain behavior in the back end. For example, when implementing message boxes for error recovery, the app developer may need a way to easily trigger this exact error condition. Suppose that the simulation behavior provided by the back-end developer, for this use case, is not sufficient.
In this case, the Qt Interface Framework Simulation System provides an override system to load your own simulation behavior file or data file, via an environment variable.
Each QIfSimulationEngine can have an additional identifier to override the default behavior file or data file, using the following environment variables:
QTIF_SIMULATION_OVERRIDE=<identifier>=<file>[;<identifier>=<file>]
QTIF_SIMULATION_DATA_OVERRIDE=<identifier>=<file>[;<identifier>=<file>]
Integrate with Qt Interface Framework Generator
The simulation system is already integrated into the Qt Interface Framework Generator tools and it is used automatically when generating code with the backend_simulator format.
The auto-generated plugin uses the QFace module name as the QIfSimulationEngine identifier, to allow overriding at runtime.
All boundary annotations defined in config_simulator are then transformed into a JSON file, and embedded as a resource file into the back end.
For each interface, a QML simulation file is created, providing a default implementation to check the boundaries of each property.
Define Your Own Simulation Files
It's not always convenient to use the autogenerated QML simulation files. You can also define your own QML file by using the simulationFile annotation.
Note: If your QFace file provides multiple interfaces, the corresponding simulation file must provide a simulation for all of these interfaces.
To reuse the auto-generated simulation files from an existing interface as a starting point, you can load these auto-generated simulation files using a QML import statement:
import 'qrc:/simulation/'Afterwards you should be able to load your modified simulation files like a regular QML file.
Simulation Control Panel
Note: This component is currently in Technology Preview. Its API and behavior may change in future releases.
When developing and testing interfaces, it is useful to inspect and modify property values at runtime without writing custom test UIs. The simulation control panel provides an automatically generated GUI that displays every property of every interface in the module, with the appropriate editor control for each property type.

Enabling the Control Panel
The control panel is an opt-in feature. To enable it, add the controlPanel annotation to the config_simulator block at the module level in your QFace IDL file:
@config_simulator: { controlPanel: true }
module Example.If.VehicleDashboard 1.0;
When controlPanel is set to true, the backend_simulator code generator produces three additional files alongside the usual simulation files:
| Filename | Purpose |
|---|---|
| _controlpanel.qml | The control panel UI, built from ControlPanelHelper components. Contains the layout and property editors for all interfaces in the module. |
| ControlPanelBase.qml | Base component that defines the control panel window structure. This is the file that the loader instantiates. |
| ControlPanelLoader.qml | A small helper that loads the control panel at startup and connects backend instances. The module simulation file creates this loader automatically. |
No additional CMake configuration or linking is required. The ControlPanelHelper module is a pure QML module that is resolved at runtime.
How It Works
The generated module simulation file creates a ControlPanelLoader instance and passes all interface backends to it:
QtObject {
    property var climatecontrol : ClimateControlSimulation { }
    property var vehiclestatus : VehicleStatusSimulation { }

    property var controlPanelLoader: VehicledashboardControlPanelLoader {
        climatecontrolBackend: climatecontrol
        vehiclestatusBackend: vehiclestatus
    }
}
The loader opens a separate window containing the control panel UI. The panel shares the same backend objects as the running application, so changes made in either the application or the control panel are reflected in the other immediately.
Property Type Mapping
The control panel selects the editor control based on the property type and its config_simulator annotations:
| Property Type / Annotation | Control |
|---|---|
bool | BooleanControl (toggle switch) |
enum / flag | ComboBoxControl (drop-down) |
int or real with @range | SpinControl (spin box with min/max) |
int with @minimum and/or @maximum | SpinControl |
int or real with @domain | ComboBoxControl (discrete values) |
string, int, or real (no annotation) | TextControl (text field with validation) |
struct | StructControl (collapsible field editor) |
list<type> | ListControl (add/remove/edit list) |
model<type> | ModelControl (add/remove/update model entries) |
Property with unsupported: true | UnsupportedControl (placeholder) |
Zoned Interfaces
For interfaces annotated with @config: { zoned: true }, the control panel provides a zone selector in the toolbar. Selecting a zone displays the per-zone property values for that zone.
Properties annotated with @config_simulator: { zoned: false } at the property level are displayed in a separate "Non-Zoned Properties" section, as they are shared across all zones.
Custom Property Editors
If the built-in controls do not fit a particular property, you can replace the default editor with a custom component. The generated control panel exposes a Component property for each property that, when set, overrides the default editor.
The custom component must inherit from CustomControlPanelComponent. This base type provides:
backendObject— Reference to the backend instance.backendProperty— The current property value, kept in sync automatically.setValue(value)— Convenience function to call the backend setter, handling zoned and non-zoned cases.
Custom Control Panel File
To replace the entire control panel UI, specify a custom QML file using the controlPanelFile annotation:
@config_simulator: { controlPanel: true, controlPanelFile: "qrc:/my_controlpanel.qml" }
module Example.If.VehicleDashboard 1.0;
The loader will load the specified file instead of the generated one. The custom file receives all backend instances as properties, following the same naming convention.
Example
The Qt Interface Framework Vehicle Dashboard Example demonstrates the control panel feature with a complete vehicle dashboard application. It defines two interfaces — a zoned ClimateControl and a non-zoned VehicleStatus — covering all supported property types including bool, enum, int, real, string, struct, list, and model.
The example also shows how to customize the control panel: it replaces the default StructControl for the tirePressure property with a custom arc-gauge editor built on CustomControlPanelComponent, and uses the controlPanelFile annotation to load the custom panel file instead of the auto-generated one.
© 2026 The Qt Company Ltd. Documentation contributions included herein are the copyrights of their respective owners. The documentation provided herein is licensed under the terms of the GNU Free Documentation License version 1.3 as published by the Free Software Foundation. Qt and respective logos are trademarks of The Qt Company Ltd. in Finland and/or other countries worldwide. All other trademarks are property of their respective owners.
