Qt Quick 3D - XR Advanced Touch
Demonstrates touch on curved displays and 3D model touch handling.
This example builds on the XR Simple Touch Example to demonstrate more advanced touch interaction techniques in Qt Quick 3D Xr:
- Touch interaction with 2D UI elements rendered on a curved 3D surface.
- Direct touch handling on 3D models using UV coordinates.
- Grabbing and manipulating 3D objects using pinch gestures.
- Creating procedural curved meshes for immersive displays.
- Building custom paintable textures with C++.
Curved Display with Source Item
One of the key features of this example is displaying a 2D user interface on a curved surface. We create a custom procedural mesh component, CurvedMesh, that generates a curved plane:
// Copyright (C) 2025 The Qt Company Ltd.
// SPDX-License-Identifier: LicenseRef-Qt-Commercial OR BSD-3-Clause

import QtQuick
import QtQuick3D
import QtQuick3D.Helpers

ProceduralMesh {
        property real partitions: 50
        property real segments: 1
        property real radius: 50.0
        property real height: 50.0
        property real width: 80
        property var meshArrays: generateMesh(partitions , width, height, radius)
        positions: meshArrays.verts
        normals: meshArrays.normals
        uv0s: meshArrays.uvs
        indexes: meshArrays.indices

        function generateMesh(partitions : real, width: real, height: real, radius: real) : var {
            let verts = []
            let normals = []
            let uvs = []
            let indices = []

            // width = angleSpan * radius
            const angleSpan = width / radius

            for (let i = 0; i <= partitions ; ++i) {
                for (let j = 0; j <= 1; ++j) {
                    const u = i / partitions ;
                    const v = j;

                    const x = u - 0.5 // centered
                    const angle = x * angleSpan

                    const posZ = radius - radius * Math.cos(angle)
                    const posY = height * v
                    const posX = radius * Math.sin(angle)

                    verts.push(Qt.vector3d(posX, posY, posZ));

                    let normal = Qt.vector3d(0 - posX, 0, radius - posZ).normalized();
                    normals.push(normal);

                    uvs.push(Qt.vector2d(u, v));
                }
            }

            for (let i = 0; i < partitions ; ++i) {
                let a = (segments + 1) * i;
                let b = (segments + 1) * (i + 1);
                let c = (segments + 1) * (i + 1) + 1;
                let d = (segments + 1) * i + 1;

                // Generate two triangles for each quad in the mesh
                // Adjust order to be counter-clockwise
                indices.push(a, b, d);
                indices.push(b, c, d);
            }
            return { verts: verts, normals: normals, uvs: uvs, indices: indices }
        }
    }
The CurvedMesh inherits from ProceduralMesh and generates vertices, normals, and UV coordinates for a curved surface. The curvature is controlled by the radius property, which determines how much the surface bends. The mesh is divided into partitions segments to create a smooth curve.
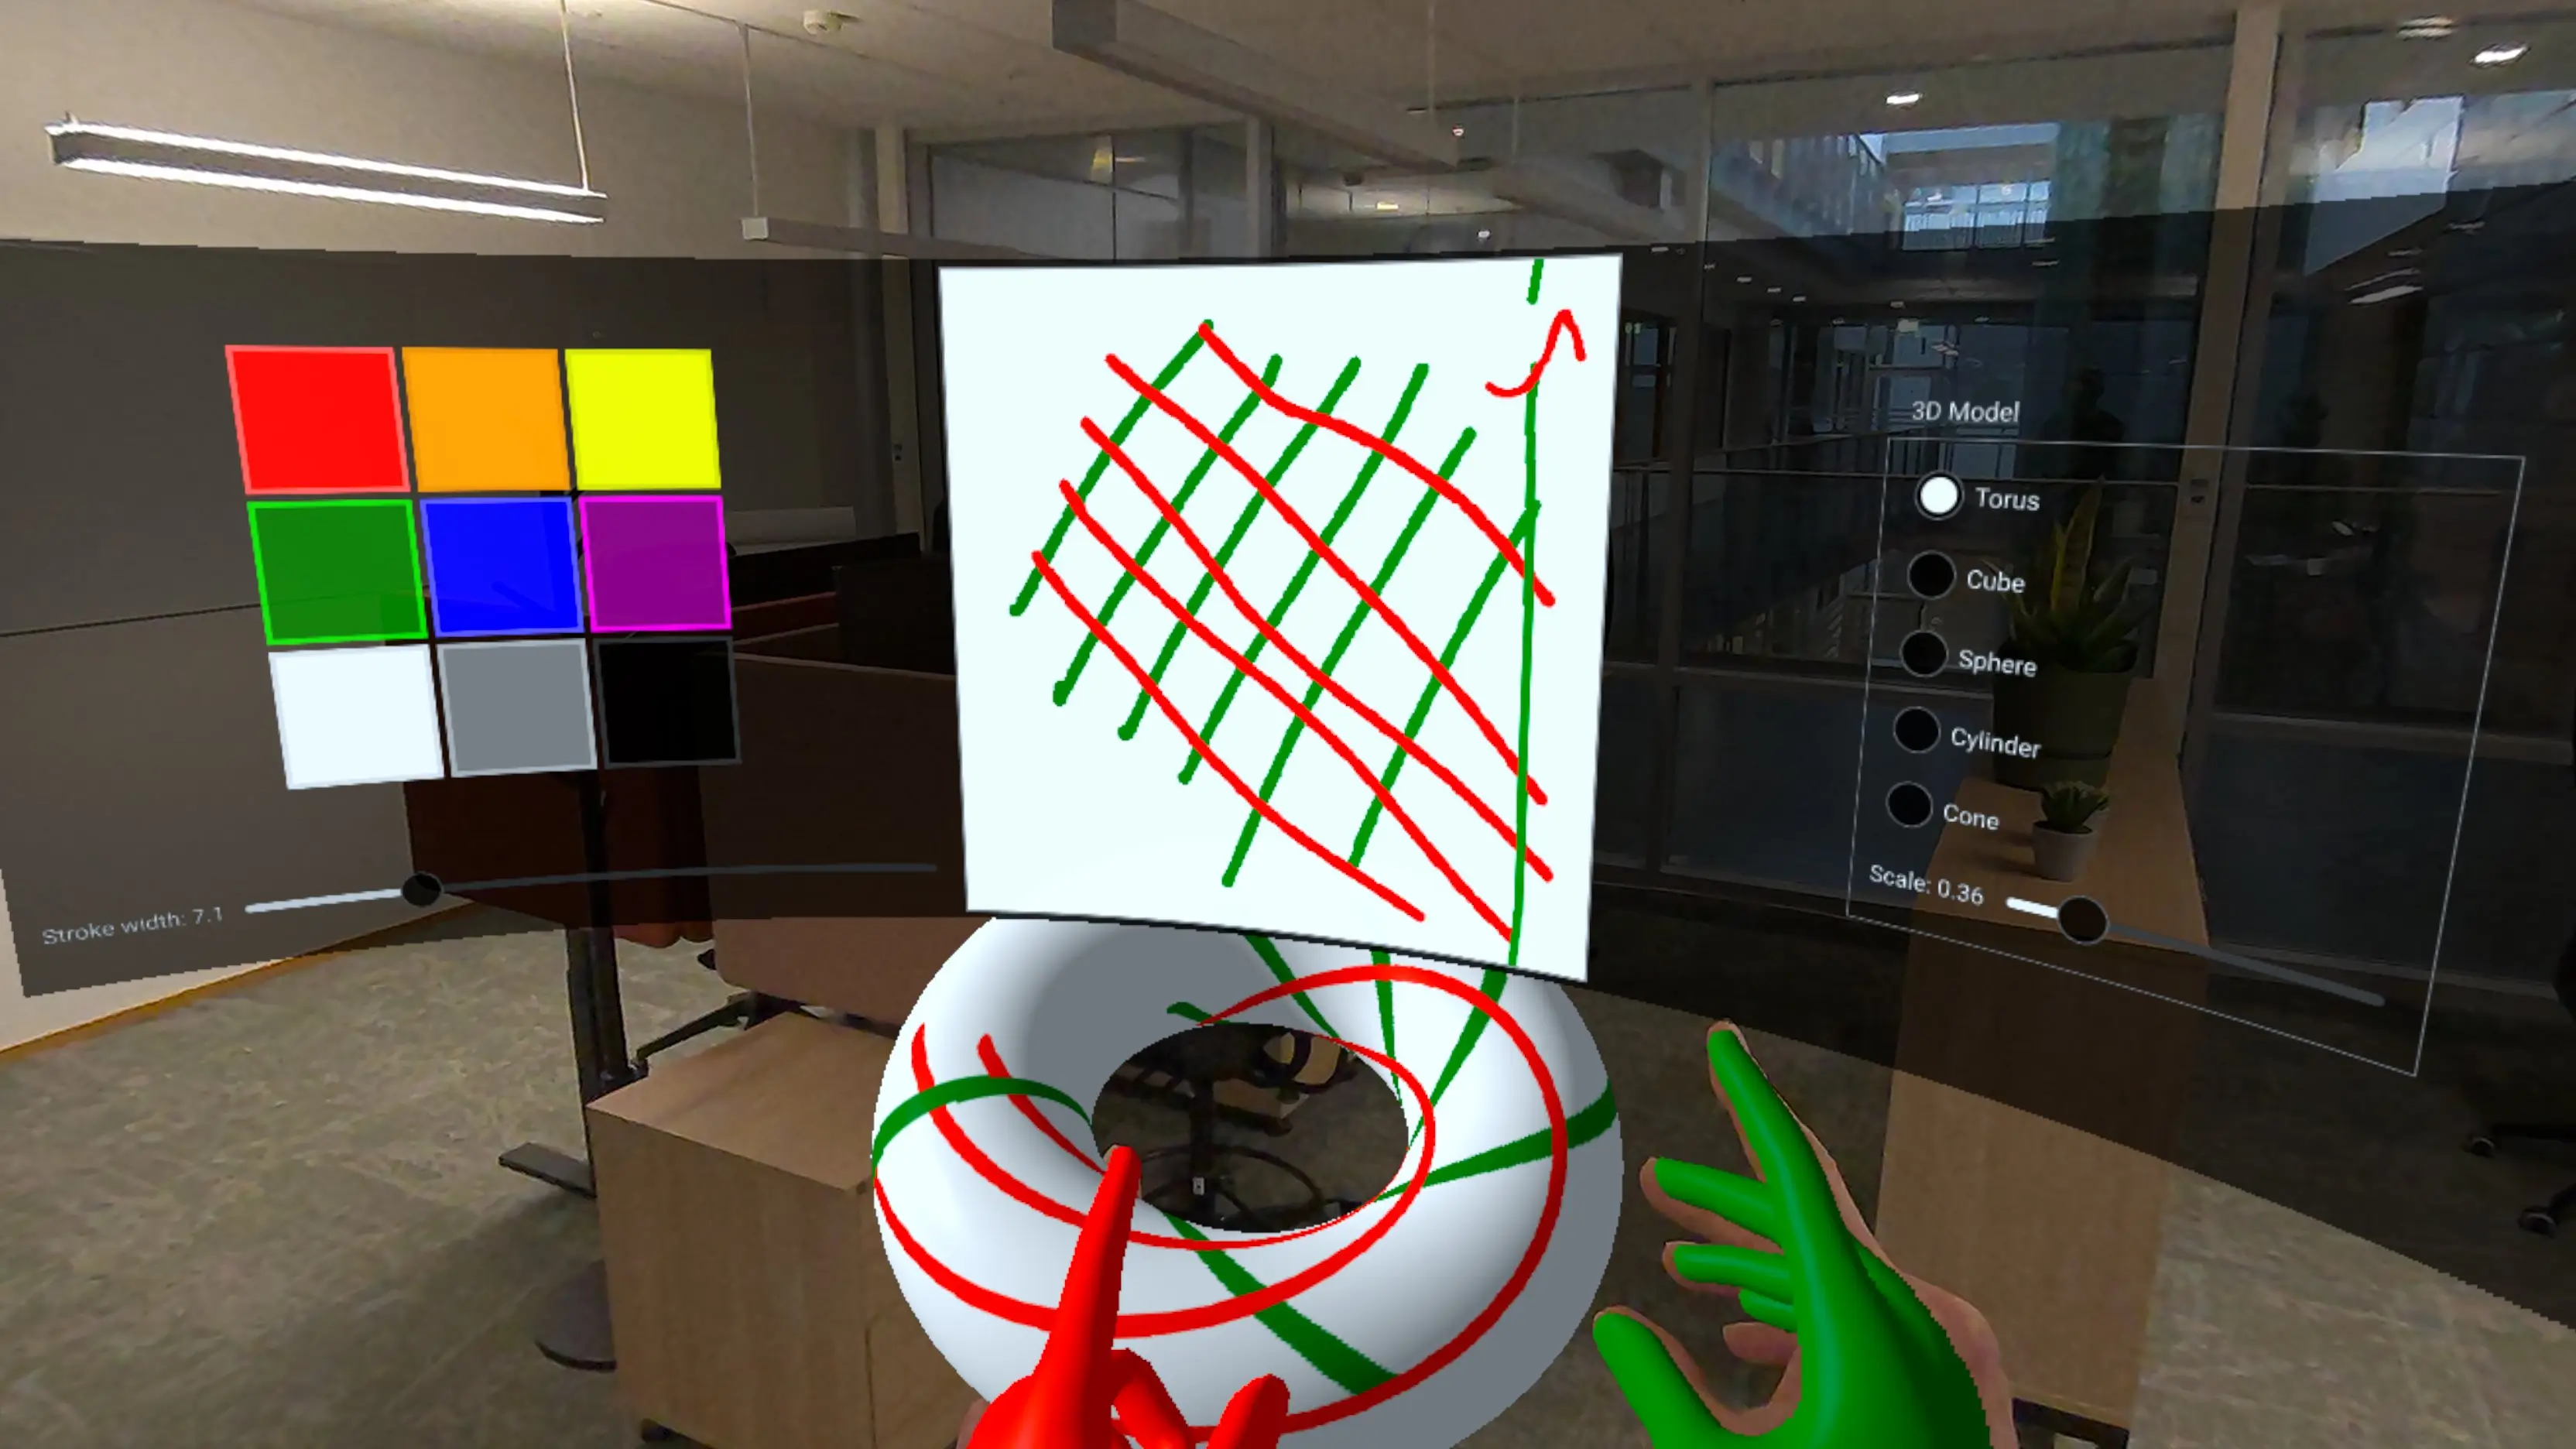
We then apply this curved geometry to a Model with a PrincipledMaterial that uses a sourceItem to render 2D content:
Model {
    objectName: "curved screen"
    x: 0
    y: -40
    z: -50
    // mesh origin is at bottom of screen; scene origin is at eye height
    geometry: CurvedMesh {
        width: height * 32 / 9
        height: 40
        radius: 80
    }
    visible: true
    pickable: true
    materials: PrincipledMaterial {
        baseColorMap: Texture {
            id: screenTexture
            sourceItem: Rectangle {
                id: uiItem
                width: height * 32 / 9
                height: 500

                property real dim: Math.min(width, height)

                color: "#dd000000"

                ColumnLayout {
                    id: leftItem
                    anchors.top: parent.top
                    anchors.bottom: parent.bottom
                    anchors.left: parent.left
                    anchors.right: centralItem.left
                    anchors.margins: 15
                    spacing: 10

                    GridLayout {
                        rows: 3
                        columns: 3
                        columnSpacing: 5
                        rowSpacing: 5

                        Layout.alignment: Qt.AlignHCenter | Qt.AlignVCenter

                        ColorSwatch {
                            color: "red"
                        }
                        ColorSwatch {
                            color: "orange"
                        }
                        ColorSwatch {
                            color: "yellow"
                        }
                        ColorSwatch {
                            color: "green"
                        }
                        ColorSwatch {
                            color: "blue"
                        }
                        ColorSwatch {
                            color: "purple"
                        }
                        ColorSwatch {
                            color: "white"
                        }
                        ColorSwatch {
                            color: "gray"
                        }
                        ColorSwatch {
                            color: "black"
                        }
                    }
                    RowLayout {
                        Label {
                            text: "Stroke width: " + penWidthSlider.value.toFixed(1)
                        }
                        Slider {
                            id: penWidthSlider
                            Layout.fillWidth: true
                            from: 1
                            to: 30
                            value: 10
                            onValueChanged: painterItem.setPenWidth(value)
                        }
                    }
                }

                Rectangle {
                    id: centralItem
                    width: uiItem.dim - 10
                    height: uiItem.dim - 10

                    anchors.centerIn: parent
                    color: "gray"

                    TextureItem {
                        id: painterItem
                        anchors.fill: parent
                        anchors.margins: 2
                        MultiPointTouchArea {
                            anchors.fill: parent
                            onPressed: (list) => {
                                           for (const pt of list) {
                                               painterItem.setPoint(pt.x, pt.y, pt.pointId, pt.pressed)
                                           }
                                       }
                            onUpdated: (list) => {
                                           for (const pt of list) {
                                               painterItem.setPoint(pt.x, pt.y, pt.pointId, pt.pressed)
                                           }
                                       }
                            onReleased: (list) => {
                                            for (const pt of list) {
                                                painterItem.setPoint(pt.x, pt.y, pt.pointId, pt.pressed)
                                            }
                                        }
                        }
                        Component.onCompleted: {
                            // Let initial colors be the same as the hand colors
                            setColor("green", 1)
                            setColor("red", 2)
                        }
                    }
                }

                Item {
                    id: rightItem
                    anchors.left: centralItem.right
                    anchors.top: parent.top
                    anchors.bottom: parent.bottom
                    anchors.right: parent.right

                    GroupBox {
                        anchors.centerIn: parent
                        title: "3D Model"
                        ColumnLayout {
                            ColumnLayout {
                                id: radioButtons
                                RadioButton {
                                    text: "Torus"
                                    checked: true
                                }
                                RadioButton {
                                    text: "Cube"
                                }
                                RadioButton {
                                    text: "Sphere"
                                }
                                RadioButton {
                                    text: "Cylinder"
                                }
                                RadioButton {
                                    text: "Cone"
                                }
                            }
                            RowLayout {
                                Label {
                                    text: "Scale: " + scaleSlider.value.toFixed(2)
                                }
                                Slider {
                                    id: scaleSlider
                                    Layout.fillWidth: true
                                    from: 0.01
                                    to: 2
                                    value: 0.25
                                }
                            }
                        }
                        ButtonGroup {
                            buttons: radioButtons.children
                            onCheckedButtonChanged: {
                                selectableModel.meshName = checkedButton.text
                            }
                        }
                    }
                }
            }
        }
        emissiveMap: screenTexture
        emissiveFactor: Qt.vector3d(0.8, 0.8, 0.8)
    }
    opacity: 0.99 // enable alpha blending
}
The sourceItem property contains a standard Qt Quick Rectangle with a complex UI including color swatches, sliders, and a drawing canvas. This 2D content is automatically projected onto the curved 3D surface. Touch events on the curved surface are mapped back to 2D coordinates and delivered to the appropriate Qt Quick elements.
Note: The emissiveMap and emissiveFactor are used to make the screen appear self-lit, improving visibility in different lighting conditions. The slight transparency (opacity: 0.99) enables alpha blending.
Custom Paintable Texture
The drawing canvas in the UI uses a custom C++ class, TextureItem, which extends QQuickPaintedItem to provide a paintable texture that can be used in 3D materials:
class TextureItem : public QQuickPaintedItem {
    Q_OBJECT
    Q_PROPERTY(const QQuick3DTextureData* textureData READ textureData NOTIFY textureDataChanged FINAL)
    QML_ELEMENT

public:
    TextureItem(QQuickItem *parent = nullptr);

    void paint(QPainter *painter) override;
    const QQuick3DTextureData *textureData() const;

    Q_INVOKABLE void setPoint(float x, float y, int id, bool pressed);
    Q_INVOKABLE void setUv(float u, float v, int id, bool pressed);
    Q_INVOKABLE void clear(const QColor &color);
    Q_INVOKABLE void setColor(const QColor &newColor, int id = 0);
    Q_INVOKABLE void setPenWidth(qreal newPenWidth);
    Q_INVOKABLE void resetPoint(int id);

public slots:
    void updateImage();

signals:
    void textureDataChanged();
    void colorChanged();
    void penWidthChanged();

private:

    struct TouchPointState {
        QColor color = "red";
        qreal penWidth = 10; // unused
        double alpha = 0.5;  // smoothing factor (0..1)
        bool initialized = false;
        QPointF prevFiltered;
        QPointF prevRaw;
        qint64 prevTime = 0; // timestamp in milliseconds

        void reset() {
            initialized = false;
            prevTime = 0;
        }

        QPointF filter(const QPointF &unfiltered, qint64 timestamp) {
            prevRaw = unfiltered;
            if (!initialized) {
                prevFiltered = unfiltered;
                prevTime = timestamp;
                initialized = true;
            } else {
                // Adjust alpha based on time delta
                qint64 dt = timestamp - prevTime;
                double adaptiveAlpha = qMin(1.0, alpha * (dt / 16.0)); // 16ms = ~60fps baseline

                prevFiltered.setX(adaptiveAlpha * unfiltered.x() + (1 - adaptiveAlpha) * prevFiltered.x());
                prevFiltered.setY(adaptiveAlpha * unfiltered.y() + (1 - adaptiveAlpha) * prevFiltered.y());
                prevTime = timestamp;
            }
            return prevFiltered;
        }
    };
The TextureItem maintains an internal QImage that can be drawn on using QPainter. The image data is then exposed as a QQuick3DTextureData that can be used in material textures. This allows us to create dynamic, user-modified textures that update in real-time.
The key method is setUv(), which handles touch input in UV coordinate space:
void TextureItem::setUv(float u, float v, int id, bool pressed)
{
    auto &s = state[id];

    bool inRange = u >= 0 && u <= 1 && v >=0 && v <= 1;
    if (!pressed || !inRange) {
        s.reset();
        return;
    }
This method implements several sophisticated features:
- Temporal smoothing with adaptive filtering to reduce jitter.
- Detection and handling of UV coordinate wrapping (when drawing crosses texture boundaries).
- Per-touch-point state tracking for multi-touch support.
Touch Handling on 3D Models
The example demonstrates direct touch interaction with 3D models through the enhanced XrGadget component. When a hand touches a 3D model, the touch position is converted to UV coordinates and forwarded to the model:
const touchState = view.touchpointState(root.touchId)
const gadget = touchState.model as XrGadget
if (gadget) {
    gadget.handleTouch(touchState.uvPosition, root.touchId, touchState.pressed)
}
The XrGadget component receives these touch events through its handleTouch function:
onTouched: (uvPosition, touchID, pressed) => {
    if (!isGrabbing)
        painterItem.setUv(uvPosition.x, uvPosition.y, touchID, pressed);
}
When the user is not grabbing the model, touch events are forwarded to the TextureItem, which draws on the model's texture. This allows users to paint directly on the 3D object's surface.
Grabbing and Manipulating 3D Objects
The example also implements grab-and-move functionality using the pinch gesture:
XrInputAction {
    id: grabAction
    controller: XrInputAction.RightHand
    actionId: [ XrInputAction.IndexFingerPinch ]

    onPressedChanged: {
        if (pressed)
            grabController.startGrab()
    }
}
When the user performs a pinch gesture with their right hand, the system captures the offset and rotation between the hand and the selected object:
XrController {
    id: grabController
    controller: XrController.RightHand
    property vector3d grabOffset
    property quaternion grabRotation

    function startGrab() {
        const scenePos = selectableModel.scenePosition
        const sceneRot = selectableModel.sceneRotation
        grabOffset = scenePos.minus(scenePosition)
        grabRotation = rotation.inverted().times(sceneRot)
    }

    onRotationChanged: {
        if (isGrabbing) {
            let newPos = scenePosition.plus(grabOffset)
            let newRot = sceneRotation.times(grabRotation)

            selectableModel.setPosition(newPos)
            selectableModel.setRotation(newRot)
        }
    }
}
As the hand moves, the object follows while maintaining the original offset and relative rotation. This creates a natural and intuitive way to position 3D objects in space.
Color Selection and Multi Touch
The color palette on the curved display demonstrates multi-touch interaction. Each hand can independently select a color by tapping a color swatch:
component ColorSwatch: Rectangle {
    implicitWidth: 100
    implicitHeight: 100

    function perceivedBrightness() {
        return 0.2 * color.r + 0.7 * color.g + 0.1 * color.b
    }

    function contrastColor() {
        if (perceivedBrightness() > 0.6)
            return Qt.darker(color, 1.1)

        const h = color.hslHue
        const s = color.hslSaturation
        const l = color.hslLightness + 0.2

        return Qt.hsla(h, s, l, 1.0)
    }

    border.color: contrastColor()
    border.width: csth.pressed ? 8 : 4
    property real penWidth: 5

    TapHandler {
        id: csth
        dragThreshold: 1000
        onTapped: (pt) => {
                      painterItem.setColor(parent.color, pt.id)
                      colorChange(parent.color, pt.id)
                  }
        onLongPressed: {
            painterItem.clear(parent.color)
        }
    }
}
The TapHandler responds to taps from different touch points (identified by pt.id), allowing each hand to have its own color. When a color is selected, it updates both the hand color and the drawing color for that touch ID through the colorChange signal:
y: xrView.referenceSpace === XrView.ReferenceSpaceLocalFloor ? 130 : 0
onColorChange: (col, id) => {
    if (id === 1)
        rightHand.color = col
    else
        leftHand.color = col
}
This demonstrates how to build multi-user or multi-hand interfaces where different touch points can have independent state and behavior.
UI Controls and Model Customization
The example includes a complete control panel that allows users to:
- Select different geometric primitives (torus, cube, sphere, cylinder, and cone).
- Adjust the scale of the 3D model.
- Change the pen width for drawing.
- Clear the drawing canvas by long-pressing a color swatch.
These controls demonstrate how to build full-featured spatial interfaces that combine 2D UI paradigms with 3D interaction in an XR environment.
© 2026 The Qt Company Ltd. Documentation contributions included herein are the copyrights of their respective owners. The documentation provided herein is licensed under the terms of the GNU Free Documentation License version 1.3 as published by the Free Software Foundation. Qt and respective logos are trademarks of The Qt Company Ltd. in Finland and/or other countries worldwide. All other trademarks are property of their respective owners.
