Qt Quick 3D - XR Simple Input Example
Demonstrates controller input in Qt Quick 3D XR.
This example shows how to use the low-level input APIs in Qt Quick 3D XR to interact with 2D and 3D objects in the scene. It follows the basic structure of the xr_simple example.
Controller Input
In this example, we do ray picking from the position of the XrController:
XrController {
    id: rightController
    controller: XrController.RightController
    poseSpace: XrController.AimPose

    property QtObject hitObject

    onRotationChanged: {
        const pickResult = xrView.rayPick(scenePosition, forward)
        if (pickResult.hitType !== PickResult.Null) {
            pickRay.hit = true
            pickRay.length = pickResult.distance
            hitObject = pickResult.objectHit
            cursorSphere.position = pickResult.scenePosition
            cursorSphere.visible = true
        } else {
            pickRay.hit = false
            pickRay.length = 50
            hitObject = null
            cursorSphere.visible = false
        }
    }

    Node {
        id: pickRay
        property real length: 50
        property bool hit: false

        Model {
            eulerRotation.x: -90
            scale: Qt.vector3d(0.005, pickRay.length/100, 0.005)
            source: "#Cone"
            materials: PrincipledMaterial {
                baseColor: rightTrigger.pressed ? "#99aaff" : "#cccccc"
                lighting: PrincipledMaterial.NoLighting
            }
            opacity: 0.8
        }
    }

    Node {
        z: 5
        Model {
            eulerRotation.x: 90
            scale: Qt.vector3d(0.05, 0.10, 0.05)
            source: "#Cylinder"
            materials: PrincipledMaterial {
                baseColor: "black"
                roughness: 0.2
            }
        }
    }
}
This performs the following functions:
- If we hit anything, we change the length of the
pickRayto so it touches the thing we hit. ThepickRayis a semi-transparent cone (a tapered cylinder) that shows where the user is aiming. We also movecursorSphereto the point where the ray hits. (cursorSphereis a semi-transparent sphere which is a child of the XrView). - We set the property
hitObjectto the object that we hit.
We also use a black cylinder as a generic representation of the controller.
For this example, we have made a simple 3D push button in the file ExampleButton.qml. (The details of how the button works are not explained here.) We create an XrInputAction to react to trigger presses:
XrInputAction {
    id: rightTrigger
    controller: XrInputAction.RightController
    actionId: [XrInputAction.TriggerPressed, XrInputAction.TriggerValue, XrInputAction.IndexFingerPinch]
    onTriggered: {
        const button = rightController.hitObject as ExampleButton
        if (button && button !== panel.activeButton) {
            panel.activeButton = button
        }
    }
}
The rightTrigger action reacts to several different IDs in order to support both hand tracking and different types of controllers. When the action is triggered, it checks if the hitObject we set above is of the type ExampleButton. In that case, the button is activated.
To allow a 3D controller to interact with 2D content, we need to add an XrVirtualMouse to map between them:
XrInputAction {
    id: rightThumbstickX
    controller: XrInputAction.RightController
    actionId: [XrInputAction.ThumbstickX]
}
XrInputAction {
    id: rightThumbstickY
    controller: XrInputAction.RightController
    actionId: [XrInputAction.ThumbstickY]
}

XrVirtualMouse {
    view: xrView
    source: rightController
    leftMouseButton: rightTrigger.pressed
    scrollWheelX: rightThumbstickX.value
    scrollWheelY: rightThumbstickY.value
}
First we add two more actions to detect horizontal and vertical thumbstick position. Then we create an XrVirtualMouse, using the XrController as a position source. We use the rightTrigger action we made earlier to generate mouse presses/releases and use the thumbstick actions to generate mouse wheel events.
Finally, we add some haptic feedback when the pickRay hits an object:
XrHapticFeedback {
    controller: XrHapticFeedback.RightController
    condition: XrHapticFeedback.RisingEdge
    trigger: pickRay.hit
    hapticEffect: XrSimpleHapticEffect {
        amplitude: 0.5
        duration: 10
        frequency: 200
    }
}
The haptic effect will trigger each time the pickRay.hit property goes from false to true.
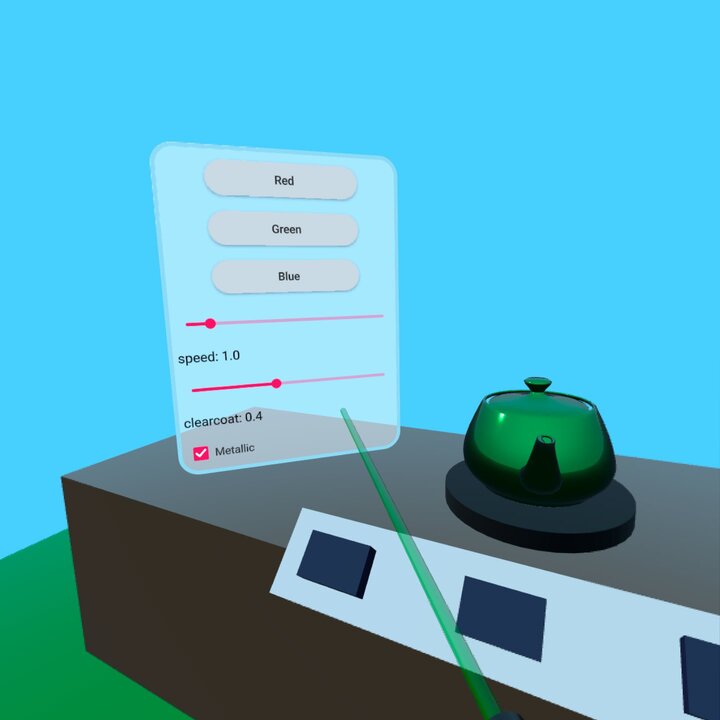
XrItem
The normal way to embed 2D user interfaces in 3D scenes also works in XR, but since the unit size is one centimeter, those user interfaces will have to be scaled to be useful. The XrItem type provides a convenient way to do the scaling automatically by setting the physical size of the 3D item and the logical size of the 2D surface.
XrItem {
    width: 75
    height: 100
    x: -100
    y: height + table.height + 5
    z: 40
    eulerRotation.y: 45
    color: "transparent"
    contentItem: Rectangle {
        color: Qt.rgba(1, 1, 1, 0.5)
        border.width: 5
        border.color: "lightblue"
        height: 400
        width: 300
        radius: 25
    ...
        }
    }
We position the XrItem in three dimensions and set it to be 75 cm wide and 100 cm tall. Then add a rectangle as a content item, and set it to be 300 x 400 units. The rest of the Qt Quick UI elements are added as children of the rectangle in the normal way and are not shown here. The 2D content is automatically scaled so it fills the XrItem.
© 2026 The Qt Company Ltd. Documentation contributions included herein are the copyrights of their respective owners. The documentation provided herein is licensed under the terms of the GNU Free Documentation License version 1.3 as published by the Free Software Foundation. Qt and respective logos are trademarks of The Qt Company Ltd. in Finland and/or other countries worldwide. All other trademarks are property of their respective owners.
