
Tutorial: Qt Bridge for C#
This tutorial illustrates how to build fluid animated user interfaces in QML with Qt Quick, while keeping application logic, models, and domain code in C#.
The Qt Quick module provides all the basic types necessary for creating user interfaces with QML. It provides a visual canvas and includes types for creating and animating visual components, receiving user input, and so on.
This tutorial describes the example application that the New project wizard generates. It imports QML types from the Qt Quick, Qt Quick Controls, and Qt Quick Layouts modules. It also creates a C# entry point and .NET project file for building and running the application the .NET way.
For more examples of creating Qt for C# applications, see Qt Bridge for C#.
Before you start
Before you start, you have to:
- Install Qt Extension for Visual Studio Code
- Install the .NET SDK
- Register Qt installations
On Windows ARM64, Linux, and macOS, you also need to select the Qt installation to build with. On Windows x64, the Qt Bridge for C# package brings its own Qt.
Create a Qt Quick C# application project
To create a Qt Quick application with C# code in Visual Studio Code:
- Go to Welcome, and then select New project.
- In Project, select Qt Bridge for C# application.
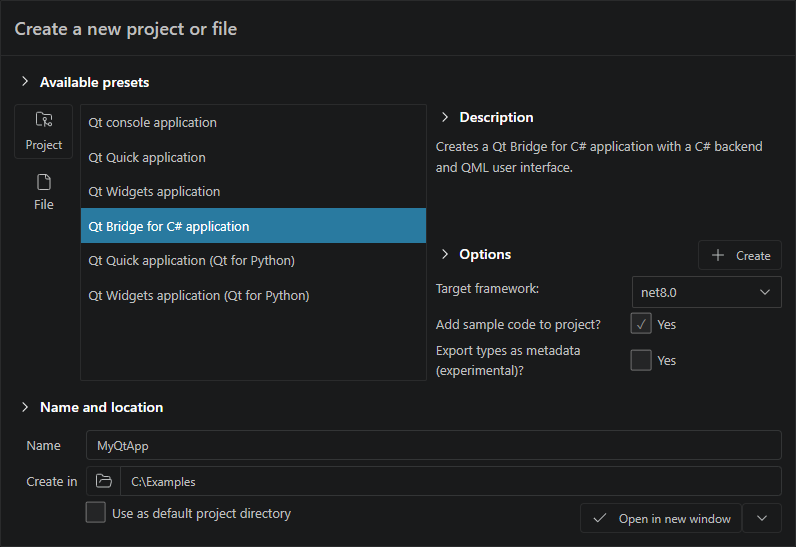
- In Name, enter the project name.
- In Create in, enter the path for the project files.
- In Target framework, select the .NET version to develop with.
- Select Add sample code to project to add a small
CounterC# class that QML can see, and to extendMain.qmlwith a labeled button. Use it to explore how a C# object and a QML type connect. Remove the class once you start building your own UI. - Select Open in new window to create the project files and open them in a new VS Code window.
You now have a small working Qt Quick application with Qt for C# code.
The wizard creates the following files:
MyQtApp.csproj, which is a regular .NET project file. It references the Qt Bridge for C# package for your platform and includesProgram.csandMain.qmlas project items. You build and run it the same way you would any other .NET project, withdotnet buildanddotnet runor from your editor.Program.cs, which is the C# entry point. It loads the QML code and keeps the application running until the QML window closes.Main.qml, which is the first QML file the application loads. It describes the window and the UI that appear when the application starts.
Run the application
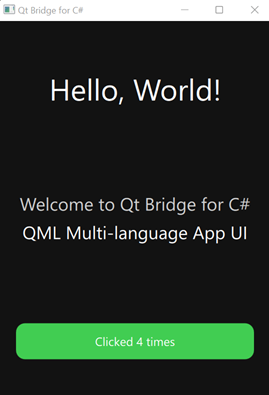
The main view of the application shows an application window with background color, text, and a button. Selecting the button updates a counter for the number of times the button was clicked.
To build and run the application, enter the following command in Terminal:
dotnet run
Note: After you build the application once, the code completion offers more complete suggestions for C# classes.
Note: To preview a QML file after you build the application once, select  on the editor toolbar. For more information, see Preview and profile Qt Bridge for C# applications.
Inspect the QML code
Open Main.qml to inspect the generated QML code.
QML imports
The file has import statements for the Qt modules that contain the QML types used in the application:
import QtQuick
import QtQuick.Controls
import QtQuick.Layouts
Main window
The file contains an instance of the ApplicationWindow QML type, which creates a main window. The window properties set an ID, initial and minimum size, background color, and a window title. Also, they determine that the window is visible on the screen.
ApplicationWindow {
    id: win
    visible: true
    title: "Qt Bridge for C#"
    width: 365; height: 510
    color: "#121212"
Qt Quick Layouts
The window contains an instance of the ColumnLayout QML type from the Qt Quick Layouts module, which positions the window contents in a column.
ColumnLayout {
    anchors.fill: parent
    anchors.margins: 24
    spacing: 20
Qt Quick Controls
The Qt Quick Controls module provides a set of controls for building complete user interfaces in Qt Quick. The application contains instaces of Label and Button controls.
Label
The Label properties set the heading text, as well as its color and its size in pixels. Also, they center the label text horizontally and vertically within the element's width and height.
The Layout properties make the label fit the column cell with 24 pixel margins and 20 pixel spacing.
Label {
    text: "Hello, World!"
    font.pixelSize: 40
    color: "white"
    horizontalAlignment: Text.AlignHCenter
    Layout.alignment: Qt.AlignHCenter
}
Button
The Button text property sets the button text and adds a counter for the button clicks.
The Layout properties make the button fit the column cell with 24 pixel margins and 20 pixel spacing. They set the preferred button height at 48 pixels.
The font property sets the text size to 16 pixels.
Button {
    id: counterBtn
    text: Counter.clicks === 0 ? "Click me" : "Clicked " + Counter.clicks + " times"

    Layout.fillWidth: true
    Layout.preferredHeight: 48
    font.pixelSize: 16

    hoverEnabled: false
    focusPolicy: Qt.NoFocus
...
}
The custom color property sets the button color to Qt green.
The background item holds an instance of the Rectangle type. The rectangle properties make the button corners round and set the button background color to a darker shade of Qt green when it is clicked.
...
readonly property color brandGreen: "#41cd52"

background: Rectangle {
    radius: 12
    border.width: 0
    color: counterBtn.down
        ? Qt.darker(counterBtn.brandGreen, 1.2)
        : counterBtn.brandGreen
}
The Text properties bind the button text, as well as its color and font to the window mode.
    contentItem: Text {
        text: counterBtn.text
        color: "white"
        font: counterBtn.font
        horizontalAlignment: Text.AlignHCenter
        verticalAlignment: Text.AlignVCenter
        elide: Text.ElideRight
    }

    onClicked: Counter.clicks += 1
}
Inspect the C# entry point code
Open the Program.cs file to inspect the generated C# code.
The wizard adds the CounterService class, exposes it to QML, and references it from Main.qml.
An example Program.cs file
using Qt.Quick;

using System.ComponentModel;
using System.Runtime.CompilerServices;

namespace MyQtApp;

[QmlElement(Name = "Counter", Singleton = true)]
public class CounterService : INotifyPropertyChanged
{
    public event PropertyChangedEventHandler? PropertyChanged;

    private int _clicks = 0;
    public int Clicks
    {
        get => _clicks;
        set
        {
            if (_clicks == value)
                return;
            _clicks = value;
            OnPropertyChanged();
        }
    }

    protected virtual void OnPropertyChanged([CallerMemberName] string? name = null)
        => PropertyChanged?.Invoke(this, new PropertyChangedEventArgs(name));
}
The Program class loads the QML code and keeps the application running until the QML window closes.
Qml.LoadFromRootModule("Main") loads Main.qml as the application's root QML file and creates the window it describes.
Qml.WaitForExit() blocks Main until the QML side shuts down, so the process stays alive while the UI runs.
public class Program
{
    internal static void Main(string[] args)
    {
        Qml.LoadFromRootModule("Main");
        Qml.WaitForExit();
    }
}
Usually, you do not need to change either call for a project.
Inspect the .NET project file
Open the MyQtApp.csproj file to inspect the .NET project file. It references the Qt Bridge for C# package for your platform and includes Program.cs and Main.qml as project items.
An example .csproj file
<Project Sdk="Microsoft.NET.Sdk">

  <PropertyGroup>
    <OutputType>WinExe</OutputType>
    <TargetFramework>net8.0</TargetFramework>
    <RollForward>Major</RollForward>
    <ImplicitUsings>enable</ImplicitUsings>
    <Nullable>enable</Nullable>
    <EnableDefaultCompileItems>false</EnableDefaultCompileItems>
    <QtBridgePackagePrefix>QtGroup.Qt.Bridge.CSharp</QtBridgePackagePrefix>
    <QtBridgeTemplateArch Condition="'$(QtBridgeTemplateArch)' == ''"
      >$([System.Runtime.InteropServices.RuntimeInformation]::OSArchitecture)</QtBridgeTemplateArch>
    <QtBridgeTemplateArch Condition="'$(QtBridgeTemplateArch)' == 'X64'">x64</QtBridgeTemplateArch>
    <QtBridgeTemplateArch Condition="'$(QtBridgeTemplateArch)' == 'Arm64'">arm64</QtBridgeTemplateArch>
    <QtBridgeTemplateRid Condition="'$(QtBridgeTemplateRid)' == '' and '$(RuntimeIdentifier)' != ''"
      >$(RuntimeIdentifier)</QtBridgeTemplateRid>
    <QtBridgeTemplateRid Condition="'$(QtBridgeTemplateRid)' == '' and $([MSBuild]::IsOSPlatform('Windows'))"
      >win-$(QtBridgeTemplateArch)</QtBridgeTemplateRid>
    <QtBridgeTemplateRid Condition="'$(QtBridgeTemplateRid)' == '' and $([MSBuild]::IsOSPlatform('Linux'))"
      >linux-$(QtBridgeTemplateArch)</QtBridgeTemplateRid>
    <QtBridgeTemplateRid Condition="'$(QtBridgeTemplateRid)' == '' and $([MSBuild]::IsOSPlatform('OSX'))"
      >osx-$(QtBridgeTemplateArch)</QtBridgeTemplateRid>
    <QtBridgePackageId>$(QtBridgePackagePrefix).$(QtBridgeTemplateRid)</QtBridgePackageId>
  </PropertyGroup>

  <ItemGroup Condition="'$(QtBridgeTemplateRid)' == 'win-x64'
                    or '$(QtBridgeTemplateRid)' == 'win-arm64'
                    or '$(QtBridgeTemplateRid)' == 'linux-x64'
                    or '$(QtBridgeTemplateRid)' == 'linux-arm64'
                    or '$(QtBridgeTemplateRid)' == 'osx-arm64'">
    <PackageReference Include="$(QtBridgePackageId)" Version="0.4.*-*" />
  </ItemGroup>

  <Target Name="EnsureSupportedQtBridgePlatform" BeforeTargets="Restore;Build"
          Condition="'$(QtBridgeTemplateRid)' != 'win-x64'
                  and '$(QtBridgeTemplateRid)' != 'win-arm64'
                  and '$(QtBridgeTemplateRid)' != 'linux-x64'
                  and '$(QtBridgeTemplateRid)' != 'linux-arm64'
                  and '$(QtBridgeTemplateRid)' != 'osx-arm64'">
    <Error Text="Qt Bridge for C# currently supports win-x64, win-arm64, linux-x64, linux-arm64, and osx-arm64. Selected RID: '$(QtBridgeTemplateRid)'." />
  </Target>

  <ItemGroup>
    <None Include="Main.qml"/>
    <Compile Include="Program.cs" />
  </ItemGroup>

</Project>© 2026 The Qt Company Ltd. Documentation contributions included herein are the copyrights of their respective owners. The documentation provided herein is licensed under the terms of the GNU Free Documentation License version 1.3 as published by the Free Software Foundation. Qt and respective logos are trademarks of The Qt Company Ltd in Finland and/or other countries worldwide. All other trademarks are property of their respective owners.
