
Tutorial: Qt Quick and Qt for Python
This tutorial illustrates how to use Qt Extension for Visual Studio Code to create a Qt Quick application with Qt for Python. You'll create a project using a project wizard and design a UI using Qt Quick Controls.
You can download the completed project from Code: HelloWorld.
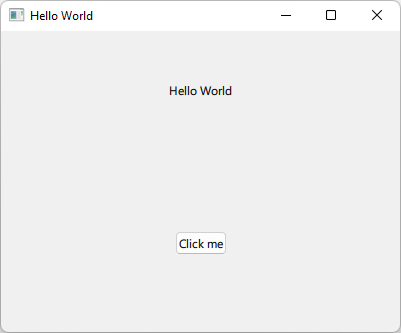
For more examples of creating Qt for Python applications, see Qt for Python: Tutorials.
Before you start
Before you start, you have to:
Create a Qt Quick Python application project
To create a Qt Quick application with Python code in Visual Studio Code:
- Go to Welcome, and then select New project.
- In Project, select Qt Quick application (Qt for Python).
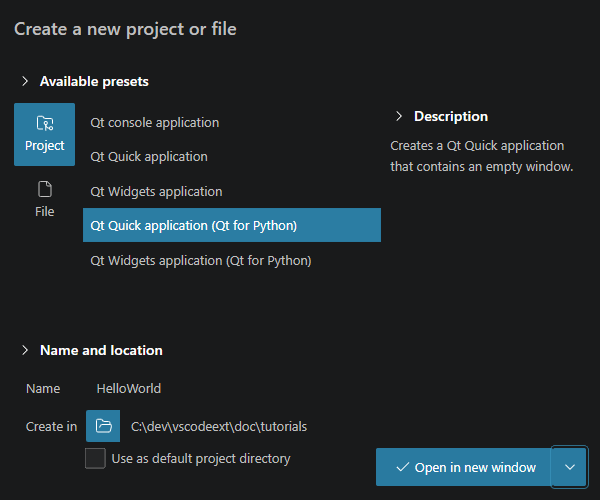
- In Name, enter the project name.
- In Create in, enter the path for the project files.
- Select Open in new window to create the project files and open them in a new VS Code window.
You now have a small working Qt Quick application with Qt for Python code. Select  on the editor toolbar to preview it. For now, the result is an empty window.
The wizard creates the following files:
pyproject.toml, which lists the files in the Python project and other configurations.main.py, which has some boilerplate code.Main.qml, which imports Qt Quick controls.qmldir, declaring a QML module.requirements.txt, which stores the PySide version of the generated code. You can use this file to install the required PySide version using pip.
Install PySide6 for the project
The recommended way to run PySide6 projects from VS Code is to install PySide6 for each project. Qt Extension for Visual Studio Code prompts you to do so the first time you open main.py.
Add Qt Quick imports
The wizard adds the following imports to the main.py source file for access to QGuiApplication and QQmlApplicationEngine:
import sys
from pathlib import Path

from PySide6.QtGui import QGuiApplication
from PySide6.QtQml import QQmlApplicationEngine
Add a main function
The wizard also adds a main function, where it creates a QGuiApplication instance and passes system arguments to the QGuiApplication object:
if __name__ == "__main__":
    app = QGuiApplication(sys.argv)
    ...
Load the QML file
The following lines in the main class create a QQmlApplicationEngine instance and load the generated QML module to the engine object:
...
engine = QQmlApplicationEngine()
qml_file = Path(__file__).resolve().parent / "main.qml"
engine.load(qml_file)
...
Finally, the wizard adds code that checks whether the file was successfully loaded. If loading the file fails, the application exits with an error code. If loading succeeds, the wizard calls the app.exec() method to enter the Qt main loop and start executing the Qt code:
...
if not engine.rootObjects():
    sys.exit(-1)

sys.exit(app.exec())
...
Design the UI
Open the Main.qml file in the Edit mode to design a Qt Quick UI.
Add imports
Add imports for Qt Quick Controls and Layouts:
import QtQuick
import QtQuick.Controls
import QtQuick.Layouts
Add properties and functions
The wizard adds a main window:
ApplicationWindow {
    width: 640
    height: 480
    visible: true
    title: qsTr("Hello World")
}
Add a property and function to randomly select the language of the displayed text:
    ...
    readonly property list<string> texts: ["Hallo Welt", "Hei maailma",
                                           "Hola Mundo", "Привет мир"]

function setText() {
    var i = Math.round(Math.random() * 3)
    text.text = texts[i]
}
Add Qt Quick Controls
Add Text and Button QML types within a ColumnLayout type to design the UI:
    ColumnLayout {
    anchors.fill:  parent

    Text {
        id: text
        text: "Hello World"
        Layout.alignment: Qt.AlignHCenter
    }
    Button {
        text: "Click me"
        Layout.alignment: Qt.AlignHCenter
        onClicked:  setText()
    }
}
The application is now ready and you can preview it to test that it works as expected.
See also Set up Python development environment.
© 2026 The Qt Company Ltd. Documentation contributions included herein are the copyrights of their respective owners. The documentation provided herein is licensed under the terms of the GNU Free Documentation License version 1.3 as published by the Free Software Foundation. Qt and respective logos are trademarks of The Qt Company Ltd in Finland and/or other countries worldwide. All other trademarks are property of their respective owners.
