Code coverage for a Qt application
In this tutorial, we will take Qt's TextEdit example and use it to illustrate how Coco can be used at different stages of the development process. To cover the whole coding cycle, we will first show how an instrumented application is created, perform manual tests and analyze their results. Then we will create an instrumented unit test.
In a second step (see Working with code coverage data), we will cover the aspects which are more interesting to product managers: analyzing the impact of code changes (e.g. bug fixes)—in particular, tracking their test progress, externalizing testing, and collecting the code coverage analysis of a complete testing team.
Note: The general recipe for instrumentation of Qt programs is in the section Qt Framework.
The Qt framework can be downloaded directly from Qt for Developers. This example needs Qt 5.15 or later. For Qt 6, the Qt 5 Compatibility Module must be installed too.
Location of the example
The example can be found in a directory called textedit. Its location varies according to the operating system. Under Microsoft® Windows, the directory is stored directly in the installation directory. Under Linux™, it can be found under /opt/SquishCoco/samples, and under macOS it is in /Applications/SquishCoco/samples.
If the example is write-protected, you need to create a copy of the directory textedit to work with it.
Compiling the example application
In this section, we will work with the files in the directory textedit/textedit_v1.
We want to be able to build our application both normally and with generated test coverage instrumentation code, without having to change our source code. This can be achieved by making a small change to the application's project (.pro) file. We can then use a command line option for qmake to generate an instrumented build instead of a normal one.
To make the project file suitable both for normal and for instrumented builds, we create a set of definitions that can be activated by a command line switch; in qmake's terminology this is called a scope. The following listing shows a minimal scope for code instrumentation.
The following must be done:
- We must ensure that precompiled headers are disabled when the code is instrumented.
qmakeallows us to do this by setting thePRECOMPILED_HEADERvariable to an empty value. - It is also necessary to increase the value of
QMAKE_LINK_OBJECT_MAXin order to disable the usage of the linker script. We set it here to 10000. - Finally,
qmakemust be instructed to use CoverageScanner's wrappers for compilation. This is done by prefixing the names of the compilation tools withcs.
CodeCoverage {
    PRECOMPILED_HEADER=
    QMAKE_LINK_OBJECT_MAX=10000

    defineReplace(toCoco) {
        cmd = $$1
        path = $$take_first(cmd)
        prog = $$basename(path)

        return(cs$$prog $$cmd)
    }

    QMAKE_AR = $$toCoco($$QMAKE_AR)
    QMAKE_CC = $$toCoco($$QMAKE_CC)
    QMAKE_CXX = $$toCoco($$QMAKE_CXX)
    QMAKE_LIB = $$toCoco($$QMAKE_LIB)
    QMAKE_LINK = $$toCoco($$QMAKE_LINK)
    QMAKE_LINK_SHLIB_CMD = $$toCoco($$QMAKE_LINK_SHLIB_CMD)
}
These modifications are sufficient for most standard C and C++ applications. For Qt applications we must use additional settings in order to ensure that CoverageScanner does not instrument the source code that is generated by Qt's tools (e.g., by uic, qrc and Meta-Object Compiler (moc)).
To exclude qrc resource files from instrumentation, we must tell CoverageScanner not to instrument any file with a name that begins with qrc_. This can be done with the command line option --cs-exclude-file-abs-wildcard=*/qrc_*. Since we do not want to have to enter this option manually, we will put it in the .pro file. Similarly, to let CoverageScanner ignore the files generated by uic we can use the same command line option, only this time with a different file matching regular expression: --cs-exclude-file-abs-wildcard=*/ui_*.
Coco supports by default applications that are built with the Qt 4 (or Qt 5 and Qt 6) toolkit. This ensures that CoverageScanner:
- does not instrument the
Q_OBJECTandQ_DECLARE_PLUGINmacros - does not instrument code generated by
moc, except that signal emissions and slot receives are instrumented, since they are vital to a Qt program's logic.
Note: If needed, this behavior can be disabled with the option --cs-no-qt4.
We can also exercise some control over the level of instrumentation and what information is reported. For example, we can switch on the counting of code executions with the --cs-count command line option, or we can enable full instrumentation at decision/condition level with the --cs-full-instrumentation option. With the --cs-output option we can specify the file the execution report is written to when the application terminates. (By default the output is written to the file <appname>.csexe, where <appname> is the name of the program that has been executed.)
So, for a Qt-based application, the final Coco scope in the application's .pro file will look something like this:
CodeCoverage {
    COVERAGE_OPTIONS =  --cs-output=textedit.exe
    COVERAGE_OPTIONS += --cs-exclude-file-abs-wildcard=*/qrc_*

    QMAKE_CFLAGS   += $$COVERAGE_OPTIONS
    QMAKE_CXXFLAGS += $$COVERAGE_OPTIONS
    QMAKE_LFLAGS   += $$COVERAGE_OPTIONS

    defineReplace(toCoco) {
        cmd = $$1
        path = $$take_first(cmd)
        prog = $$basename(path)

        return(cs$$prog $$cmd)
    }

    QMAKE_AR = $$toCoco($$QMAKE_AR)
    QMAKE_CC = $$toCoco($$QMAKE_CC)
    QMAKE_CXX = $$toCoco($$QMAKE_CXX)
    QMAKE_LIB = $$toCoco($$QMAKE_LIB)
    QMAKE_LINK = $$toCoco($$QMAKE_LINK)
    QMAKE_LINK_SHLIB_CMD = $$toCoco($$QMAKE_LINK_SHLIB_CMD)
}
In this form, the scope has been added to the project file textedit_v1/textedit_v1.pro. When we now run qmake without options, a Makefile for a normal build is generated; but we can also build an instrumented version of the program in the following way:
- Linux™ and macOS:
$ ~/Qt/5.5/gcc/bin/qmake CONFIG+=CodeCoverage
$ make
The path to the
qmakeprogram will of course vary according to the Qt version you use. - Under Microsoft® Windows, it is also necessary to set the paths that make the
nmakecommand accessible. All Microsoft® Visual Studio® versions provide a Native Tools Command Prompt window, which sets the paths for a given compiler version. In such a command window, the command sequence to compile the example might look like this:C:\textedit\textedit_v1>C:\Qt\5.5\msvc2015\bin\qmake CONFIG+=CodeCoverage C:\textedit\textedit_v1>nmake
In either case we still end up with a textedit.exe executable. But with an instrumented build we will also get an additional file, textedit.exe.csmes. It contains the instrumentation database.
The first code coverage results
For our first exercise, we will execute TextEdit and then quit the application straight away. This will generate an execution report called textedit.exe.csexe. The file contains a snapshot of the most recent execution that we have just done.
To see the results, we must run the CoverageBrowser tool and load the textedit.exe.csmes instrumentation database. This can be done with the menu entry File > Open. After the file has been opened, no coverage information is available because no execution reports have been imported. The instrumented code lines are shown grayed out and no coverage statistics has been computed.
CoverageBrowser after loading the TextEdit's instrumentation database
In order to see an execution report, click File > Load Execution Report, which invokes the import dialog. You need to enter at least the file name (including the full path) of the textedit.exe.csexe file into the field File > Name. You also need to give the test a name. Enter in the field Name e.g. the text Start and Quit. Switch the Delete execution report after loading option on because the report is no longer needed after our import. It is also helpful to select Open this dialog automatically when the file is modified because then the file import dialog is automatically opened after each run. The new .csexe file that it created in the test can then be added to the database.
After the import has finished, the code coverage information is visible:
- The coverage statistics for the functions and methods of all source files of the application is shown.
- The source window is now colored. It shows executed code on a green background and unexecuted code on a red background.
- The execution list now contains one selected item called Start and Quit, the only test execution report we have created so far.
Interactive testing
CoverageBrowser reveals, for example, that the TextEdit::fileSave() function is not executed. We will now validate this function interactively, guided by the code coverage analysis.
In the source window, all unexecuted source code lines are shown on a red background.
bool TextEdit::fileSave()
{
  if (fileName.isEmpty())
  {
    QMessageBox::warning(this, tr("No file name specified"),
      tr("Save first your document using 'Save As...' from the menu"),
      QMessageBox::Ok);
    return false;
   }

  QTextDocumentWriter writer(fileName);
  bool success = writer.write(textEdit->document());
  if (success)
     textEdit->document()->setModified(false);
  return success;
}
To test this function, we must perform the following steps:
- Start the TextEdit application.
- Click the Save button: TextEdit should display the error message Save first your document using 'Save As' from the menu.
- Quit the application.
After these steps have been done and the execution report imported, CoverageBrowser shows that the return false; line just after the call to QMessageBox::warning() has been executed, as indicated by the green background. However, the line if (fileName.isEmpty()) is partially executed: This is shown by an orange background.
bool TextEdit::fileSave()
{
  if (fileName.isEmpty())
  {
    QMessageBox::warning(this, tr("No file name specified"),
      tr("Save first your document using 'Save As...' from the menu"),
      QMessageBox::Ok);
    return false;
   }

  QTextDocumentWriter writer(fileName);
  bool success = writer.write(textEdit->document());
  if (success)
     textEdit->document()->setModified(false);
  return success;
}
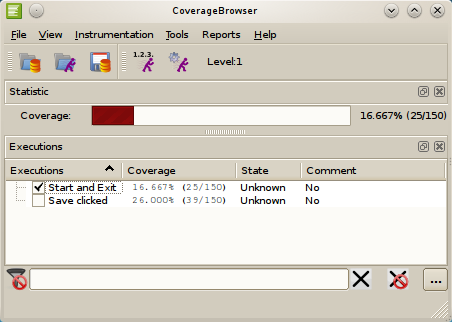
The explanation window tells us that the value of the expression fileName.isEmpty() was true during one execution but was never false. It is therefore considered as only partially executed. In order to fully test this expression, we must click the Save As button, then choose a file name, and finally click the Save button.
partially executed: fileName.isEmpty()
TRUE | FALSE |
|---|---|
| yes Execution Count: 1 Executed by: - Save Clicked | no Execution Count: 0 |
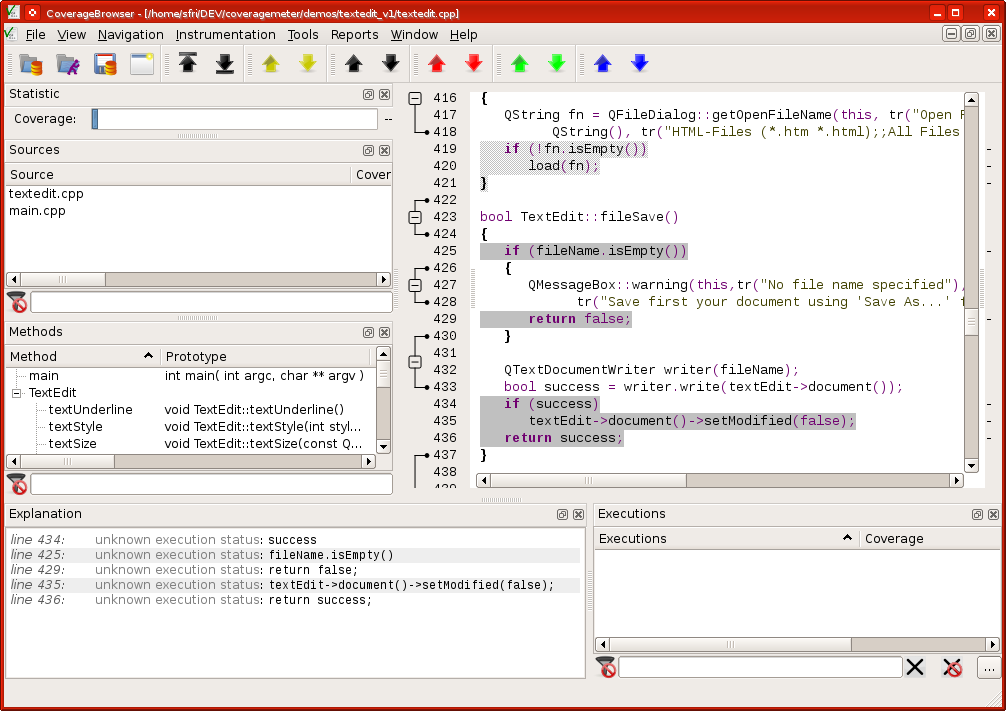
After rerunning the application and doing a Save As, the new execution report has only one source code line that is partially untested. In this case, CoverageBrowser shows that the Boolean variable success was never false, which means that saving the document has never failed.
We could force a write failure, and this would ensure that we had 100% code coverage for this function. But we will use a different test strategy to get complete code coverage: We will use a unit test and import the execution result into the TextEdit instrumentation database.
bool TextEdit::fileSave()
{
  if (fileName.isEmpty())
  {
    QMessageBox::warning(this,tr("No file name specified"),
      tr("Save first your document using 'Save As...' from the menu"),
      QMessageBox::Ok );
    return false;
   }

  QTextDocumentWriter writer(fileName);
  bool success = writer.write(textEdit->document());
  if (success)
     textEdit->document()->setModified(false);
  return success;
}
Writing unit tests
The unit test infrastructure can be found in the directory textedit_v1_tests/. It contains just one test, which sets an illegal filename and then tries to execute TextEdit's fileSave() function. To do this, we use the Qt Test unit test library that is part of Qt. The test is contained in the file textedit_v1_tests/tst_textedit.cpp.
#include "tst_textedit.h"

void TestTextEdit::tst_saveFile() {
  TextEdit textEdit;
  textEdit.fileName="/";
  QVERIFY( !textEdit.fileSave() );
}

QTEST_MAIN(TestTextEdit);
To import the instrumentation result of this test into TextEdit's instrumentation database, the following infrastructure is necessary:
- A
qmakeproject file with code coverage, configured identically to that of the TextEdit project. - A post-build rule, which automatically executes the test and collects the coverage information.
- A unit test listener, which saves the code coverage data (and the test status—passed or failed) for every executed test into the unit test's own instrumentation database.
- A way to import the code coverage report into TextEdit's instrumentation database.
The unit test will recompile along with textedit_v1/textedit.cpp. To make its results importable into the TextEdit instrumentation database, it is necessary that both executables, TextEdit and the unit test, are instrumented in exactly the same way. Since we use only the default instrumentation, this requirement is already fulfilled.
Unfortunately, this is not everything we need to do. Coco's default behavior is to instrument only header and source files in the directory it is invoked, but here we need to instrument the TextEdit application's sources in addition to the unit test. Therefore we must use another command line option to specify an additional path for files to instrument: --cs-include-path.
As before, we do not want to have to remember these command line arguments every time, so we set them in the qmake project file, textedit_v1_tests.pro. With these lines in the unit test project file, the qmake-generated Makefile will create the tst_textedit.exe executable which, when run, produces the execution report tst_textedit.exe.csexe. We then can use the CoverageBrowser to import this report into the file tst_textedit.exe.csmes.
HEADERS  = ../textedit_v1/textedit.h tst_textedit.h
SOURCES  = ../textedit_v1/textedit.cpp tst_textedit.cpp

CodeCoverage {
    COVERAGE_OPTIONS =  --cs-output=tst_textedit.exe
    COVERAGE_OPTIONS += --cs-include-path=../textedit_v1
    COVERAGE_OPTIONS += --cs-exclude-file-abs-wildcard=*/qrc_*

    defineReplace(toCoco) {
        cmd = $$1
        path = $$take_first(cmd)
        prog = $$basename(path)

        return(cs$$prog $$cmd)
    }

    QMAKE_AR = $$toCoco($$QMAKE_AR)
    QMAKE_CC = $$toCoco($$QMAKE_CC)
    QMAKE_CXX = $$toCoco($$QMAKE_CXX)
    QMAKE_LIB = $$toCoco($$QMAKE_LIB)
    QMAKE_LINK = $$toCoco($$QMAKE_LINK)
    QMAKE_LINK_SHLIB_CMD = $$toCoco($$QMAKE_LINK_SHLIB_CMD)
}
We can also execute the unit test automatically and import the execution report with a post-build rule. Coco provides an extra command line tool, cmcsexeimport (see cmcsexeimport – command line import utility), which imports an execution report into an instrumentation database. The post-build rule first deletes any previous execution report, then executes the test itself, and finally imports the results into the application's execution database, tst_textedit.exe.csexe.
CodeCoverage {
  win32: MAINDIR=$$replace(PWD,"/","\\")
  !win32:MAINDIR=$$PWD

  unix {
    QMAKE_POST_LINK  = rm $$MAINDIR/tst_textedit_v1.exe.csexe ;
    QMAKE_POST_LINK += $$MAINDIR/tst_textedit_v1.exe ;
    QMAKE_POST_LINK += cmcsexeimport -m $$MAINDIR/tst_textedit_v1.exe.csmes \
                       -e $$MAINDIR/tst_textedit_v1.exe.csexe -t UnitTest
  }
  win32 {
    QMAKE_POST_LINK  = del /F $$MAINDIR\\tst_textedit_v1.csexe &
    QMAKE_POST_LINK += $$MAINDIR\\tst_textedit_v1.exe &
    QMAKE_POST_LINK += cmcsexeimport -m $$MAINDIR\\tst_textedit_v1.exe.csmes \
                       -e $$MAINDIR\\tst_textedit_v1.csexe -t UnitTest
  }
}
By default, the coverage data is imported without any information about the executed tests. Instead, an execution report called UnitTest is created, which does not describe which test was executed or whether its execution was successful. To provide the missing information, we must use the CoverageScanner API and generate an execution report for each test that is executed. An example that shows how this is done is available in Qt Test. In the example, the API is used in the following way:
- Two Coco source files are added to the
qmakeproject file.HEADERS += testcoverageobject.h SOURCES += testcoverageobject.cpp - The unit test class,
TestTextEdit, inherits fromTestCoverageObjectinstead of directly fromQObject.#include "testcoverageobject.h" #include "../textedit_v1/textedit.h" #include <QtTest/QtTest> class TestTextEdit : public TestCoverageObject { Q_OBJECT private slots: void tst_saveFile(); };
The source code of the file testcoverageobject.cpp adds a single cleanup() function to Qt Test, which is executed after each unit test item. The code between #ifdef __COVERAGESCANNER__ and #endif is only compiled when CoverageScanner is invoked. This extra code creates a test name by combining the test class' object name and the test function's name. In the example, an execution item called unittest/TestTextEdit/tst_saveFile is generated. The slash is used to support the organization of tests in a tree view. The current test status (PASSED or FAILED) is also recorded and added to the execution report by the __coveragescanner_save() function.
...
void TestCoverageObject::cleanup()
{
  cleanupTest();
#ifdef __COVERAGESCANNER__
  QString test_name="unittest/";
  test_name += metaObject()->className();
  test_name += "/";
  test_name += QTest::currentTestFunction();
  __coveragescanner_testname(test_name.toLatin1());
  if (QTest::currentTestFailed())
    __coveragescanner_teststate("FAILED");
  else
    __coveragescanner_teststate("PASSED") ;
  __coveragescanner_save();
#endif
}
Note: The symbol __COVERAGESCANNER__ is defined automatically by CoverageScanner and so does not need to be defined manually.
At this stage we could start CoverageBrowser, load the TextEdit instrumentation database, and import the unit test's instrumentation database by clicking File > Import Unit Tests. An even more convenient alternative is to use the cmmerge tool to automate this step. The cmmerge program is designed to import one instrumentation database's execution report into another instrumentation database. This means that we can extend our post-build rules to use the cmmerge program to import the coverage information automatically from the unit test into the TextEdit program's instrumentation database.
CodeCoverage {
  # Merge coverage database into TextEdit database
  unix {
    QMAKE_POST_LINK += ;
    QMAKE_POST_LINK += cmmerge -o $$MAINDIR/../textedit_v1/textedit.tmp \
                       -i $$MAINDIR/../textedit_v1/textedit.exe.csmes \
                       $$MAINDIR/./tst_textedit_v1.exe.csmes &&
    QMAKE_POST_LINK += rm $$MAINDIR/../textedit_v1/textedit.exe.csmes &&
    QMAKE_POST_LINK += mv $$MAINDIR/../textedit_v1/textedit.tmp \
                       $$MAINDIR/../textedit_v1/textedit.exe.csmes
  }
  win32 {
    QMAKE_POST_LINK += &
    QMAKE_POST_LINK += echo Merging unit test result into the main application &
    QMAKE_POST_LINK += cmmerge -o $$MAINDIR\\..\\textedit_v1\\textedit_unit.exe.csmes \
                       -i $$MAINDIR\\..\\textedit_v1\\textedit.exe.csmes \
                       $$MAINDIR\\tst_textedit_v1.exe.csmes &
    QMAKE_POST_LINK += COPY /Y $$MAINDIR\\..\\textedit_v1\\textedit_unit.exe.csmes \
                       $$MAINDIR\\..\\textedit_v1\\textedit.exe.csmes &
    QMAKE_POST_LINK += DEL /F $$MAINDIR\\..\\textedit_v1\\textedit_unit.exe.csmes
  }
}
With all these changes to the .pro file in place, we can once again build and run the unit test. Now the CoverageBrowser shows the fileSave() function to be 100% covered, with the execution list containing our three original manual tests and the single unit test.
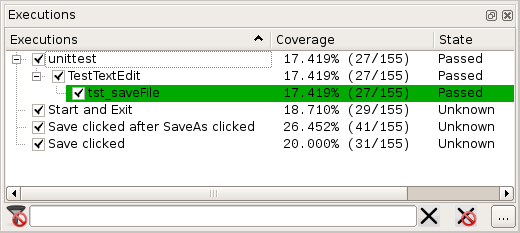
The execution list after all the tests have been executed
Working with code coverage data
The most common ways in which code coverage data is used are for developers to find untested code, and for managers to produce test status reports (e.g., as diagrams).
In addition to fully supporting the common use cases, Coco also provides additional features which make it possible to go beyond these fundamentals and extend what can be achieved with code coverage. This will be discussed in the current subsection.
Post mortem analysis
Recording each test's coverage data makes it possible to compare their data to answer the question What does this test cover that the others do not? This is particularly useful if just one test fails, since it can help us to identify which part of the code is involved.
To see how this works in practice, let us return to the TextEdit example. If we click Save, we will get an error message that no file name is defined. This is not very convenient for users—we should have designed TextEdit to handle this particular case by opening the Save As dialog rather than by producing an error.
To identify where in the code this problem arises, we simply compare the Save Clicked execution with all other executions that involve the Save button. To do this, we must first switch to the Execution Comparison Analysis mode by selecting Tools > Execution Comparison Analysis. Select the checkboxes in the Reference column for the tst_saveFile and SaveAs clicked before Save clicked tests. This will make the execution comparison symbol appear in front of the affected names. In the Executions column, click Save clicked checkbox.
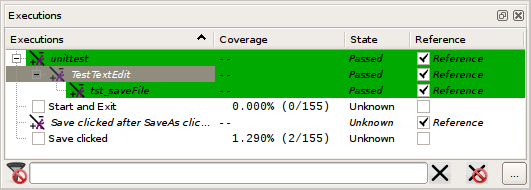
The execution list being used to compare different executions
In this mode, the coverage analysis is based only on source code lines which are not executed by tst_saveFile and SaveAs clicked before Save clicked. This is why the overall coverage decreases to 1.29%: It means that Save clicked executes 1.29% more code than the selected tests.
Use cmreport to generate a HTML report which displays the same information:
cmreport  --csmes=textedit_v1/textedit.exe.csmes \
          --html=textedit.html \
          --section=execution \
          --select-reference=".*tst_saveFile" \
          --select-reference="SaveAs clicked before Save clicked"
If we now look at the source code itself, we will see that only two lines of the TextEdit::fileSave() function are not grayed: the lines which pop up the error message. These are the lines that must be modified to change the Save button's behavior.
bool TextEdit::fileSave()
{
  if (fileName.isEmpty())
  {
    QMessageBox::warning(this,tr("No file name specified"),
      tr("Save first your document using 'Save As...' from the menu"),
      QMessageBox::Ok );
    return false;
   }

  QTextDocumentWriter writer(fileName);
  bool success = writer.write(textEdit->document());
  if (success)
     textEdit->document()->setModified(false);
  return success;
}
In this case, changing the fileSave() function is easy—we simply replace the QMessageBox::warning() call with a call to the fileSaveAs() method.
bool TextEdit::fileSave()
{
   if (fileName.isEmpty())
     return fileSaveAs();

   QTextDocumentWriter writer(fileName);
   bool success = writer.write(textEdit->document());
   if (success)
      textEdit->document()->setModified(false);
   return success;
}
Evaluating the impact of a hot fix
Before committing a change or starting to test a hot fix, it is possible to estimate the impact of the code modification. CoverageBrowser is able to perform an analysis on the difference between two source sets and can list the tests that will be affected (and those which will not).
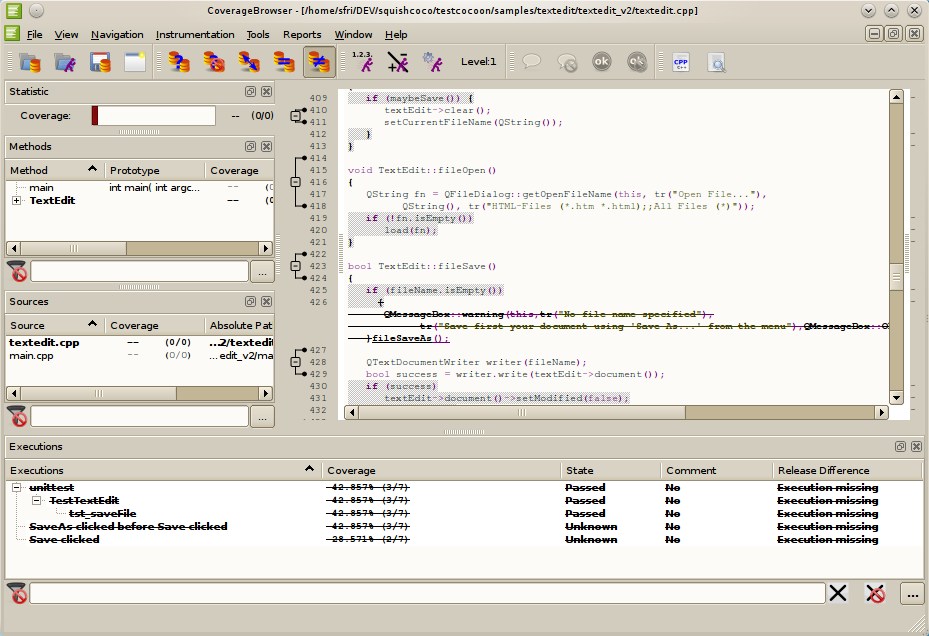
Start CoverageBrowser and load the modified TextEdit example's instrumentation database. Now click Tools > Compare with and select the original version of the TextEdit instrumentation database. CoverageBrowser will now display the source code like a text comparison application does (e.g., diff).
Click Tools > Analysis of Modified Functions to exclude all unmodified functions from the coverage analysis. In the TextEdit case, doing this will mean that only one function, TextEdit::fileSave(), will be treated as being instrumented since that is the only method we have changed. This also affects the statistic calculations since execution coverage statistics will now be limited to just this function. The test executions whose coverage statistic is not zero are the ones that are affected by the code modifications we have made.
In our case we have:
- Save clicked
- SaveAs clicked before Save clicked
- tst_saveFile (our unit test)
The Start and Exit case has a coverage of 0% and so does not execute our modified code. It is for this reason no longer visible in the execution list. All entries in the 'Execution' column are struck through to inform us that these tests are not executed in the newest version and only present in the reference database.
In other words, only the two manual tests and the unit test listed above must be re-executed to ensure that no regressions have been introduced by our code changes.
List of tests affected by a code modification
Black-box testing/distributed testing
Up to now we have done white-box testing, i.e. testing where we have access to the source code and which makes use of our knowledge of the code. It is also possible to use Coco for black-box testing. In other words, we can still do code coverage analysis without having access to or even knowledge of the source code. If we use this approach, the generated instrumentation database will, of course, contain no source code.
To use black-box testing we must create a suitable instrumentation database by clicking File > Generate Black-Box Configuration. This database, along with the TextEdit executable, can be given to the test team which can then use them with a simplified version of CoverageBrowser. This version of CoverageBrowser only supports the importing and managing of execution reports since it does not have access to the application's source code.
Black-box testing results as shown by CoverageBrowser
Once all the tests are finished, the black-box database can be merged into the original TextEdit instrumentation database using CoverageBrowser's merge facilities (File > Merge with).
Verifying if a bug fix is correctly tested
Often, when a small bug fix is made, the effects are very localized and leave most of the source code unchanged. In view of this, it is often unnecessary to retest the entire application with the whole test suite.
Coco makes it possible to avoid unnecessary testing. We can tell it to restrict itself to the source code that has changed between the original and fixed version of the application (see Evaluating the impact of a hot fix). This allows us to focus purely on the analysis of the fix. To achieve this, simply load the fixed application's freshly generated instrumentation database (e.g., for the modified TextEdit application), and compare it with the earlier database for the unfixed version, using Coco's facility for analyzing modified functions.
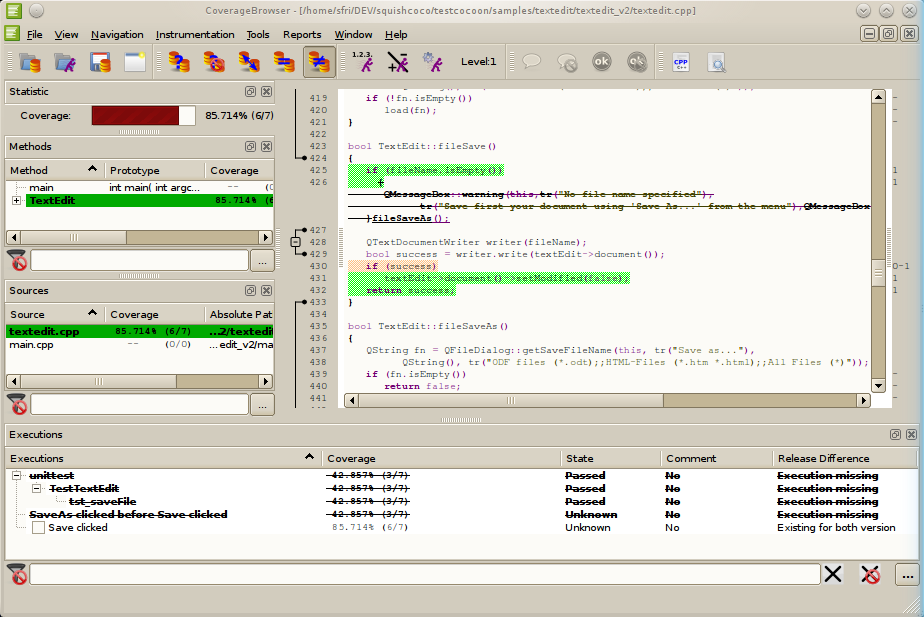
Coverage of the patched function
We have done just such a comparison and the results are shown in the image above. The two tests, Save clicked and Start and Exit, cover 85% of the TextEdit::fileSave() function, the only method that was modified for our fix. From this we know exactly what additional testing is necessary to achieve 100% code coverage for our tests for the fixed version of the application. CoverageBrowser continues to display the list of missing tests (which are only executed using the first version of TextEdit) in strikeout style. This gives a hint of what remains for testing effort.
Use cmreport to generate a HTML report which displays the same information:
cmreport  --csmes=textedit_v2/textedit.exe.csmes \
          --csmes-reference=textedit_v1/textedit.exe.csmes \
          --html=textedit.html \
          --section=execution
Conclusion
Coco provides code coverage analysis which can be applied to all the usual testing techniques: unit, manual, and black-box testing. Coco can easily be told to ignore the generated code produced by the Qt library's tools (moc, qrc, and uic), so that only the code written by developers is instrumented. Test results can be collected into a database and can be used to evaluate how much code coverage our tests achieve and to show which statements are not currently tested. With this information we can target our testing efforts towards 100% test code coverage. In addition, Coco makes it possible to see what effect a code modification would have in terms of test code coverage without having to test the entire application.
Overall, Coco can help us target our tests to ensure that our applications have as much test coverage as possible, while avoiding or minimizing test coverage duplication. Furthermore, Coco can help us see what effects changes to our code have on test coverage, so that we can adapt our test suites accordingly.
Coco v7.6.0 ©2026 The Qt Company Ltd.
Qt and respective logos are trademarks of The Qt Company Ltd. in Finland and/or other countries worldwide. All other trademarks are property
of their respective owners.
