Support for General Purpose IDEs
Qt Creator
Note: This section is about instrumentation with CMake. For the QMake and QBS build systems, please follow the links.
Create a file squishcoco.cmake in the root directory of your source code, as described before.
To include it in your project, select in the Project view the CMake section and the Initial Configuration tab. In the field Additional CMake options, add a command line option of the form "-C<path>/squishcoco.cmake" to read the file squishcoco.cmake. The path to squishcoco.cmake must be an absolute path.

Microsoft Visual Studio
Coco provides wrappers for link.exe and cl.exe located on the %SQUISHCOCO%\visualstudio directory. They behave exactly like the corresponding Microsoft® compiler and linker except that the code coverage analysis becomes activated when the option --cs-on among the command arguments. The wrappers call the Microsoft tools for compilation and linking.
Note: See here for C# instrumentation
Microsoft Visual Studio .NET C and C++ Compiler
There are two ways to activate the instrumentation of a Visual Studio C/C++ project. It can be done automatically, with the Visual Studio Coco Wizard. Or one one can do it manually, as it is described in the rest of this section.
To use Coco with Visual Studio .NET:
- Add the location of the CoverageScanner wrappers to the first position in the
VC++ Directories.- For Visual Studio 2005 or 2008:
- Start Visual Studio 2005 or 2008.
- Select Tools > Preferences.
- Select Projects > VC++ Directories.
- Add the entry
$(SQUISHCOCO)\visualstudioas the first item in the list of directories: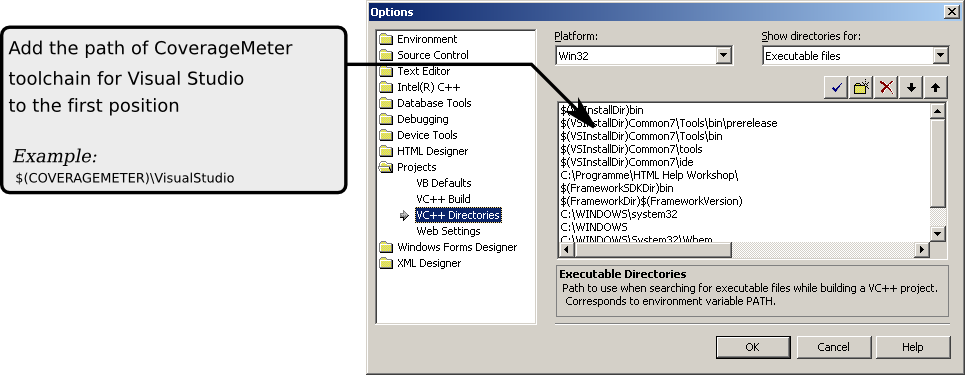
- For Visual Studio 2010:
- Start Visual Studio 2010.
- Open a C++ project.
- Open the project properties using the context menu of the loaded project.
- Select Configuration Properties > VC++ Directories.
- Add the entry
$(SQUISHCOCO)\visualstudioas the first item in the list of executable directories: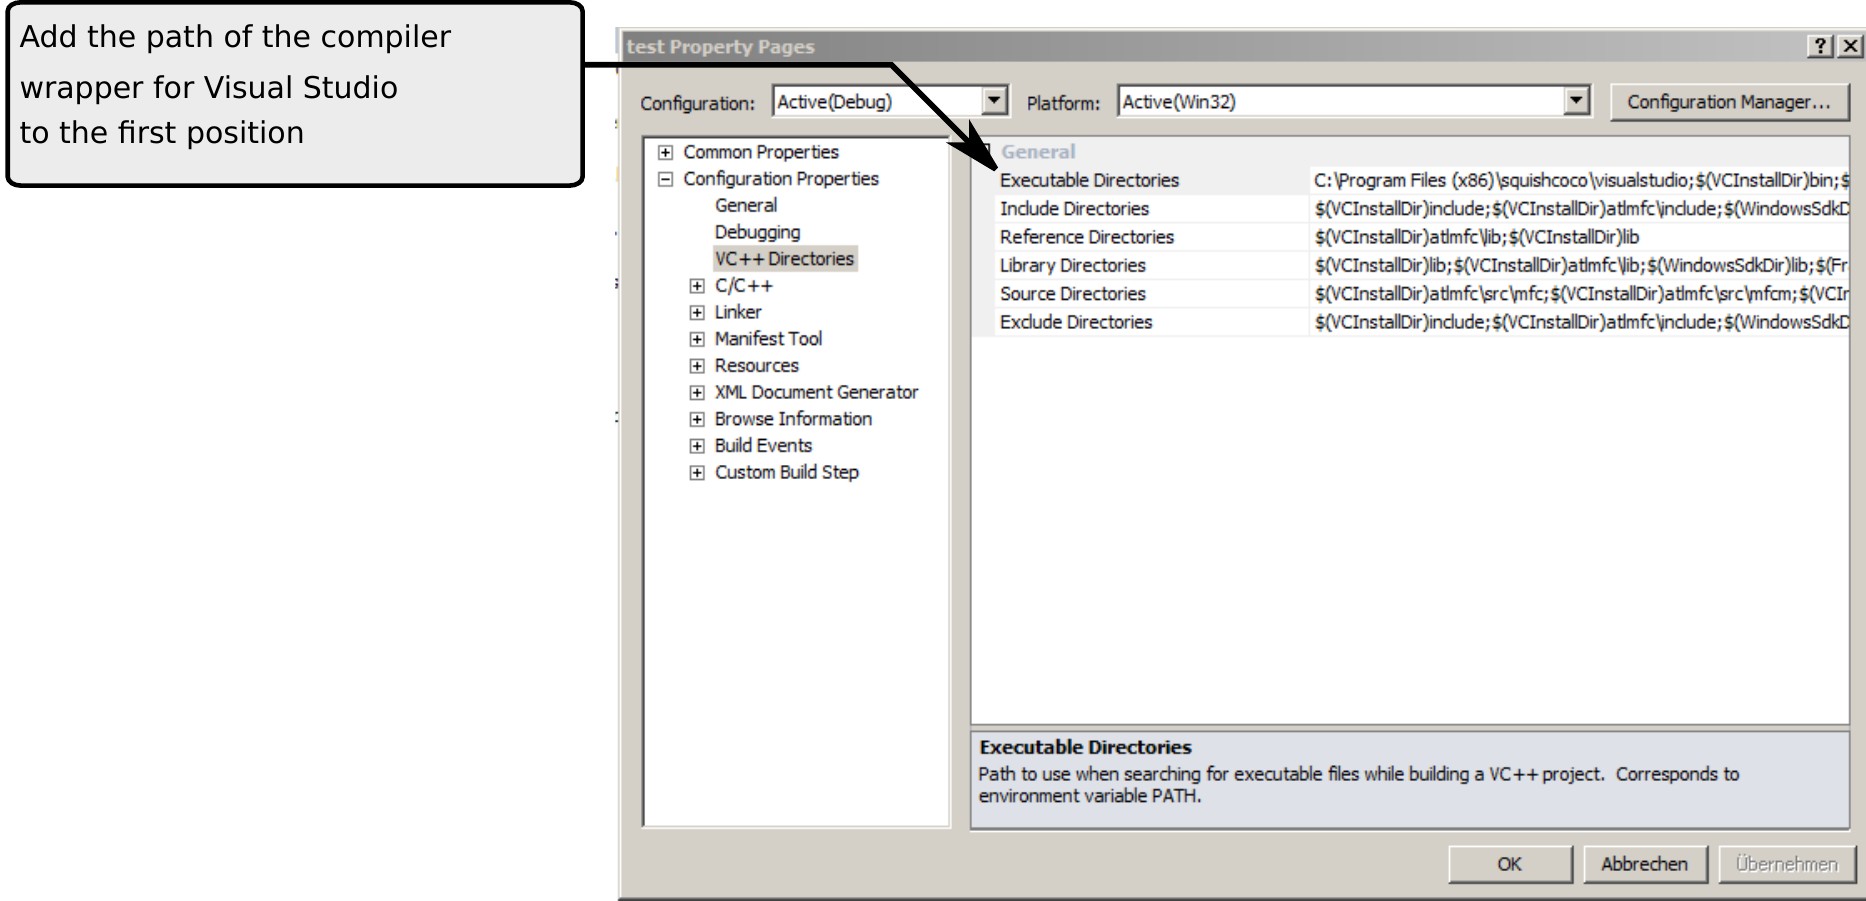
- For Visual Studio 2005 or 2008:
- To activate code coverage analysis:
- Open a Visual C or C++ project.
- Edit the project settings by clicking Project > Properties.
- In Configuration Properties > C/C++ > Command Line > Additional Options, enter
--cs-on: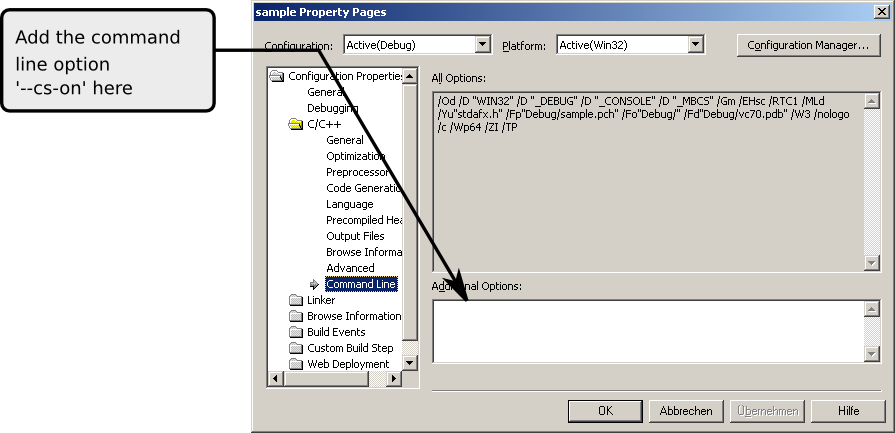
- In Configuration Properties > Linker > Command Line > Additional Options, enter
--cs-libgento specify the library to use for the generation of the CoverageScanner library.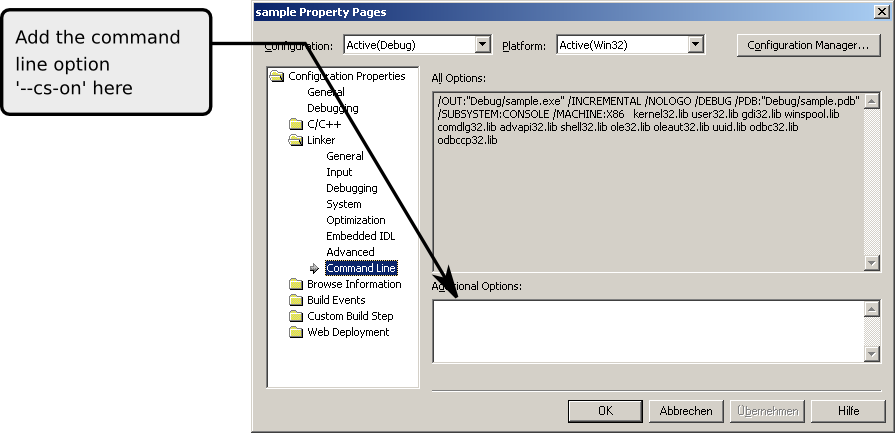
For a list of recommended settings, see Library settings.
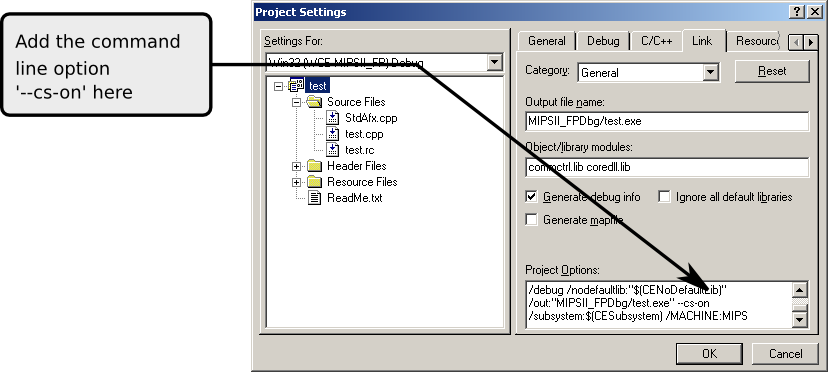
- For Microsoft Windows CE applications, append to the linker arguments the command line option
--cs-architecturewhich lets you specify the target platform. For a summary of available architectures, see Architectures.
Library settings
| Library | Library file | Command line option |
|---|---|---|
| Single Threaded | LIBC.LIB | --cs-libgen=/ML |
| Static MultiThread | LIBCMT.LIB | --cs-libgen=/MT |
| Dynamic Link (DLL) | LIBCRT.LIB | --cs-libgen=/MD |
| Debug Single Threaded | LIBCD.LIB | --cs-libgen=/MLd |
| Debug Static MultiThread | LIBCMTD.LIB | --cs-libgen=/MTd |
| Debug Dynamic Link (DLL) | LIBCRTD.LIB | --cs-libgen=/MDd |
Architectures
| Targeted architecture | Command line option |
|---|---|
| ARM Microprocessor | --cs-architecture=ARM |
| ARM Microprocessor (Thumb code) | --cs-architecture=THUMB |
| x86 Microprocessor | --cs-architecture=IX86 |
| MIPS16 Microprocessor | --cs-architecture=MIPS16 |
| MIPS Microprocessor | --cs-architecture=MIPS |
| MIPS Microprocessor with FPU | --cs-architecture=MIPSFPU |
| SH3 Microprocessor with FPU | --cs-architecture=SH3 |
| SH4 Microprocessor with FPU | --cs-architecture=SH4 |
Microsoft Visual C++ Express
To use Coco with Microsoft Visual C++ Express:
- Add the location of the CoverageScanner wrappers to the first position in the VC++ Directories:
- Start Microsoft Visual C++ Express.
- Select Tools > Preferences.
- Select Projects > VC++ Directories.
- Add the entry
$(SQUISHCOCO)\visualstudioas the first item in the list of directories.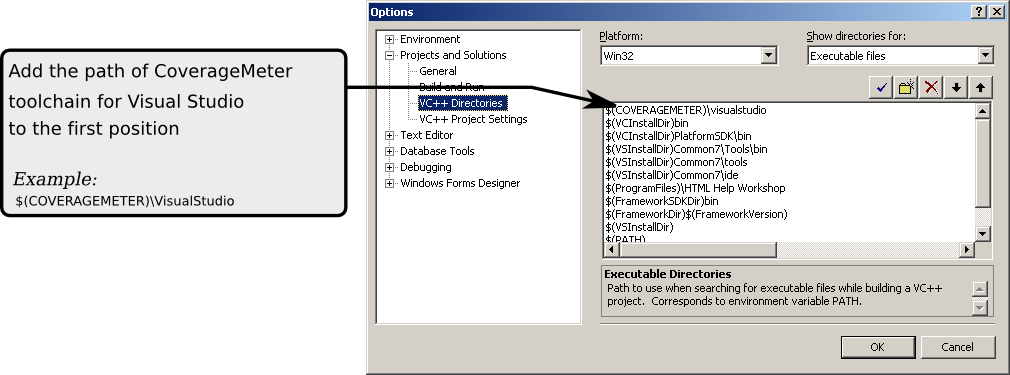
- The activation of the code coverage analysis is similar to Visual Studio .NET (see Visual Studio .NET C and C++ Compiler).
Microsoft Visual Studio 6.0
To use Coco with Visual Studio 6.0:
- Add the location of the CoverageScanner wrappers to the first position in the executable directories:
- Start Visual Studio 6.0.
- Select Tools > Preferences > Directories.
- In Show directories for, select Executable files.
- Add the path of the directory
visualstudioof the Coco installation as the first item in the list of directories. For example, if Coco is installed onc:\programme\SquishCoco, add the pathc:\programme\SquishCoco\visualstudio.Note: Microsoft Visual Studio 6.0 does not handle system variables in the path list. So the
%SQUISHCOCO%variable needs to be expanded.
- To activate code coverage analysis:
- Open a Visual C or C++ project.
- Edit the project settings by clicking Project > Properties.
- Add the option
--cs-onto the additional command line arguments of the C or C++ compiler and linker.
- In the additional arguments of the linker, add
--cs-libgenwhich specifies the name of the generated CoverageScanner library.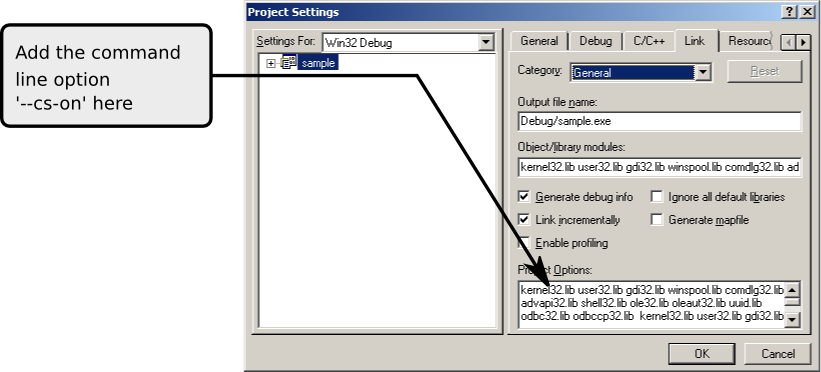
For a list of recommended settings, see Library settings.
Microsoft eMbedded Visual C++
To use Coco with Microsoft eMbedded Visual C++:
- Add the location of the CoverageScanner wrappers to the first position in the executable directories.
- Start eMbedded Visual C++.
- Select Tools > Preferences > Directories.
- In Show directories for, select Executable files.
- Select Platform and the targeted CPUs.
- Add the path of the directory
WinCEof the Coco installation to the first position in the list of directories. For example: if Coco is installed onc:\programme\SquishCoco, add the pathc:\programme\SquishCoco\WinCE.Note: Microsoft eMbedded Visual C++ does not handle system variables in the path list, so the
%SQUISHCOCO%variable needs to be expanded.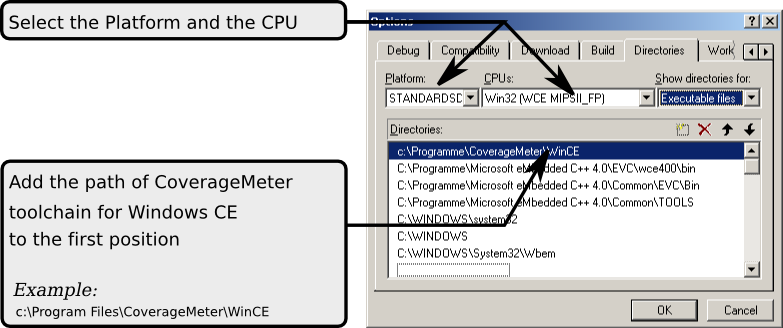
- To activate the code coverage analysis:
- Open a Visual C or C++ project.
- Edit the project settings by clicking Project > Properties.
- Add the option
--cs-onto the additional command line arguments of the C and C++ compiler and linker.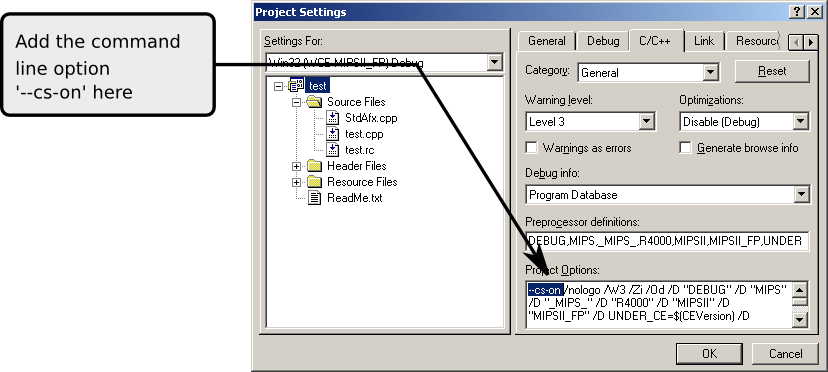
Eclipse IDE for C/C++
In Eclipse™ IDE for C/C++, enable code coverage for a configuration by replacing the names of the compilers it uses with the names of the Coco compiler wrappers:
- Start Eclipse.
- Load the C or C++ project that should be instrumented.
- Open the property window Project Properties.
- Click C/C++ Build > Settings.
- Create a new configuration by clicking Manage Configurations, and select it.
- Click Tools Settings tab.
- Click GCC C++ Compiler and prepend
csto the name of the compiler.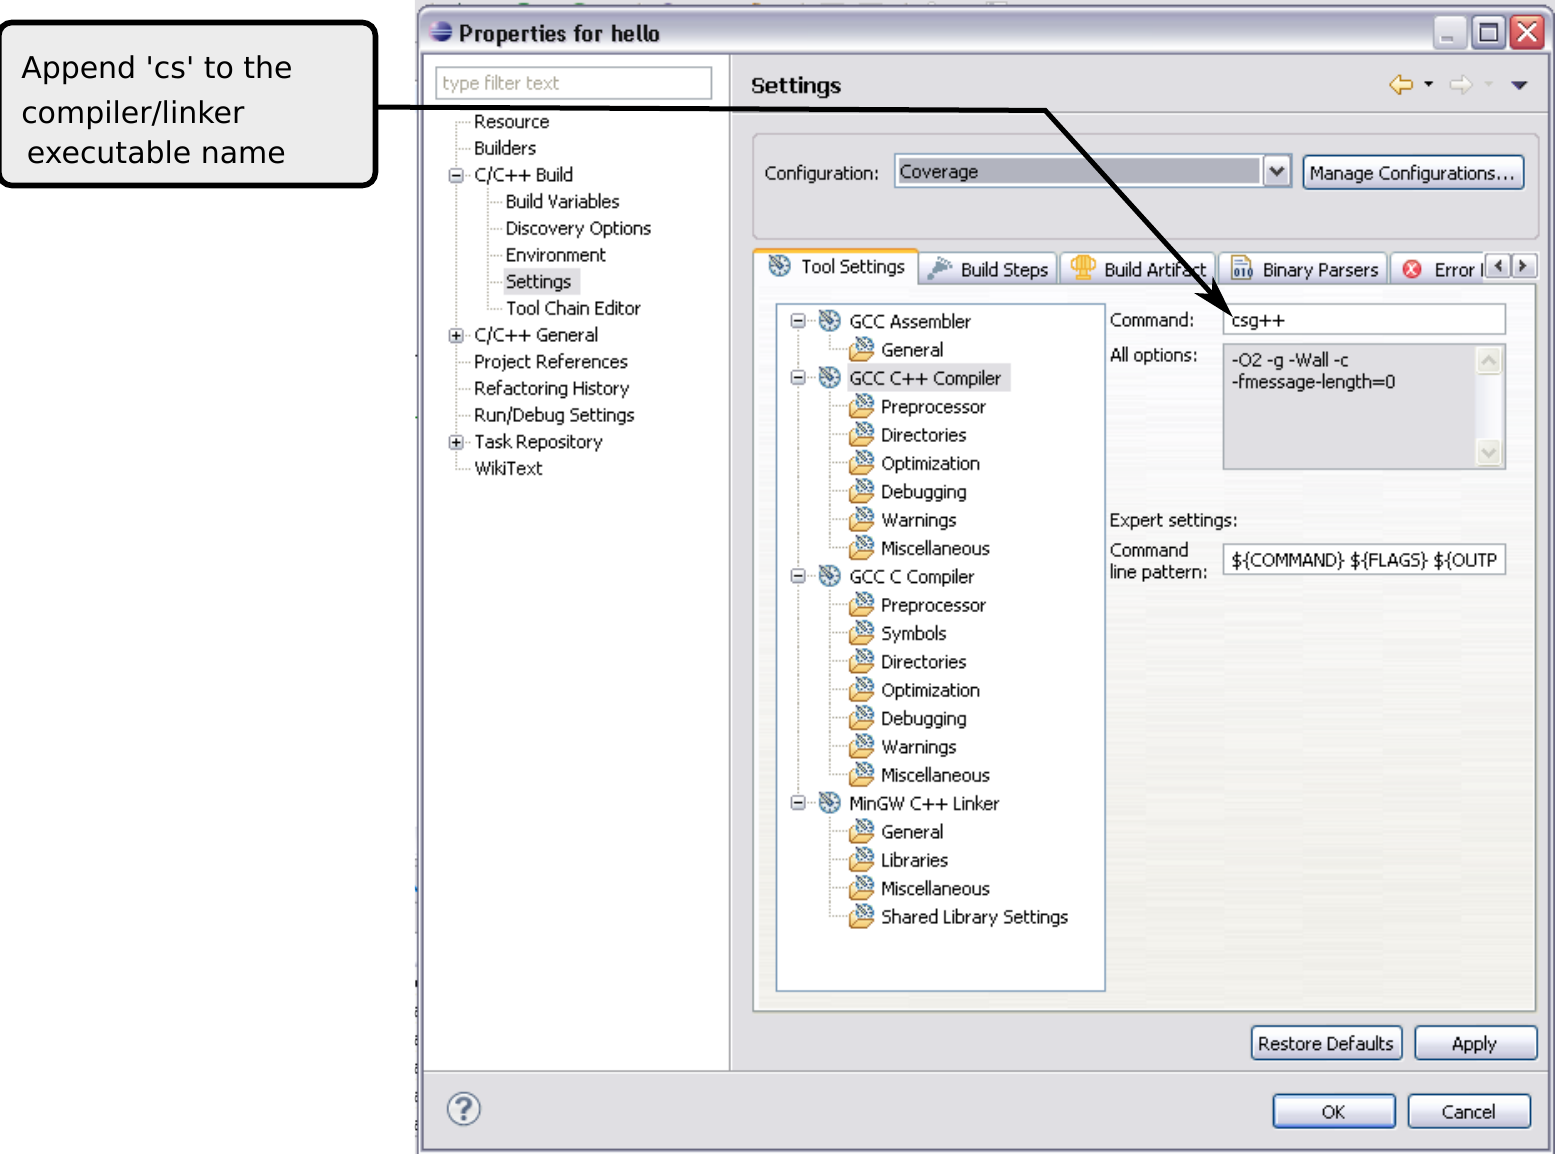
- Click GCC C Compiler and prepend
csto the name of the compiler. - Click C++ Linker and prepend
csto the name of the linker. - If it is a library project, also click GCC archiver and replace the name of the archiver command
arwithcsar.
Now Eclipse will use the Coco wrappers instead of the compilers when compiling.
However, the Coco wrappers are not by default in the search PATH and cannot yet be found during compilation.
To change this, a copy of the PATH variable needs to be added to the C/C++ Build > Environment section of the property window, and the path of the Coco binaries added. Under UNIX®, and with Coco installed at the default location, PATH will then have a value like /opt/SquishCoco/bin:/usr/local/bin:/usr/bin:/bin.
Almost always it will be necessary to modify the behavior of Coco by setting command line options. The easiest way to do this is by adding the variable COVERAGESCANNER_ARGS to the C/C++ Build > Environment. Its value then consists of command line options (see List of options). Code instrumentation is however already activated if this variable is not set or empty.
Note: If the value of COVERAGESCANNER_ARGS has changed, it is necessary to compile the whole project again. Otherwise, the new options have no effect.
If everything is done correctly and the project is compiled, you will see in the console window that csg++ is used instead of g++, and that a .csmes file is created next to the place of the newly-built binary. When the binary is run, a .csexe file is created in its working directory, which is typically a different directory from that of the .csmes file.
Apple Xcode
For versions up to Apple Xcode 12
To use Coco with Apple® Xcode, activate the code coverage analysis:
- Open a terminal window and set the
CPLUSPLUS,LDPLUSPLUS,LDandCCto CoverageScanner compiler wrapper. The path of a native compiler (clang,clang++,gccorg++) needs to be set in thePATHenvironment variable. - Start Xcode using the
opencommand.If
GCCis used as compiler:SQUISHCOCO=/Applications/SquishCoco/wrapper export CC=$SQUISHCOCO/gcc export LD=$SQUISHCOCO/gcc export CPLUSPLUS=$SQUISHCOCO/g++ export LDPLUSPLUS=$SQUISHCOCO/g++ open /Developer/Applications/Xcode.appIf
clangis used as compiler:SQUISHCOCO=/Applications/SquishCoco/wrapper export CC=$SQUISHCOCO/clang export LD=$SQUISHCOCO/clang export CPLUSPLUS=$SQUISHCOCO/clang++ export LDPLUSPLUS=$SQUISHCOCO/clang++ export XCODE_TOOLCHAIN_DIR=/Applications/Xcode.app/Contents/Developer/Toolchains export XCODE_TOOLCHAIN=$XCODE_TOOLCHAIN_DIR/XcodeDefault.xctoolchain/usr/bin/ export PATH=$XCODE_TOOLCHAIN:$PATH open /Applications/Xcode.app - Open a Xcode C or C++ project.
- Edit the project settings by clicking Project > Edit Project Settings.
- Add the option
--cs-onto the additional command line arguments of the C and C++ compiler in Other C Flags and Other C++ Flags and of the linker in Other Linker Flags.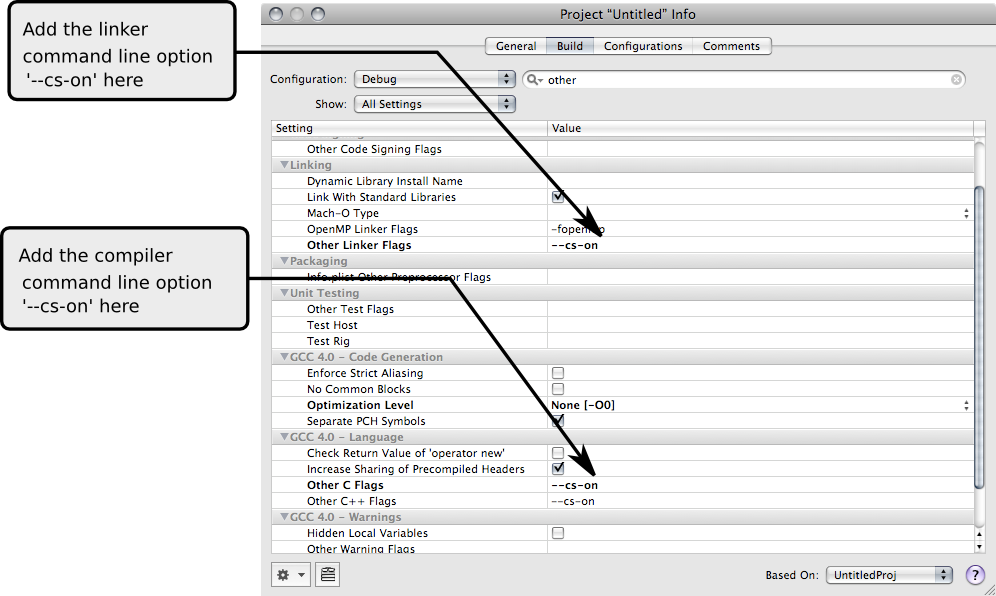
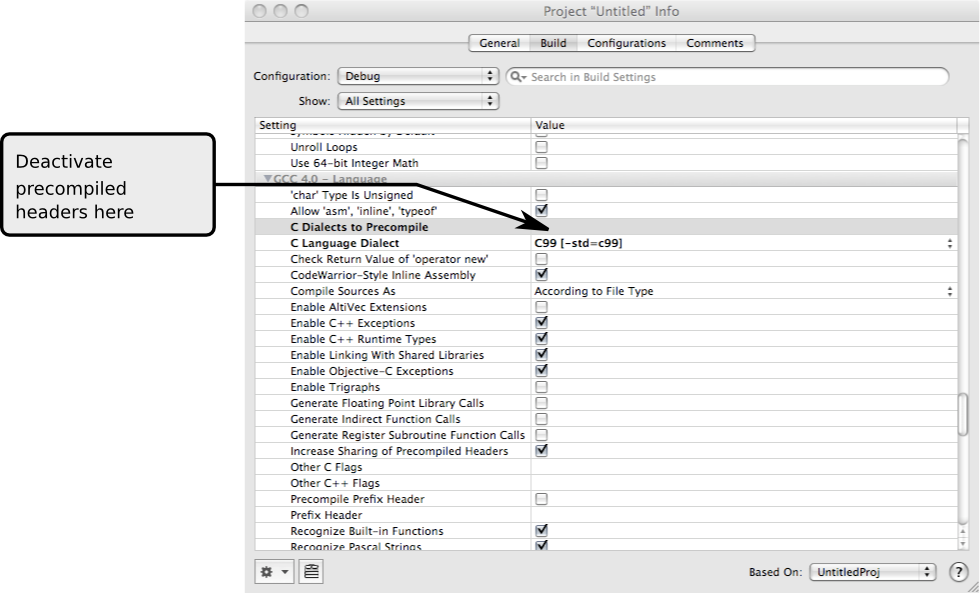
- Disable the usage of the precompiled header. Open the settings of the active target (Project > Edit Active Target) and remove the contents of Prefix Header.
For Apple Xcode 12 and above
To use Coco with Apple Xcode, activate the code coverage analysis:
- Open a Xcode C or C++ project.
- Edit the project settings by clicking the top level project.
- Press on the + button and insert the following User Defined Settings:
CC: /Applications/SquishCoco/wrapper/clangCPLUSPLUS: /Applications/SquishCoco/wrapper/clangLD: /Applications/SquishCoco/wrapper/clangLDPLUSPLUS: /Applications/SquishCoco/wrapper/clang++
- Add the option
--cs-onto the additional command line arguments of the C and C++ compiler in Other C Flags and Other C++ Flags and of the linker in Other Linker Flags. It is also recommended to set the path to theclangtoolchain by adding the switch--cs-native-toolchain. Here is a complete example:--cs-on --cs-native-toolchain=/Applications/Xcode.app/Contents/Developer/Toolchains /XcodeDefault.xctoolchain/usr/bin/ - Disable the usage of the precompiled header. Open the settings of the active target (Project > Edit Active Target) and remove the contents of Prefix Header.
Coco v7.6.0 ©2026 The Qt Company Ltd.
Qt and respective logos are trademarks of The Qt Company Ltd. in Finland and/or other countries worldwide. All other trademarks are property
of their respective owners.
