Discovering new test data with Coco Test Engine
Coco Test Engine is a set of macros and a command line-tool that together allow you to generate test data for a function, while it tries to maximize code coverage and minimize the number of test rows for the given data set. It executes a unit test repeatedly, with data generated by the Coco Test Engine, and uses Coco to measure the code coverage that results from the execution.
This tutorial will show you how to write a data-driven test case that makes use of Coco's test data discovery. After you have executed this test in discovery mode, we will show you how to work with the results, and later, how to run a regression test against the discovered data set.
This tutorial shows two different approaches for code integration. The first approach uses the Coco Test Engine Driver, also known as cocotestengine, that executes a target program written by the user. The second approach uses a third-party unit-testing framework, CppUnit.
The example application is based on the simple expression parser presented in the section Instrumentation of a simple project. It is recommended that you have at least performed the steps in UNIX and macOS setup or Microsoft Windows setup of the tutorial section before proceeding.
The function we wish to test is Parser::parse(const std::string &). Here is an example data-driven test which calls parse() after fetching a row of data, and compares the result to an expected value.
// fetch a test data value into a variable called 'expression'
COCOTEST_FETCH( std::string, expression );

Parser ps;
// Parse the test data
std::string result = ps.parse( expression ).msg();

// compare the result to the expected value
COCOTEST_CHECK( result );
Build Environment Setup for Parser Examples
For the Makefiles to work correctly, the SQUISHCOCO environment variable must be set to the Coco installation directory. This is already done for you by the Coco installer on Windows, but it has to be set manually on Linux or MacOS. For example,
$ export SQUISHCOCO=$HOME/SquishCocoThis will be used to locate the header files which are in the include subdirectory of the Coco installation.
Test data generation using the Coco Test Engine driver
This section describes how to use Coco's own driver tool to generate test data and execute tests. This has the advantage that it can also detect and recover from crashes compared to the CPPUnit approach.
The files for this example can be found in the <Windows Coco>\parser\parser_cocotestengine directory on Windows and SquishCoco/samples/parser/parser_cocotestengine on UNIX and macOS. Make sure to work on a copy of these directories in your workspace and not directly on the installation. See UNIX and macOS setup or Microsoft Windows setup for the guide in setting up the examples for your operating system.
Create target program
To prepare a tested function for test data discovery, it is necessary to write a target program that calls that function. An example for this is testcases.cpp.
At the top of your source file, CocoTestEngine.h must be included.
#include "CocoTestEngine.h"
#include "parser.h"
CocoTestEngine.h defines macros and functions for the target compilation. It is located in the <Windows Coco>\include directory on Windows or SquishCoco/include on UNIX and macOS.
Given a function for which we wish to generate data, we can define a named test case with the help of COCOTEST(), COCOTEST_FETCH() and COCOTEST_CHECK() macros. COCOTEST() turns a block of code into a function that gets called repeatedly, once for each row of test data. The parameter to the COCOTEST() macro is the name of the test.
At the beginning of the COCOTEST block, there are one or more COCOTEST_FETCH() statements that define variables and assign input values to them. At the end, there are one or more COCOTEST_CHECK() macros that compare to, insert, or update the expected output values depending on whether the exec_mode is Test, Discovery or Learn.
COCOTEST( testname )
{
    // declare a variable 'expression' and fetch a value into it:
    COCOTEST_FETCH( std::string, expression ) ;

    Parser ps;
    // parse the input data, and capture the result in 'result'
    const std::string result = ps.parse( expression ).msg();

    // compare 'result' to an expected value from the data row.
    COCOTEST_CHECK( result ) ;
}
At the end of the file, there must always be a COCOTEST_MAIN, which provides a main() function.
COCOTEST_MAINCompile the Target Program
The target program now must be compiled and instrumented. This means that the include path of the compiler must be configured so that the file CocoTestEngine.h can be found. For instrumentation, we use as before a version of the instrumented script, this time in parser/parser_cocotestengine.
On Linux:
$ ./instrumented make -f gmake.mak testsOn Windows:
> instrumented.bat nmake -f nmake.mak testsThis will build a target program called testcases(.exe). The tests target also runs the testcase, doing a regression-test.
The COVERAGESCANNER_ARGS like --cs-mcdc or --cs-mcc are optional but result in more coverage points which can make the code coverage analysis better. --cs-function-profiler is also not required for this example. However, there is one new option which is required for discovery to work properly: --cs-test-case-generation.
We added these recommended options to the COVERAGESCANNER_ARGS to exclude some of the target code:
--cs-exclude-path=../../cppunit-1.15.1
--cs-exclude-file-abs-wildcard=*\unittests.cpp
Using these, the search algorithm only uses coverage data starting from the function under test.
Discover Test Data
Configuration files
Files in JSON format are used to store the configuration options and test data. They need to be in the current working directory to be found by cocotestengine, unless a -d directory argument is passed to it.
Each file is associated with one test and has the format <test name>.<file type>.json. The <test name> field is the name of the test, which must match the argument passed to the COCOTEST() macro.
The <file type> field is one of the following:
cfgfor configuration of the generators of the test datadatafor the test data (created during the--discoverprocess if not present)runfor runtime parameters (not needed when usingcocotestengine)
The configuration file contains the generators for the different input values and a list of expected output values. It has the extension .cfg.json and requires "inputs" and "outputs" as top-level keys. The "inputs" field contains the names of input variables. Under each variable name is a "generator" for that particular variable. This is followed by the generator's required properties and their values. The generator determines the variable's data type and the distribution, range or pattern that the input variable may contain. The "outputs" field is an array of expected output variable names.
An example of this is the file testname.cfg.json which can be found in the parser_v5 and parser_cocotestengine subdirectories.
{
    "inputs": {
        "expression": {
            "generator": "RegExpString",
            "meanLength": 10,
            "pattern": "(abs|sign|sqrt|log10|a?tan|a?sin|a?cos|factorial|ln|log|exp|[-+/=<>^|!*%0-9A-Z.()]+)*"
        }
    },
    "outputs": [
        "result"
    ]
}
It contains the input variable "expression" which has a "RegExpString" or regular expression generator. The property "meanLength" defines the average length of the "*" and "+" operators, while "pattern" contains the match pattern that all generated strings must follow. For example, this generator can produce strings like "3*2" or "sqrtabs123".
Start Discovery of Test Data
Now that we have a configuration file, we can use the cocotestengine driver to --discover some test data. The Makefiles each have a discover target which runs 100000 tries. To execute this target:
On Linux:
$ ./instrumented make -f gmake.mak discoverOn Windows:
> instrumented.bat nmake -f nmake.mak discoverThe call might look like this,
cocotestengine -e ./testcases -d . -t testname --discover --max-tries=100000 --update=2-e testcasesdefines the path to the parser executable. Under Windows, the executable would have ended with.exe.-d .defines the directory that contains the configuration and data files.-t testnamesets the test name. The names of the files are then put together from the directory and the test name: The data file has therefore the name./testname.data.json.--discoverenables discovery mode.--max-tries=100000sets the number of trial rows that the driver generates. (The default value is 10000.)--update=2is not strictly needed but useful: With it,cocotestengineprints every 2 seconds a status update about the discovery process.
Running it, you might see output that looks like this:
Generating data for test "testname" (100000 tries).
10:55:54 Found 66 rows in 24700 tries. Coverage=76.87% (309/402).
10:55:56 Found 67 rows in 49700 tries. Coverage=78.11% (314/402).
10:55:58 Found 69 rows in 75000 tries. Coverage=78.86% (317/402).
10:56:00 Found 71 rows in 100000 tries. Coverage=80.35% (323/402).
After 100000 tries, we have 80% code coverage, and we achieved this using 71 rows, and found them in roughly 7 seconds of execution time.
At the end, all the data rows that were found are written to testname.data.json. If the discovery process takes too much time, press Ctrl-C; then the discovery stops and all data found so far is written to the disk.
Working with generated data
Test data file
The data file contains the possible input values and expected output values of a particular test. If it has not been created yet, the Discover step will do that for you. It has the extension .data.json, contains an optional object field "types" and a required array field called "data". "types" contains a list of input and output field names and their data types which could be one of the following:
"Bool""Integer""UnsignedInteger""Float""String"
"data" is an array of test data rows with fields "inputs" and "ouputs" containing "variableName":"value" pairs. Each row also has optional fields validated, which indicates that the expected output values have been manually checked for correctness, and "crash", which indicates that the inputs of this row triggered a crash during test discovery.
An example of this is the file testname.data.json which can be found in the parser_v5 and parser_cocotestengine subdirectories.
{
"data": [
{
"inputs": {
"expression": "3+2"
},
"outputs": {
"result": "Ans = 5"
},
"validated": true
},
{
"inputs": {
"expression": "cos(0)"
},
"outputs": {
"result": "Ans = 1"
},
"validated": true
},
{
"inputs": {
"expression": "sqrt(9)+tan(2)"
},
"outputs": {
"result": "Ans = 0.81496"
},
"validated": true
}
]
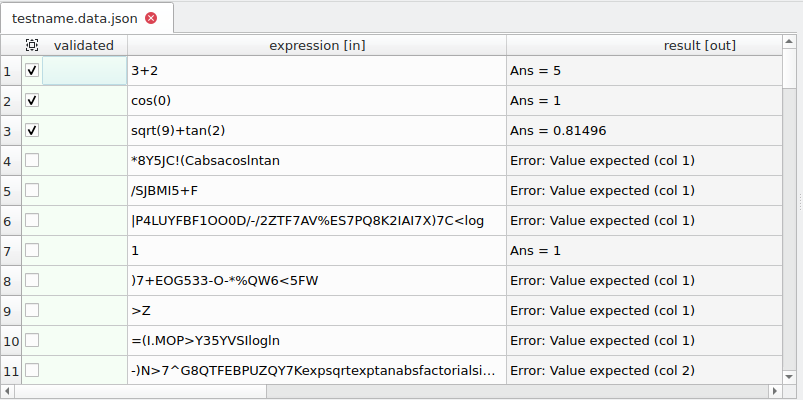
}After the discovery has been run, we can see all of the rows in testname.data.json, using a text editor, or better still, in a proper table using testdataeditor. Notice in the image below that the discovered rows are not validated while the first 3 rows are.
Test Data Editor
Since the data files are stored in JSON format, they can be created and modified in any text editor. For convenience, Coco includes a Test Data Editor tool that allows viewing and editing data files in tabular form. The executable named testdataeditor can be found in the Coco binary directory. It takes in as arguments a directory or a list of data files to open.
To edit the data file in one of the samples directories:
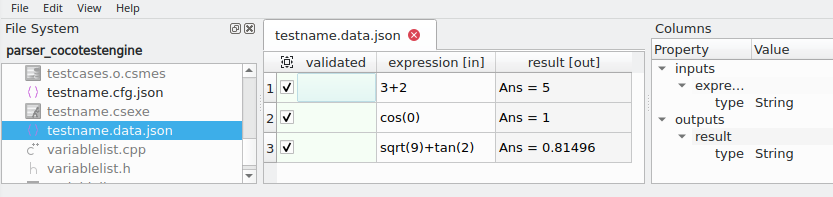
$ testdataeditor testname.data.jsonThe main window contains a File System pane for easily opening and switching between test data files and a Columns pane that shows the type information of each column which is either taken from the "types" field of the datafile or extrapolated from the contents of "data".
The table view in the center shows the contents of the data file. The first column is validated. This can optionally be followed by crashed, if one is present in the data file. This is followed by the input variables indicated by [in], and output variables indicated by [out].
The Edit menu contains common commands for editing the table such as for adding and deleting rows and columns.
Analyze Coverage
It should now be possible to open testcases.csmes in CoverageBrowser and load/delete the testcases.csexe execution report. On Windows, these files would be named testcases.exe.csmes and testcases.exe.csexe, respectively.
On Linux:
$ coveragebrowser -m testcases.csmes -e testcases.csexeOn Windows:
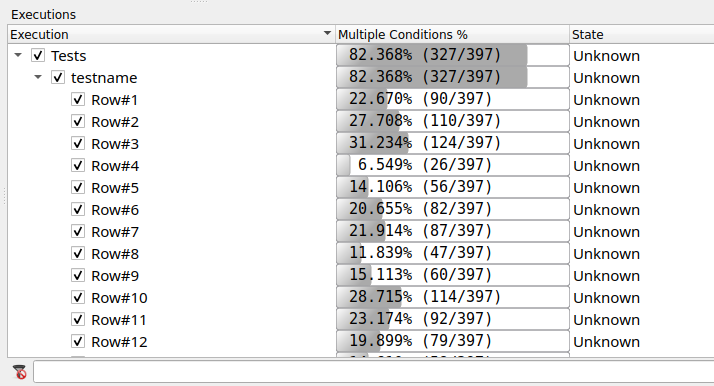
> coveragebrowser -m testcases.exe.csmes -e testcases.exe.csexeNotice in the Executions window, there are tree nodes for your data-driven test. Expand them to find testname. Notice that this tree node has children, one for each row of test data.
From CoverageBrowser, you can open parser.cpp and see if there are some uncovered cases that can be easily covered by adding a row or two of data. After running our discovered data set and afterwards opening the CoverageBrowser to that file, will see something like this:
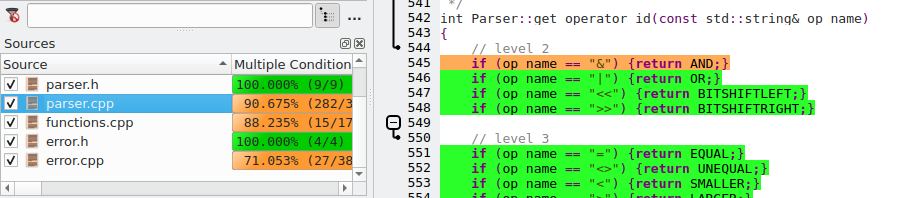
A quick glance at the coverage of the get_operator_id() function shows us that the ampersand operator (&) is not covered, so any test data row that uses that operator will increase the overall coverage.
- Take note of the current coverage % (overall, or just for
parser.cpp) (line, mcdc) in coveragebrowser. We want to improve on it.
Validate test data rows
Open the testname.data.json in the testdataeditor again.
Curating your data after it has been machine-generated is very important. This is the step where we check the expected values of the interesting data rows and possibly delete the non-interesting ones (although keep in mind, no matter how silly the test data looks, it does cover something that the other test rows did not).
Each data row has an optional property: validated, which can be checked or un-checked from the testdataeditor. When a row is validated, that means:
- The expected value is "correct" [*]
- The row will not be removed during subsequent discovery runs.
[*] If the expected value is later updated by running cocotestengine with --learn, validated is changed to false.
Add some new rows that increase coverage
- Add 1 or 2 data rows from
testdataeditorwith Edit - Insert Rows, where the input is an expression using the (&) operator (or whatever operator was left uncovered in your own coverage report from before). - To get the corresponding output, execute the test in learn mode:
cocotestengine -e ./testcases -d . -t testname --learnThis updates the expected ouput parameters in the data file with the actual outputs of the function. It also generates a new {testcases.csexe} file which contains the updated coverage.
- Open the data file again with
testdataeditor. The rows you have just manually inserted should now have the corresponding outputs. You can then validate these rows as well.
Run a data-driven regression test
Now that we have checked and validated some generated data, we are ready to use it in a data-driven regression test. Make sure to delete testcases.csexe if it is present in the directory. Then, execute this command:
$ cocotestengine -e ./testcases -d . -t testname
Running test "testname" (73 rows).
Rows run: 73. Passed: 73, Failed: 0.
All of our tests passed, and since this was instrumented, we will have a testcases.csexe file that contains the coverage of this test.
Revisit Coverage
It should now be possible to open testcases.csmes in coveragebrowser and load/delete the testcases.csexe execution report again.
In CoverageBrowser, you can open parser.cpp again. See if the missing operator is covered now.
- Check to see if the overall coverage % is increased.
In our example, the coverage increased from 82% to 86% after we added 1 row of data.
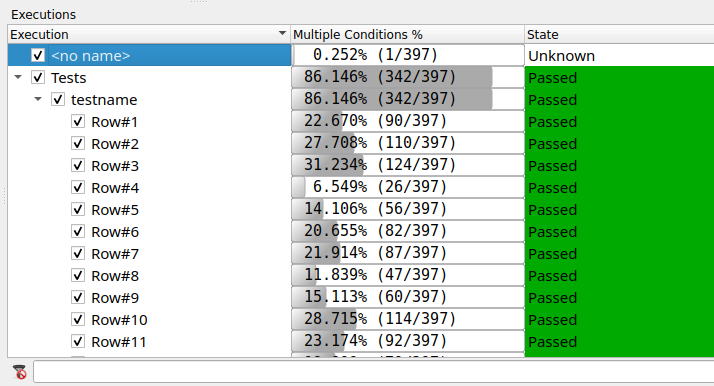
The executions now also have an execution state which identifies whether the test row has passed or failed, and whether that row is validated or not.
Integrating test data discovery with CPPUnit
This section describes how to integrate test data discovery into a unit testing framework, CPPUnit. In this approach, the test discovery and test execution are driven by the unit testing framework instead of cocotestengine. For information about integration with other unit testing frameworks, see Integration with Third-Party Unit Testing Frameworks.
This example is based on tests written for the simple expression parser. The files for this example can be found in the <Windows Coco>\parser\parser_v5 directory on Windows and SquishCoco/samples/parser/parser_v5 on UNIX and macOS. Make sure to work on a copy of these directories in your workspace and not directly on the installation. See UNIX and macOS setup or Microsoft Windows setup for the guide in setting up the examples for your operating system.
Adapt the Unit Test
The following steps have to be taken in order to adapt an existing unit test written in CppUnit to perform test data discovery.
The first change is to include CocoTestEngine_cppunit.h into the unit test source file:
#include "CocoTestEngine_cppunit.h"This file contains macros to execute and discover the tests. It is located in the <Windows Coco>\include directory on Windows or SquishCoco/include on UNIX and macOS. Test execution is possible without instrumenting with Squish Coco, but test data discovery is only possible with instrumentation.
We can add a new unit test for the Parser::parse function. It provides a string expression as input and monitors the output string result.
The code of the unit test is in unittests.cpp:
void testDataDiscovery( void )
{
    COCOTEST_BEGIN( testname )
    {
        COCOTEST_FETCH( std::string, expression );

        Parser ps;
        std::string result = ps.parse( expression ).msg();

        COCOTEST_CHECK( result );
    }
    COCOTEST_END()
}
This code means during the execution of the unit test, for each test data row in the file testname.data.json, take the string expression as input to the parse() function and compare the output result with the recorded values. COCOTEST_BEGIN() and COCOTEST_END() define a loop that executes the body (the COCOTEST block) once for each row of test data. The data rows are fetched from the file testname.data.json, one at a time, into a variable expression defined by COCOTEST_FETCH().
We pass each string expression as input to the parse() function, store the result and compare that with the expected value in our test data, by using the COCOTEST_CHECK() macro.
Configuration files
Files in JSON format are used to store configuration options as described in the previous section. The file testname.cfg.json is provided there, as an example. It will be used to generate a list of arithmetic expressions based on a regular expression pattern.
Execution parameters need to be supplied using a different file called the run configuration file. For this purpose, there is a file called testname.run.json.
{
    "exec_mode": "Discovery",
    "save_interval": 2,
    "max_tries" : 100000
}
The first property, specifying exec_mode, can have 3 possible values: "Discovery" (for discovering test data), "Test" (for executing the tests), and "Learn" (for updating the expected values of the test data).
This example enables the Discovery mode with a maximum number of tries set to 100000. It also saves the resulting data file every 2 seconds.
Start Discovery of Test Data
Once the file testname.run.json is correctly configured, it is just necessary to execute the unit test.
During Discovery mode, COCOTEST_CHECK() saves data rows to the file testname.data.json.
On Windows:
$ instrumented.bat nmake -f nmake.mak testsOn Linux:
$ instrumented make -f gmake.mak testsThe unit tests are executed automatically at the end of the build. One of the tests, called testDataDiscovery, has a COCOTEST block and performs the data-driven test.
You should see output like this:
ParserTest::testInt : OK
ParserTest::testInvalidNumber
Failed test ParserTest::testInvalidNumber: equality assertion failed
- Expected: Error: Syntax error in part "1.1e+" (col 4)
- Actual  : Ans = 1.1

 : assertion
[...]
ParserTest::testDataDiscovery : OK
The file testname.data.json is generated and the data can be viewed and edited using the Test Data Editor.
Execute data-driven regression tests
To execute the unit tests, it is just necessary to edit testname.run.json and change the execution mode as follows.
"exec_mode": "Test"This is also the default setting when the file is not present.
On Windows:
$ instrumented.bat nmake -f nmake.mak testsOn Linux:
$ ./instrumented make -f gmake.mak tests
Coco v7.6.0 ©2026 The Qt Company Ltd.
Qt and respective logos are trademarks of The Qt Company Ltd. in Finland and/or other countries worldwide. All other trademarks are property
of their respective owners.
