QML, SQL and PySide Integration Tutorial
This tutorial is very similar to the Qt Chat Tutorial one but it focuses on explaining how to integrate a SQL database into a PySide6 application using QML for its UI.
sqlDialog.py
We import the pertinent libraries to our program, define a global variable that hold the
name of our table, and define the global function createTable() that creates a new table if it
doesn’t already exist.
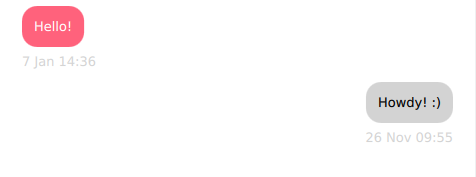
The database contains a single line to mock the beginning of a conversation.
 1import datetime
 2import logging
 3
 4from PySide6.QtCore import Qt, Slot
 5from PySide6.QtSql import QSqlDatabase, QSqlQuery, QSqlRecord, QSqlTableModel
 6from PySide6.QtQml import QmlElement
 7
 8table_name = "Conversations"
 9QML_IMPORT_NAME = "ChatModel"
10QML_IMPORT_MAJOR_VERSION = 1
11
12
13def createTable():
14    if table_name in QSqlDatabase.database().tables():
15        return
16
17    query = QSqlQuery()
18    if not query.exec_(
19        """
20        CREATE TABLE IF NOT EXISTS 'Conversations' (
21            'author' TEXT NOT NULL,
22            'recipient' TEXT NOT NULL,
23            'timestamp' TEXT NOT NULL,
24            'message' TEXT NOT NULL,
25        FOREIGN KEY('author') REFERENCES Contacts ( name ),
26        FOREIGN KEY('recipient') REFERENCES Contacts ( name )
27        )
28        """
29    ):
30        logging.error("Failed to query database")
31
32    # This adds the first message from the Bot
33    # and further development is required to make it interactive.
34    query.exec_(
35        """
36        INSERT INTO Conversations VALUES(
37            'machine', 'Me', '2019-01-07T14:36:06', 'Hello!'
38        )
39        """
40    )
The SqlConversationModel class offers the read-only data model required for the non-editable
contacts list. It derives from the QSqlQueryModel class, which is the logical choice for
this use case.
Then, we proceed to create the table, set its name to the one defined previously with the
setTable() method.
We add the necessary attributes to the table, to have a program that reflects the idea
of a chat application.
 1@QmlElement
 2class SqlConversationModel(QSqlTableModel):
 3    def __init__(self, parent=None):
 4        super(SqlConversationModel, self).__init__(parent)
 5
 6        createTable()
 7        self.setTable(table_name)
 8        self.setSort(2, Qt.DescendingOrder)
 9        self.setEditStrategy(QSqlTableModel.OnManualSubmit)
10        self.recipient = ""
11
12        self.select()
13        logging.debug("Table was loaded successfully.")
The data() function falls back to QSqlTableModel’s implementation if the role is not a
custom user role.
If you get a user role, we can subtract UserRole() from it to get the index of
that field, and then use that index to find the value to be returned.
1    def data(self, index, role):
2        if role < Qt.UserRole:
3            return QSqlTableModel.data(self, index, role)
4
5        sql_record = QSqlRecord()
6        sql_record = self.record(index.row())
7
8        return sql_record.value(role - Qt.UserRole)
In roleNames(), we return a Python dictionary with our custom role and role names as key-values
pairs, so we can use these roles in QML.
Alternatively, it can be useful to declare an Enum to hold all of the role values.
1    def roleNames(self):
2        """Converts dict to hash because that's the result expected
3        by QSqlTableModel"""
4
5        return {int(Qt.UserRole): b"author",
6                Qt.UserRole + 1: b"recipient",
7                Qt.UserRole + 2: b"timestamp",
8                Qt.UserRole + 3: b"message"}
The send_message() function uses the given recipient and message to insert a new record into
the database.
Using OnManualSubmit() requires you to also call submitAll(),
since all the changes will be cached in the model until you do so.
 1    # This is a workaround because PySide doesn't provide Q_INVOKABLE
 2    # So we declare this as a Slot to be able to call it  from QML
 3    @Slot(str, str, str)
 4    def send_message(self, recipient, message, author):
 5        timestamp = datetime.datetime.now()
 6
 7        new_record = self.record()
 8        new_record.setValue("author", author)
 9        new_record.setValue("recipient", recipient)
10        new_record.setValue("timestamp", str(timestamp))
11        new_record.setValue("message", message)
12
13        logging.debug(f'Message: "{message}" \n Received by: "{recipient}"')
14
15        if not self.insertRecord(self.rowCount(), new_record):
16            logging.error("Failed to send message: {self.lastError().text()}")
17            return
18
19        self.submitAll()
20        self.select()
Main.qml
Let’s look at the Main.qml file.
1import QtQuick
2import QtQuick.Layouts
3import QtQuick.Controls
First, import the Qt Quick module. This gives us access to graphical primitives such as Item, Rectangle, Text, and so on. For a full list of types, see the Qt Quick QML Types documentation. We then add QtQuick.Layouts import, which we’ll cover shortly.
Next, import the Qt Quick Controls module.
Among other things, this provides access to ApplicationWindow, which replaces the existing
root type, Window:
Let’s step through the App/Main.qml file.
1ApplicationWindow {
2    id: window
3    title: qsTr("Chat")
4    width: 640
5    height: 960
6    visible: true
ApplicationWindow is a Window with some added convenience for creating a header and a footer.
It also provides the foundation for popups and supports some basic styling, such as the background
color.
There are three properties that are almost always set when using ApplicationWindow: width,
height, and visible.
Once we’ve set these, we have a properly sized, empty window ready to be filled with content.
Because we are exposing the SqlConversationModel class to QML, we will
declare a component to access it:
1    SqlConversationModel {
2        id: chat_model
3    }
There are two ways of laying out items in QML: Item Positioners and Qt Quick Layouts.
Item positioners (Row, Column, and so on) are useful for situations where the size of items is known or fixed, and all that is required is to neatly position them in a certain formation.
The layouts in Qt Quick Layouts can both position and resize items, making them well suited for resizable user interfaces. Below, we use ColumnLayout to vertically lay out a ListView and a Pane.
1    ColumnLayout {
2        anchors.fill: parent
3
4        ListView {
1        Pane {
2            id: pane
3            Layout.fillWidth: true
Pane is basically a rectangle whose color comes from the application’s style. It’s similar to Frame, but it has no stroke around its border.
Items that are direct children of a layout have various attached properties available to them. We use Layout.fillWidth and Layout.fillHeight on the ListView to ensure that it takes as much space within the ColumnLayout as it can, and the same is done for the Pane. As ColumnLayout is a vertical layout, there aren’t any items to the left or right of each child, so this results in each item consuming the entire width of the layout.
On the other hand, the Layout.fillHeight statement in the ListView enables it to occupy the remaining space that is left after accommodating the Pane.
Let’s look at the Listview in detail:
 1        ListView {
 2            id: listView
 3            Layout.fillWidth: true
 4            Layout.fillHeight: true
 5            Layout.margins: pane.leftPadding + messageField.leftPadding
 6            displayMarginBeginning: 40
 7            displayMarginEnd: 40
 8            verticalLayoutDirection: ListView.BottomToTop
 9            spacing: 12
10            model: chat_model
11            delegate: Column {
12                anchors.right: sentByMe ? listView.contentItem.right : undefined
13                spacing: 6
14
15                readonly property bool sentByMe: model.recipient !== "Me"
16                Row {
17                    id: messageRow
18                    spacing: 6
19                    anchors.right: sentByMe ? parent.right : undefined
20
21                    Rectangle {
22                        width: Math.min(messageText.implicitWidth + 24,
23                            listView.width - (!sentByMe ? messageRow.spacing : 0))
24                        height: messageText.implicitHeight + 24
25                        radius: 15
26                        color: sentByMe ? "lightgrey" : "steelblue"
27
28                        Label {
29                            id: messageText
30                            text: model.message
31                            color: sentByMe ? "black" : "white"
32                            anchors.fill: parent
33                            anchors.margins: 12
34                            wrapMode: Label.Wrap
35                        }
36                    }
37                }
38
39                Label {
40                    id: timestampText
41                    text: Qt.formatDateTime(model.timestamp, "d MMM hh:mm")
42                    color: "lightgrey"
43                    anchors.right: sentByMe ? parent.right : undefined
44                }
45            }
46
47            ScrollBar.vertical: ScrollBar {}
48        }
After filling the width and height of its parent, we also set some margins on the view.
Next, we set displayMarginBeginning and displayMarginEnd. These properties ensure that the delegates outside the view don’t disappear when you scroll at the edges of the view. To get a better understanding, consider commenting out the properties and then rerun your code. Now watch what happens when you scroll the view.
We then flip the vertical direction of the view, so that first items are at the bottom.
Additionally, messages sent by the contact should be distinguished from those sent by a contact.
For now, when a message is sent by you, we set a sentByMe property, to alternate between
different contacts.
Using this property, we distinguish between different contacts in two ways:
Messages sent by the contact are aligned to the right side of the screen by setting
anchors.righttoparent.right.We change the color of the rectangle depending on the contact. Since we don’t want to display dark text on a dark background, and vice versa, we also set the text color depending on who the contact is.
At the bottom of the screen, we place a TextArea item to allow multi-line text input, and a button to send the message. We use Pane to cover the area under these two items:
 1        Pane {
 2            id: pane
 3            Layout.fillWidth: true
 4
 5            RowLayout {
 6                width: parent.width
 7
 8                TextArea {
 9                    id: messageField
10                    Layout.fillWidth: true
11                    placeholderText: qsTr("Compose message")
12                    wrapMode: TextArea.Wrap
13                }
14
15                Button {
16                    id: sendButton
17                    text: qsTr("Send")
18                    enabled: messageField.length > 0
19                    onClicked: {
20                        listView.model.send_message("machine", messageField.text, "Me");
21                        messageField.text = "";
22                    }
23                }
24            }
25        }
The TextArea should fill the available width of the screen. We assign some placeholder text to provide a visual cue to the contact as to where they should begin typing. The text within the input area is wrapped to ensure that it does not go outside of the screen.
Lastly, we have a button that allows us to call the send_message method we defined on
sqlDialog.py, since we’re just having a mock up example here and there is only one possible
recipient and one possible sender for this conversation we’re just using strings here.
Main.qml needs to be put into a directory named App along
with a file named qmldir to describe a basic QML module:
module App
Main 254.0 Main.qml
main.py
We use logging instead of Python’s print(), because it provides a better way to control the
messages levels that our application will generate (errors, warnings, and information messages).
 1import sys
 2import logging
 3
 4from PySide6.QtCore import QCoreApplication, QDir, QFile, QStandardPaths
 5from PySide6.QtGui import QGuiApplication
 6from PySide6.QtQml import QQmlApplicationEngine
 7from PySide6.QtSql import QSqlDatabase
 8
 9# We import the file just to trigger the QmlElement type registration.
10import sqlDialog  # noqa E703
11
12logging.basicConfig(filename="chat.log", level=logging.DEBUG)
13logger = logging.getLogger("logger")
connectToDatabase() creates a connection with the SQLite database, creating the actual file
if it doesn’t already exist.
 1def connectToDatabase():
 2    database = QSqlDatabase.database()
 3    if not database.isValid():
 4        database = QSqlDatabase.addDatabase("QSQLITE")
 5        if not database.isValid():
 6            logger.error("Cannot add database")
 7
 8    app_data = QStandardPaths.writableLocation(QStandardPaths.StandardLocation.AppDataLocation)
 9    write_dir = QDir(app_data)
10    if not write_dir.mkpath("."):
11        logger.error(f"Failed to create writable directory {app_data}")
12
13    # Ensure that we have a writable location on all devices.
14    abs_path = write_dir.absolutePath()
15    filename = f"{abs_path}/chat-database.sqlite3"
16
17    # When using the SQLite driver, open() will create the SQLite
18    # database if it doesn't exist.
19    database.setDatabaseName(filename)
20    if not database.open():
21        logger.error("Cannot open database")
22        QFile.remove(filename)
A few interesting things happen in the main function:
Declaring a QGuiApplication. You should use a QGuiApplication instead of QApplication because we’re not using the QtWidgets module.
Connecting to the database,
Declaring a QQmlApplicationEngine. This allows you to access the QML Elements to connect Python and QML from the conversation model we built on
sqlDialog.py.Loading the
.qmlfile that defines the UI.
Finally, the Qt application runs, and your program starts.
 1    app = QGuiApplication()
 2    QCoreApplication.setOrganizationName("QtProject")
 3    QCoreApplication.setApplicationName("Chat Tutorial")
 4
 5    connectToDatabase()
 6
 7    engine = QQmlApplicationEngine()
 8    engine.addImportPath(sys.path[0])
 9    engine.loadFromModule("App", "Main")
10
11    if not engine.rootObjects():
12        sys.exit(-1)
13
14    exit_code = app.exec()
15    del engine