Using .ui files from Designer or QtCreator with QUiLoader and pyside6-uic
This page describes the use of
Qt Widgets Designer to create
graphical interfaces based on Qt Widgets for your Qt for Python project.
Qt Widgets Designer is a graphical UI design tool which is available as a
standalone binary (pyside6-designer) or embedded into the
Qt Creator IDE. Its use within Qt Creator is described at
Using Qt Widgets Designer.
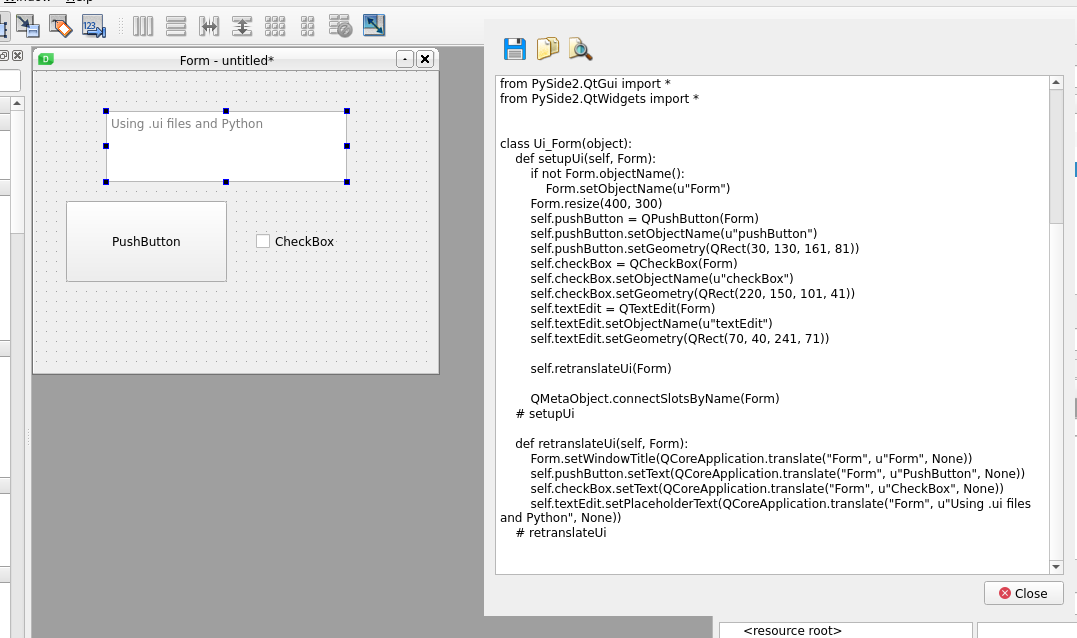
The designs are stored in .ui files, which is an XML-based format. It will
be converted to Python or C++ code populating a widget instance at project build
time by the pyside6-uic tool.
To create a new Qt Design Form in Qt Creator, choose
File/New File Or Project and “Main Window” for template. Save it as
mainwindow.ui. Add a QPushButton to the center of the centralwidget.
Your file mainwindow.ui should look something like this:
<?xml version="1.0" encoding="UTF-8"?>
<ui version="4.0">
 <class>MainWindow</class>
 <widget class="QMainWindow" name="MainWindow">
  <property name="geometry">
   <rect>
    <x>0</x>
    <y>0</y>
    <width>400</width>
    <height>300</height>
   </rect>
  </property>
  <property name="windowTitle">
   <string>MainWindow</string>
  </property>
  <widget class="QWidget" name="centralWidget">
   <widget class="QPushButton" name="pushButton">
    <property name="geometry">
     <rect>
      <x>110</x>
      <y>80</y>
      <width>201</width>
      <height>81</height>
     </rect>
    </property>
    <property name="text">
     <string>PushButton</string>
    </property>
   </widget>
  </widget>
  <widget class="QMenuBar" name="menuBar">
   <property name="geometry">
    <rect>
     <x>0</x>
     <y>0</y>
     <width>400</width>
     <height>20</height>
    </rect>
   </property>
  </widget>
  <widget class="QToolBar" name="mainToolBar">
   <attribute name="toolBarArea">
    <enum>TopToolBarArea</enum>
   </attribute>
   <attribute name="toolBarBreak">
    <bool>false</bool>
   </attribute>
  </widget>
  <widget class="QStatusBar" name="statusBar"/>
 </widget>
 <layoutdefault spacing="6" margin="11"/>
 <resources/>
 <connections/>
</ui>
Now we are ready to decide how to use the UI file from Python.
Option A: Generating a Python class
The standard way to interact with a UI file is to generate a Python
class from it. This is possible thanks to the pyside6-uic tool.
To use this tool, you need to run the following command on a console:
pyside6-uic mainwindow.ui -o ui_mainwindow.py
We redirect all the output of the command to a file called ui_mainwindow.py,
which will be imported directly:
from ui_mainwindow import Ui_MainWindow
Now to use it, we should create a personalized class for our widget to setup this generated design.
To understand the idea, let’s take a look at the whole code:
import sys
from PySide6.QtWidgets import QApplication, QMainWindow
from PySide6.QtCore import QFile
from ui_mainwindow import Ui_MainWindow

class MainWindow(QMainWindow):
    def __init__(self):
        super(MainWindow, self).__init__()
        self.ui = Ui_MainWindow()
        self.ui.setupUi(self)

if __name__ == "__main__":
    app = QApplication(sys.argv)

    window = MainWindow()
    window.show()

    sys.exit(app.exec())
What is inside the if statement is already known from the previous examples, and our new basic class contains only two new lines that are in charge of loading the generated python class from the UI file:
self.ui = Ui_MainWindow()
self.ui.setupUi(self)
Note
You must run pyside6-uic again every time you make changes
to the UI file.
Resources
To avoid path resolution issues for image files used in icons, they can be embedded into Qt resource files (see Qt Resource System, Editing Resources with Qt Widgets Designer and Using .qrc Files (pyside6-rcc)).
When building the project, the tool pyside6-rcc generates a Python file
loading them from the .qrc file. It is typically named rc_<name>.py
and is imported by the Python file generated by pyside6-uic. For this
to work, the resource file and the .ui file should be in the same
directory.
If that is not the case, the import statement generated by pyside6-uic
can be tailored by a number of command line options
(see pyside6-uic --help):
--from-imports                  Python: generate imports relative to '.'
--absolute-imports              Python: generate absolute imports
--python-paths <pathlist>       Python paths for --absolute-imports.
Typically, this will be a combination of --absolute-imports and
--python-paths, passing the project directory to the latter.
Option B: Loading it directly
To load the UI file directly, we will need a class from the QtUiTools module:
from PySide6.QtUiTools import QUiLoader
The QUiLoader lets us load the ui file dynamically
and use it right away:
ui_file = QFile("mainwindow.ui")
ui_file.open(QFile.ReadOnly)

loader = QUiLoader()
window = loader.load(ui_file)
window.show()
The complete code of this example looks like this:
# File: main.py
import sys
from PySide6.QtUiTools import QUiLoader
from PySide6.QtWidgets import QApplication
from PySide6.QtCore import QFile, QIODevice

if __name__ == "__main__":
    app = QApplication(sys.argv)

    ui_file_name = "mainwindow.ui"
    ui_file = QFile(ui_file_name)
    if not ui_file.open(QIODevice.ReadOnly):
        print(f"Cannot open {ui_file_name}: {ui_file.errorString()}")
        sys.exit(-1)
    loader = QUiLoader()
    window = loader.load(ui_file)
    ui_file.close()
    if not window:
        print(loader.errorString())
        sys.exit(-1)
    window.show()

    sys.exit(app.exec())
Then to execute it we just need to run the following on a command prompt:
python main.py
Note
QUiLoader uses connect() calls taking the function signatures as string
arguments for signal/slot connections.
It is thus unable to handle Python types like str or list from
custom widgets written in Python since these types are internally mapped
to different C++ types.
Custom Widgets in Qt Widgets Designer
Qt Widgets Designer is able to use user-provided (custom) widgets. They are shown in the widget box and can be dragged onto the form just like Qt’s widgets (see Using Custom Widgets with Qt Widgets Designer ). Normally, this requires implementing the widget as a plugin to Qt Widgets Designer written in C++ implementing its QDesignerCustomWidgetInterface .
Qt for Python provides a simple interface for this which is similar to
registerCustomWidget().
The widget needs to be provided as a Python module, as shown by
the WigglyWidget Example (file wigglywidget.py) or
the Task Menu Extension Example (file tictactoe.py).
Registering this with Qt Widgets Designer is done by providing
a registration script named register*.py and pointing
the path-type environment variable PYSIDE_DESIGNER_PLUGINS
to the directory.
The code of the registration script looks as follows:
# File: registerwigglywidget.py
from wigglywidget import WigglyWidget

import QtDesigner


TOOLTIP = "A cool wiggly widget (Python)"
DOM_XML = """
<ui language='c++'>
    <widget class='WigglyWidget' name='wigglyWidget'>
        <property name='geometry'>
            <rect>
                <x>0</x>
                <y>0</y>
                <width>400</width>
                <height>200</height>
            </rect>
        </property>
        <property name='text'>
            <string>Hello, world</string>
        </property>
    </widget>
</ui>
"""

QPyDesignerCustomWidgetCollection.registerCustomWidget(WigglyWidget, module="wigglywidget",
                                                       tool_tip=TOOLTIP, xml=DOM_XML)
QPyDesignerCustomWidgetCollection provides an implementation of QDesignerCustomWidgetCollectionInterface exposing custom widgets to Qt Widgets Designer with static convenience functions for registering types or adding instances of QDesignerCustomWidgetInterface .
The function
registerCustomWidget()
is used to register a widget type with Qt Widgets Designer. In the simple case, it
can be used like QUiLoader.registerCustomWidget(). It takes the custom widget
type and some optional keyword arguments passing values that correspond to the
getters of
QDesignerCustomWidgetInterface :
When launching Qt Widgets Designer via its launcher pyside6-designer,
the custom widget should be visible in the widget box.
For advanced usage, it is also possible to pass the function an implementation
of the class QDesignerCustomWidgetInterface instead of the type to
addCustomWidget().
This is shown in the Task Menu Extension Example, where a custom context menu
is registered for the custom widget. The example is a port of the
corresponding C++
Task Menu Extension Example .
For properties to become visible in Qt Widgets Designer, they need to be
declared using PySide6.QtCore.Property.
Enums and flag types need to appear within the class and be decorated using
@PySide6.QtCore.QEnum or @PySide6.QtCore.QFlag, respectively.
This requires extracting a base class for them since otherwise, the enum type
is not known when specifying PySide6.QtCore.Property:
class CustomWidgetBase(QObject):
    @QEnum
    class TestEnum(Enum):
        EnumValue0 = 0
        EnumValue1 = 1


class CustomWidget(CustomWidgetBase):
    def __init__(self, parent=None):
        super().__init__(parent)
        self._testEnum = CustomWidget.TestEnum.EnumValue1

    def testEnum(self):
        return self._testEnum

    def setTestEnum(self, new_val):
        self._testEnum = new_val

    testEnum = Property(CustomWidgetBase.TestEnum, testEnum, setTestEnum)
The launcher
pyside6-designermust be used. The standalone Qt Widgets Designer will not load the plugin.The menu item Help/About Plugin brings up a dialog showing the plugins found and potential load error messages.
Check the console or Windows Debug view for further error messages.
Due to the buffering of output by Python, error messages may appear only after Qt Widgets Designer has terminated.
When building Qt for Python, be sure to set the
--standaloneoption for the plugin to be properly installed.