Tutorial: Qt Widgets application
This tutorial illustrates how to use Qt Extension for VS Code to create a Qt Widgets application. You'll create a project using a project wizard and design a widget-based UI using Qt Widgets Designer.
You can download the completed project from Code: AddressBook.
Before you start
Before you start, you have to:
Create a Qt Widgets application project
To develop Qt applications, you need a project folder that has the code and a project configuration file (CMakeLists.txt) that has instructions for building the project.
The AddressBook project has two classes, each with a header, source, and UI form:
To create a Qt Widgets application project in Visual Studio Code:
- Go to Welcome, and then select New project.
- In Project, select Qt Widgets application.

- In Base class, select QWidget as the base class type.
- Select UI form to generate a UI form.
- In Name, enter
AddressBook. - In Create in, enter the path for the project files. For example,
C:\Qt\Examples. - Select Open in new window to create the project files and open them in a new VS Code window.
- Select a CMake kit for the project.
The wizard generates the necessary project files in an AddressBook folder at the path you specify. You can rename the files. In this tutorial, they are called addressbook.cpp, addressbook.h, and addressbook.ui.
Next, create the main view of the application.
Design the main view
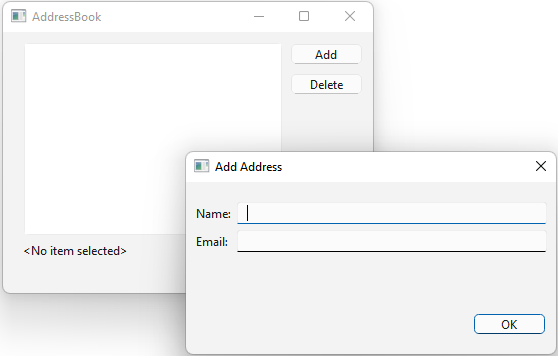
Use Qt Widgets Designer to design the application's main view, which has some widgets placed in layouts:
For more information about using Qt Widgets Designer, see Qt Widgets Designer Manual.
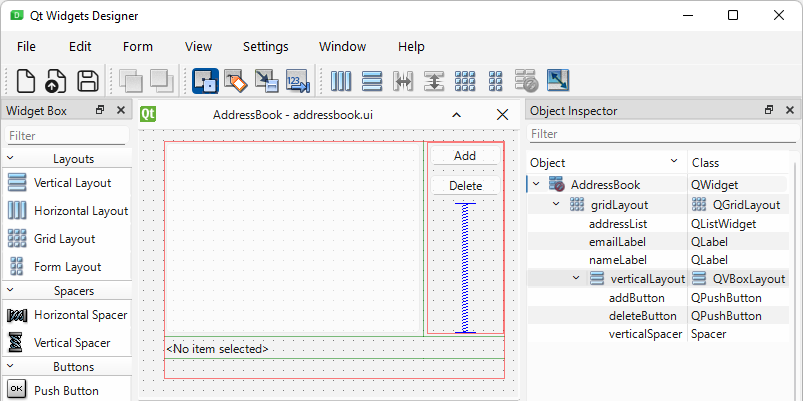
Add widgets
To add widgets to the UI and to set properties for them:
- In VS Code Explorer, select
addressbook.ui, and then select Open this file with Qt Widgets Designer to open it in Qt Widgets Designer.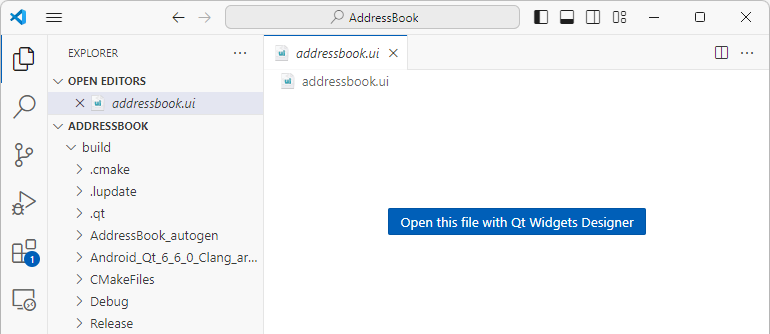
- In Qt Widgets Designer's Widget Box, select List Widget and Drag it to the form to add a QListWidget.
- In the Property Editor, set the
objectNameproperty toaddressList. - Drag two Push Button widgets to the top-right corner of the form to add QPushButton objects for the Add and Delete buttons.
- Set the
objectNameproperties of the buttons toaddButtonanddeleteButtonand text property values toAddandDelete. - Drag two Label widgets to the form to add QLabel objects for displaying the selected item in the list.
- Rename the first label to
nameLabeland change its text property to<No item selected>. - Rename the second label to
emailLabeland leave its text property empty.
Position the widgets as they appear in the screenshot above. To properly position the widgets and to automatically resize them when the form is resized, you need to add layouts to the form.
Add widgets to layouts
You will need a vertical layout for the buttons as well as a spacer to push the buttons to the top of the layout. In addition, you will need a second layout to manage the positioning of the other widgets as well as the button layout.
To add widgets to layouts:
- Drag a Vertical Spacer item to the form to add a spacer.
- Select the buttons and the spacer, and then select Form > Lay Out Vertically to add a vertical layout (QVBoxLayout).
- Select the list widgets, the two labels, and the button layout, and then select Form > Lay Out in a Grid to add a grid layout (QGridLayout).
Note: Make sure that the labels are almost as wide as the form. Otherwise, the grid layout will make them only as wide as the address list.
- Select Form > Preview to preview your form without compiling it.
- Go to File > Save to save the form.
Build and run the application to check the main view.
Add a dialog
Now that the main view is ready, move on to add functionality to the application. To have the application open a dialog when the user clicks the Add button, create an Add Address dialog and invoke the dialog from a slot that you connect to the Add button.
To add a dialog:
- In Qt Widgets Designer, go to File > New, and select Dialog without Buttons.
- Select Create to create the dialog.
- In the Property Editor, set the
ObjectNameproperty toAddDialog. - Go to File > Save, and save the file as
adddialog.ui.
Add the UI file to the project sources in the CMakeLists.txt file:
set(PROJECT_SOURCES
        main.cpp
        addressbook.cpp
        addressbook.h
        addressbook.ui
        adddialog.cpp
        adddialog.h
        adddialog.ui
)
Design the dialog
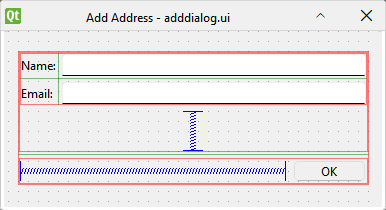
To design the dialog:
- In Qt Widgets Designer, set
Add Addressas the windowTitle. - Add a Label to the form and set its objectName property to
nameTextand text property toName:. - Add another Label and set its objectName property to
emailTextand text property toEmail:. - Add a Line Edit (QLineEdit) and set its objectName property to
nameEdit. Leave the text property empty. - Add another Line Edit and set its objectName property to
emailEdit. Leave the text property empty. - Select the labels and line edits, and then go to Form > Lay Out in a Grid to add a grid layout.
- Add a Push Button and set its objectName property to
okButtonand text property toOK. - Add a horizontal spacer to the left of the button.
- Add a horizontal layout for the spacer and the button.
- Add a vertical spacer between the labels and the button.
- Add a vertical layout for the labels and the spacer.
- Add a grid layout for both layouts.
- Go to Form > Preview to preview your form without compiling it.
- Go to File > Save to save the form.
Connect to the dialog's OK button
To have the OK button invoke the QDialog::accept() slot, click the Edit Signals/Slots toolbar button to enter Qt Widgets Designer's Signals and Slots Editing Mode.
Click the OK button, drag the mouse cursor to an empty area of the form, and release the mouse button. In the Configure Connection dialog, connect the button's QPushButton::clicked() signal to the form's QDialog::accept() slot.
Open dialogs from the main view
To invoke the dialog when the user selects Add in the main view, you must add a slot to the AddressBook class and invoke AddDialog from this slot.
Forms that you create using Qt Widgets Designer call QMetaObject::connectSlotsByName() to establish connections between signals that the form's child widgets emit and slots that follow the naming convention on_<sender>_<signal>(). For the application to react appropriately when the user clicks the Add button, you must implement a slot called on_addButton_clicked().
To implement the slot, open the addressbook.h file in VS Code and add a declaration for the slot:
private slots:
    void on_addButton_clicked();
Then open addressbook.cpp, and add the slot definition:
void AddressBook::on_addButton_clicked()
{
    AddDialog dialog(this);
    dialog.exec();
}
To connect to some other signal, you must add the signal to the AddressBook class. This requires editing both the header file, addressbook.h, and the implementation file, addressbook.cpp.
Include adddialog.h to addressbook.cpp:
#include "adddialog.h"To test your changes, build and run the application. Select the Add button to open the Add Address dialog, and then select OK to close it.
Add items to the list widget
When the user selects OK, an item should be added to the QListWidget. To implement this function, change the code in the on_addButton_clicked() slot, as follows:
AddDialog dialog(this);

    if (dialog.exec()) {
        QString name = dialog.nameEdit->text();
        QString email = dialog.emailEdit->text();

        if (!name.isEmpty() && !email.isEmpty()) {
            QListWidgetItem *item = new QListWidgetItem(name, ui.addressList);
            item->setData(Qt::UserRole, email);
            ui.addressList->setCurrentItem(item);
        }
    }
The dialog is executed. If the user accepts it by selecting OK, the Name and Email fields are extracted and a QListWidgetItem that has the specified information is created.
Display the selected item
To update the nameLabel and the emailLabel at the bottom of the form when the user selects an item in the list widget, add another slot to the AddressBook class.
In the addressbook.h file, add the following code in the private slots section of the class:
void on_addressList_currentItemChanged();Then, add the block of code below to addressbook.cpp:
void AddressBook::on_addressList_currentItemChanged()
{
    QListWidgetItem *curItem = ui.addressList->currentItem();

    if (curItem) {
        ui.nameLabel->setText("Name: " + curItem->text());
        ui.emailLabel->setText("Email: " + curItem->data(Qt::UserRole).toString());
    } else {
        ui.nameLabel->setText("<No item selected>");
        ui.emailLabel->clear();
    }
}
The naming convention enables this slot to be automatically connected to the QListWidget::currentItemChanged() signal of addressList and be invoked whenever the selected item in the list changes.
Add functionality for the Delete button
To implement a slot for the Delete button, open the addressbook.h file in Visual Studio and add a declaration for the on_deleteButton_clicked() slot. Then open addressbook.cpp and add the slot definition for on_deleteButton_clicked().
Type the following code in the slot's body:
void AddressBook::on_deleteButton_clicked()
{
    QListWidgetItem *curItem = ui.addressList->currentItem();

    if (curItem) {
        int row = ui.addressList->row(curItem);
        ui.addressList->takeItem(row);
        delete curItem;

        if (ui.addressList->count() > 0)
            ui.addressList->setCurrentRow(0);
        else
            on_addressList_currentItemChanged();
    }
}
Your application is now complete.
See also Create Qt projects, Add files to projects, and Design widgets-based UIs.
© 2026 The Qt Company Ltd. Documentation contributions included herein are the copyrights of their respective owners. The documentation provided herein is licensed under the terms of the GNU Free Documentation License version 1.3 as published by the Free Software Foundation. Qt and respective logos are trademarks of The Qt Company Ltd in Finland and/or other countries worldwide. All other trademarks are property of their respective owners.
