Tutorial: Qt Quick application
This tutorial illustrates how to use Qt Extension for VS Code to create a Qt Quick application. You'll create a project using a project wizard and design a UI using Qt Quick Controls. Also, you'll learn how to add QML files to your projects.
You can download the completed project from Code: QuickAddressBook.
Before you start
Before you start, you have to:
Create a Qt Quick application project
To create a Qt Quick project in Visual Studio Code:
- Go to Welcome, and then select New project.
- In Project, select Qt Quick application.
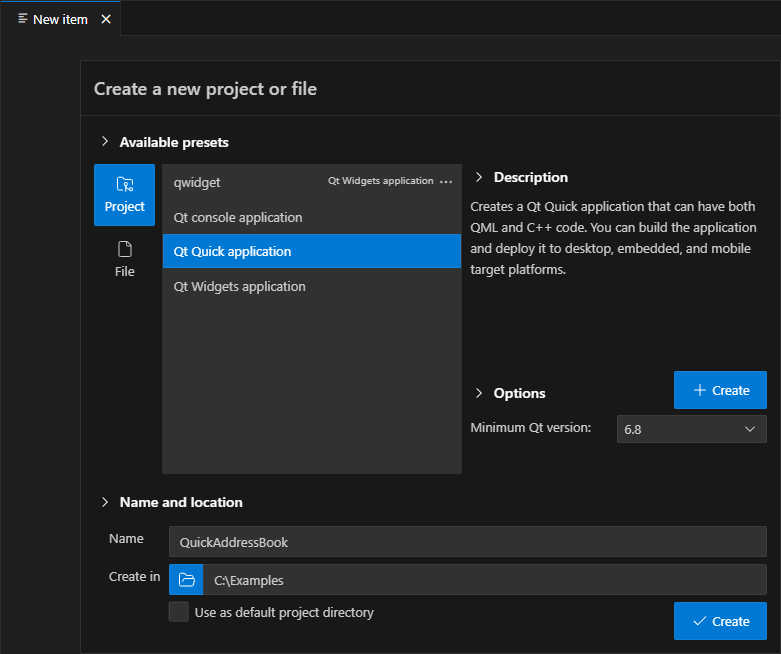
- In Minimum Qt version, select the Qt version to develop with. The Qt version determines the Qt Quick imports to use in the QML files.
- In Name, enter
QuickAddressBook. - In Create in, enter the path for the project files.
- Select Open in new window to create the project files and open them in a new VS Code window.
- Select a CMake kit for the project.
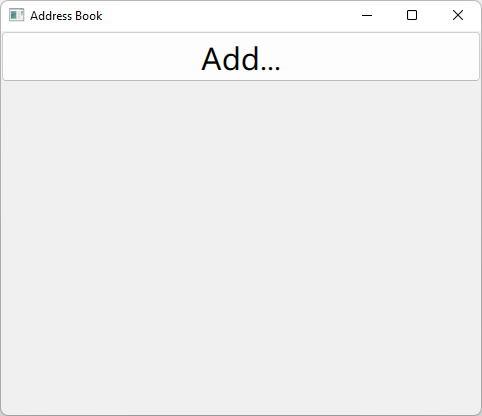
You now have a small working Qt Quick application. Select  to build and run it. For now, the result is an empty window.
Design the main window
The wizard created a main QML file for you, which declares a root object of the type ApplicationWindow. Change the file to design the application's main window.
To bind the components to their context, specify the Bound argument:
pragma ComponentBehavior: Bound
Add import statements for the modules that you plan to use in the root type:
Set the value of the title property to the title of the application main window:
ApplicationWindow {
    id: mainWindow
    visible: true
    width: 480
    height: 640
    title: qsTr("Address Book")
Add a button
To create the Add button, declare an object of the Button type from the Qt Quick Controls module. Set the value of the button text property to Add... and the value of the font.pointSize property to 24:
Button {
    id: addButton
    text: "Add..."
    font.pointSize: 24
When you run the application, you should now see this:
Connect the button to an action
QML has a signal and handler mechanism, where the signal is the event and the signal is responded to through a signal handler. When a signal is emitted, the corresponding signal handler is invoked. Placing logic such as a script or other operations in the handler allows the component to respond to the event.
To receive a notification when a particular signal is emitted for a particular object, the object definition should declare a signal handler named on<Signal>, where <Signal> is the name of the signal, with the first letter capitalized. The signal handler should contain the JavaScript code to be executed when the signal handler is invoked.
The Button type has a clicked signal, which is emitted when the users click the button. To invoke a popup for adding an address book entry when the users select the Add button in the main window, you must connect the onClicked signal handler of the button to the open() method of the popup:
onClicked: newAddressPopup.open()You will add the popup as a separate QML type later.
Add a list model
Within the ApplicationWindow, declare an object of the ListModel type with the id addressList for storing the contact data. A list model defines a free-form list data source:
ListModel {
    id: addressList
}
Declare a popup
Declare an object of the custom NewAddressPopup type that defines the popup where the users will add address book entries. Use the onAddressAdded signal handler to append address book entries to the addressList model:
NewAddressPopup {
    id: newAddressPopup
    onAddressAdded: function(newName, newAddr) {
        addressList.append({name: newName, addr: newAddr})
}
You will create the NewAddressPopup type later.
Position the button
Declare an object of ColumnLayout type to position the Button object and an instance of the Repeater type:
ColumnLayout {
    id: mainWindowLayout
    Layout.fillWidth: true
    spacing: 0
    Button {
        id: addButton
        Layout.preferredWidth: mainWindow.width
        Layout.fillWidth: true
        text: "Add..."
        font.pointSize: 24
        onClicked: newAddressPopup.open()
    }
Set Layout.fillWidth to true to make the application scalable on different screen sizes. Set the spacing between the rows in the column to 0. Bind the preferred width of the button to the width of the main window.
Add a repeater
The Repeater type creates many similar items. It has a model and a delegate: for each entry in the model, the delegate is instantiated in a context seeded with data from the model. Enclose the repeater in an instance of a positioner type such as a ColumnLayout to visually position the delegate items that the repeater creates.
Specify addressList as the model to use for the repeater:
Repeater {
    id: addressListViewer
    model: addressList
    Layout.preferredWidth: mainWindow.width
    Layout.fillWidth: true
}
Declare an object of the custom AddressBookItem type that the repeater will use to instantiate address book entries:
AddressBookItem {
    id: addressBookItem
You will create the AddressBookItem type later.
Connect the Remove button to an action
Use the onRemoved signal handler to remove an address book entry from the list when the user clicks its Remove button.
onRemoved: addressList.remove(index)Add a popup
Now that the main window is ready, move on to create the popup where users can add address book entries. The AddressBookItem type specifies that the repeater instantiates the data that the users enter in the main window.
Use a Qt file wizard in Visual Studio Code to create a custom type that defines the popup.
Create a popup
To add a custom QML type to the project:
- Go to Command Palette, and then select Qt: Create a new project or file.
- In File, select QML file.
- In Name, enter
NewAddressPopup. - In Create in, enter
QuickAddressBookTypesafter the path to the project folder to create the new file in that subfolder. - Select Create to create a custom QML type.
Add NewAddressPopup.qml to the QML_FILES section of the CMakeLists.txt file:
qt_add_qml_module(appQuickAddressBook
URI QuickAddressBook
VERSION 1.0
QML_FILES
Main.qml
QuickAddressBookTypes/AddressBookItem.qml
QuickAddressBookTypes/NewAddressPopup.qml
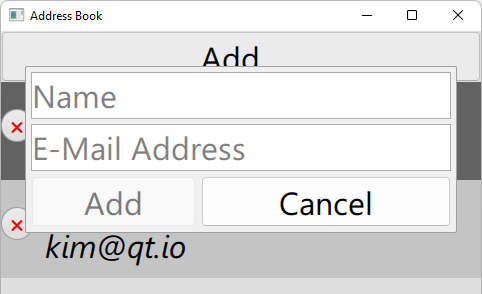
)Design the popup
In NewAddressPopup.qml, declare a root object of the type Popup to create a popup that opens in an ApplicationWindow. A popup does not provide a layout of its own, so you will use a ColumnLayout and a RowLayout to position the Name and E-Mail Address fields.
Set the modal property to true to specify that the popup is modal. Set the focus property to true to specify that the popup requests focus:
modal: true
focus: true
Specify values for the width, x, and y properties to set the position and size of the popup on top of the main window:
width: parent.width * 0.9
x: (parent.width - width) / 2
y: 35
Reset popup controls
When the popup opens, the Name and E-Mail Address fields should display placeholder text and any values entered previously should be cleared. You use the onOpened signal handler to reset the values of the fields and give focus to the Name field:
onOpened: {
    nameField.text = "";
    addrField.text = "";
    nameField.focus = true;
}
Position fields
Use an instance of the ColumnLayout type to position the TextField objects that specify the Name and E-Mail Address fields of the popup:
ColumnLayout {
    anchors.fill: parent
    TextField {
        id: nameField
        placeholderText: qsTr("Name")
        font.pointSize: 24
        Layout.preferredWidth: newAddressPopup / 2
        Layout.fillWidth: true
    }
    TextField {
        id: addrField
        placeholderText: qsTr("E-Mail Address")
        font.pointSize: 24
        Layout.preferredWidth: newAddressPopup / 2
        Layout.fillWidth: true
    }
Position buttons
Use an instance of a RowLayout type to position two Button objects that specify the Add and Cancel buttons:
RowLayout {
    Layout.fillWidth: true
    Button {
        text: "Add"
        enabled: nameField.length > 0 && addrField.length > 0
        font.pointSize: 24
        Layout.preferredWidth: newAddressPopup / 2
        Layout.fillWidth: true
Connect buttons to actions
When the users click the Add button, the values they entered to the Name and E-Mail Address fields are added to the address list in the main window and the popup is closed.
To enable this, add the addressAdded(string newName, string newAddr) signal:
signal addressAdded(string newName, string newAddr)Connect the onClicked signal handler of the Add button to the addressAdded() signal and to the popup's close() method:
    onClicked: {
        newAddressPopup.addressAdded(nameField.text, addrField.text)
        newAddressPopup.close()
    }
}
For the Cancel button, connect the onClicked signal handler to the to the popup's close() method to close the popup without saving the data:
Button {
text: "Cancel"
font.pointSize: 24
Layout.preferredWidth: newAddressPopup / 2
Layout.fillWidth: true
onClicked: newAddressPopup.close()
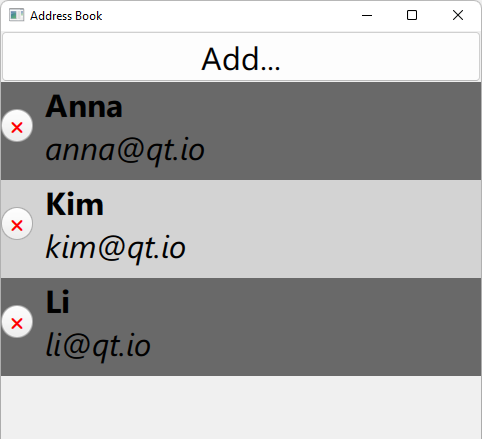
}Define an address book entry
The custom AddressBookItem type specifies how to present address book entries in the main window.
Follow the instructions in Create a popup to create a new QML file called AddressBookItem.qml and to add it to the CMakeLists.txt file.
Design the entry
First, you will declare a root object of type Rectangle. It is one of the basic building blocks you can use to create an application in QML. Give it an id to be able to refer to it later.
Set the properties that you will use in the Rectangle and Text types:
required property int index
required property string name
required property string addr
To use alternating colors for rows, set the value of the color property:
color: (index % 2) == 0 ? "dimgray" : "lightgray"
Anchor the rectangle to the left and right edges of its parent to make the application scalable on different screen sizes. Bind the rectangle height property to the height of the text items it will contain:
anchors.left: parent.left
anchors.right: parent.right
height: itemText.height + 12
Connect the Remove button to an action
Add the removed() signal that you will connect to the onClicked signal handler of the remove button. This removes an address book entry from the main window when users click the button:
signal removed()
Position the button and text
Use instances of the RoundButton and Text types within an instance of a RowLayout type to define an address book entry:
RowLayout {
    spacing: 12
    Layout.fillWidth: true
    RoundButton {
        id: deleteButton
        text: "??"
        font.pointSize: 12
        palette.buttonText: "red"
        onClicked: addressBookItem.removed()
    }
Format the text
Set the value of the text property to combine the values of the name and addr fields from the popup and to use bold and italic formatting for the values:
Text {
    id: itemText
    font.pointSize: 24
    text: "<b>" + addressBookItem.name + "</b><br><i>" + addressBookItem.addr + "</i>"
}
Your application is now complete.
See also Create Qt projects, Add files to projects, and Turn on QML Language Server.
© 2026 The Qt Company Ltd. Documentation contributions included herein are the copyrights of their respective owners. The documentation provided herein is licensed under the terms of the GNU Free Documentation License version 1.3 as published by the Free Software Foundation. Qt and respective logos are trademarks of The Qt Company Ltd in Finland and/or other countries worldwide. All other trademarks are property of their respective owners.
