C
Tutorial: Deploying your first project
You can deploy all kinds of Qt projects to your target device: Qt Examples and projects that you have created yourself. In this tutorial, we use Qt Creator's project wizard and create a new Qt Quick project. We build and run the project, and deploy it to a target device.
This tutorial describes how you deploy a project to one of the target devices with pre-built Qt for embedded Linux images (see Supported Target Devices and Development Hosts). However, you should follow similar steps when you deploy to a target device where you have built an image yourself.
The tutorial assumes that you have installed Qt for embedded Linux to your development host and flashed it to your target device. That is, Get Started with Qt appears on the device screen when you power on the device.
Preparing Qt for embedded Linux kits
Qt Creator groups build-and-run-specific settings together as kits. Each kit consists of a set of values that define one environment, such as a target device, tool chain, Qt version, and debugger command to use.
Before deploying, make sure that your kit contains the target device. Connect your target device to the host platform, open Qt Creator, and execute the following steps:
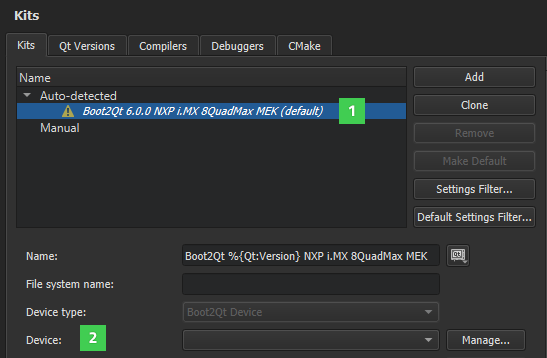
- Select Edit > Preferences > Kits.
- Select one of the predefined kits that matches the type of your device (1).
- Select the appropriate device in the Run device field (2).
- Select Apply.
Note: If you use Docker, go to Preferences > Devices, and select the Docker Device in the selected kit. Then check that the path to your project is listed in Paths to mount. This option maps the path to the docker container.
Troubleshooting: Device is not found
When your target device is connected to the host platform, Qt Creator should automatically detect it and the device should appear in the kit's Device field. If it doesn't appear, first replug the device. If that doesn't help, then reboot the host platform.
Note: In Linux, ensure that you have access to plugged in devices. For more information, see Setting Up USB Access to Embedded Devices.
Creating new Qt Quick project
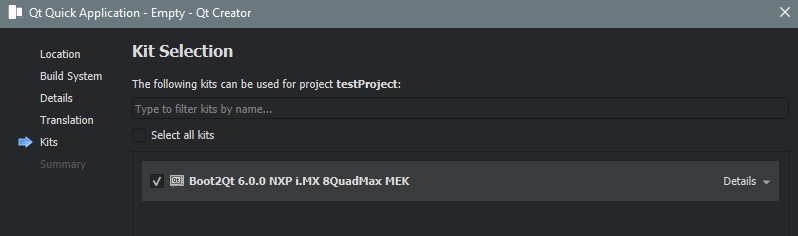
Create a new Qt Quick project with the steps in Creating Qt Quick Applications. When creating the project, you can use the default values defined in the wizard pages. In the Kit Selection page, select the kit that matches the type of your target device. The following picture illustrates how to select the kit where the device was added in Preparing Qt for embedded Linux Kits:
After you complete the steps in the project wizard, the generated Qt Quick project is automatically opened in the Edit mode (1).
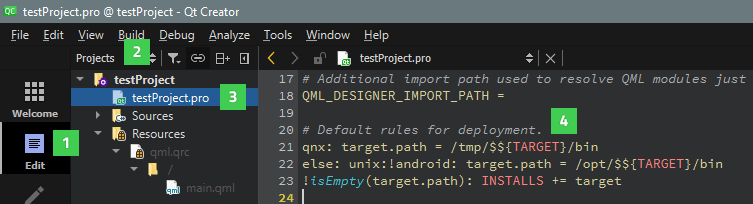
You can see the project's structure by selecting Projects in the sidebar (2). If you select the CMakeLists.txt file (3) under your project, you see its content in the editor view. The last lines in the CMakeLists.txt file (4) define the path where your project is deployed. Qt's project wizard generates the path automatically for Qt Quick projects. For other projects, you might need to define the path manually in the CMakeLists.txt file.
For more information on CMake, see Build with CMake. For more information on Qt Creator configurations for Qt for embedded Linux, see Developing for devices.
Building, running, and deploying projects
Now it is time to build and run your project, and deploy it to the target device. When you run the project, Qt Creator automatically both builds it and deploys it to the device. Thus, you just need to select the Run button (1) in Qt Creator.
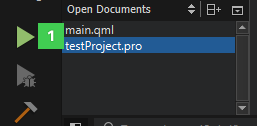
Your project is now running on the target device.
For more information on CMake deployment, see Deployment in CMake documentation.
Custom deployment steps
Qt Creator allows you to execute custom commands on the embedded device connected to the development host. You can add the custom commands to the deployment phase of your project.
Follow these steps to add a custom step to be executed during deployment:
- In Qt Creator, go to Projects > Deploy Settings
- Select Add Deploy Step > Run custom remote command.
- Enter the command to be executed.
Available under certain Qt licenses.
Find out more.
