C
Getting started on Nuvoton
Overview
This topic provides all the necessary information to get started on the Nuvoton platforms supported by Qt Quick Ultralite.
Note: Make sure you have all the prerequisites installed before setting up the development environment.
Setting up the development environment
Configuring the Qt Creator IDE
To develop for MCUs using the Qt Creator IDE, you need the MCU plugin. Qt Online Installer enables it by default when you install Qt for MCUs.
To build and run your application on MCUs, you must create a kit:
- Select Edit > Preferences > SDKs > MCU.
Note: If you cannot see the MCU tab, select Help > About Plugins, enable the Qt for MCUs plugin, and restart Qt Creator to apply changes.
- If not already set, provide the path to the Qt for MCUs installation directory.
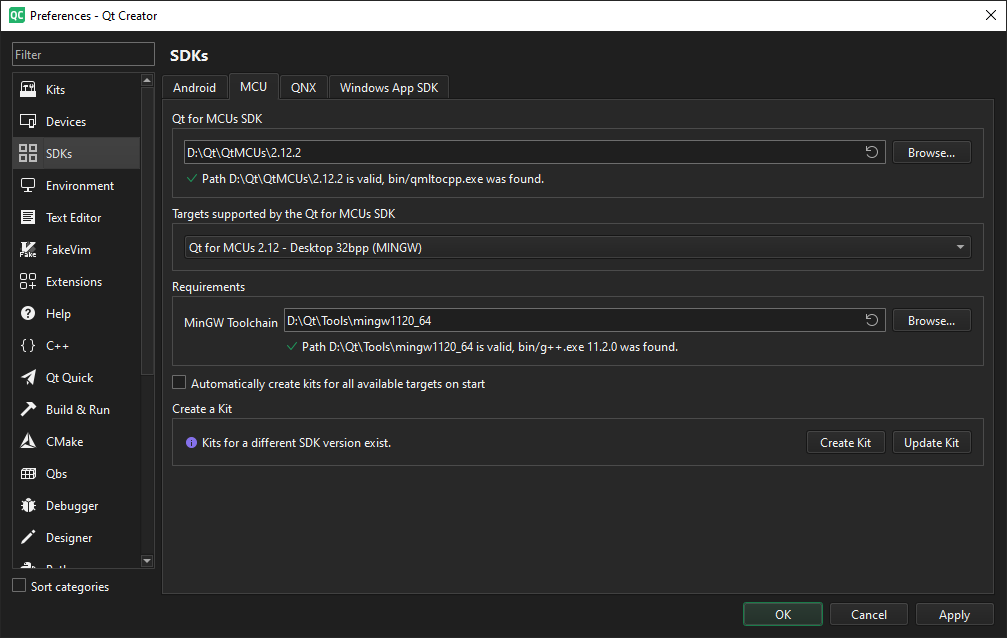
- Select a Target supported by the Qt for MCUs SDK. For example, Qt for MCUs 3.0.0 - GERDA-4L-UITRON 32bpp.
- In the Requirements section, ensure that the platform-specific requirements are met.
- Select Automatically create kits for all available targets on start to create kits automatically.
Note: You can also create/update kits manually using Create Kit and Update Kit.
- Select Apply and restart Qt Creator if you choose to create kits automatically.
Configuring CMake variables
You can also set up the development environment from the command prompt. For more information on how to use CMake with Qt Quick Ultralite when developing applications for Nuvoton boards, see CMake manual for Nuvoton boards.
Building applications with prebuilt Qt Quick Ultralite libraries
Building applications using Qt Creator IDE
- Open the CMake project file for the example you want to build.
- In the Configure Project window:
- Select the kit you created earlier. For example, Qt for MCUs 3.0.0 - GERDA-4L-UITRON 32bpp.
- Select Configure Project.
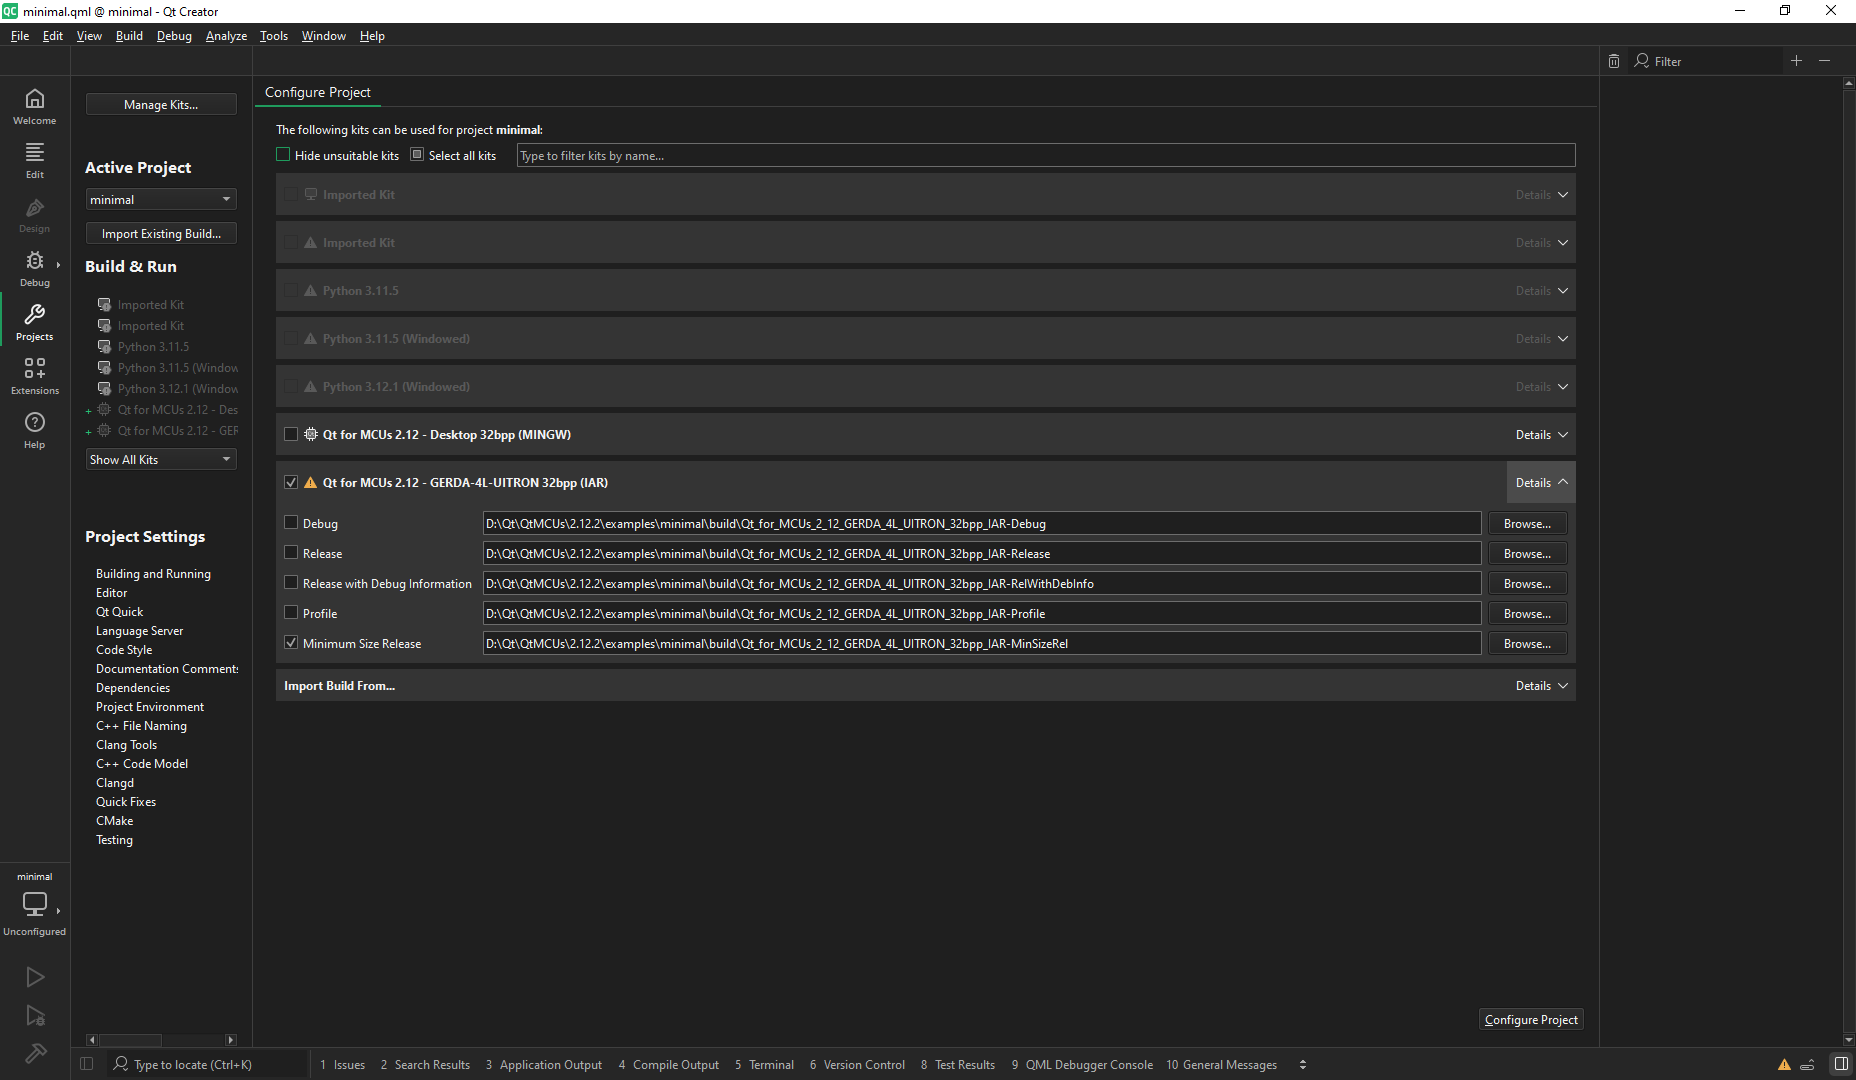
After you configure the project, select Run or use the Ctrl+r keyboard shortcut to build and flash the binary to the target.
Building applications using the command prompt
You can also build applications from the command prompt. The following example demonstrates how to build the minimal example for Nuvoton Gerda-4L.
QUL_ROOT and QUL_TOOLS are used in the command line examples below as if they were set as environment variables. For example:
export QUL_ROOT=$HOME/Qt/QtMCUs/3.0.0
export QUL_TOOLS=$HOME/Qt/Tools/QtMCUs
set QUL_ROOT=C:\Qt\QtMCUs\3.0.0
set QUL_TOOLS=C:\Qt\Tools\QtMCUsThe following command builds the minimal example for the gerda-4l-uitron platform:
cd %QUL_ROOT%\examples\minimal
mkdir build
cd build
cmake .. -G "Ninja" -DCMAKE_BUILD_TYPE=MinSizeRel -DQul_ROOT=%QUL_ROOT% -DCMAKE_TOOLCHAIN_FILE=%QUL_ROOT%\lib\cmake\Qul\toolchain\iar.cmake -DQUL_TARGET_TOOLCHAIN_DIR="C:\Path\to\IAR Systems\Embedded Workbench 9.2\arm" -DQUL_PLATFORM=gerda-4l-uitron -DQUL_BOARD_SDK_DIR=C:\Path\to\Gerda-4L-SDK
cmake --build .
Flashing the example application
IAR I-jet
Install IAR I-jet configuration for Gerda-4L board provided by Nuvoton. Get the configuration from Nuvoton as it is not available through the Qt Online Installer.
Nuvoton Gerda-4L Qt for MCUs platform configures IAR I-jet as its default flashing hardware. After building the minimal example application, attach the IAR I-jet debugger to 20-pin JTAG connector on board. Use the following command to flash the example:
cmake --build . --target flash_minimalSimilarly, other application target can be built and flashed.
Note: IAR I-jet uses the cspybat flashing tool, which does not exit after flashing. You must close it manually.
PARTNER-Jet2
Refer Gerda-4L Startup Manual document provided by Nuvoton to setup the PARTNER-Jet2 debugging hardware. After the debugger is setup, add PARTNER_JET2_PATH to the CMake configure step as shown in the following example:
cd %QUL_ROOT%\examples\minimal
mkdir build
cd build
cmake .. -G "Ninja" -DCMAKE_BUILD_TYPE=MinSizeRel -DQul_ROOT=%QUL_ROOT% -DCMAKE_TOOLCHAIN_FILE=%QUL_ROOT%\lib\cmake\Qul\toolchain\iar.cmake -DQUL_TARGET_TOOLCHAIN_DIR="C:\Path\to\IAR Systems\Embedded Workbench 9.2\arm" -DQUL_PLATFORM=gerda-4l-uitron -DQUL_BOARD_SDK_DIR=C:\Path\to\Gerda-4L-SDK -DPARTNER_JET2_PATH=C:\Path\to\Partner-jet2-installation
cmake --build .
After building the minimal example application, attach the PARTNER-Jet2 debugger to 20-pin JTAG connector on board. Use the following command to flash it:
cmake --build . --target flash_minimalDebugging
Install IAR I-jet configuration files for Gerda-4L provided by Nuvoton. Refer the EWARM_Setup_Step_vx.xx.pdf guide to setup the IAR EWARM IDE for I-jet provided by Nuvoton.
Debugging using IAR EWARM IDE and IAR I-jet debugger
To setup the IAR I-jet debugging hardware for debugging applications, refer Gerda-4L Startup Manual document provided by Nuvoton.
Debugging using PARTNER-Jet2
To setup the PARTNER-Jet2 debugging hardware for debugging applications on Gerda-4L board, refer Gerda-4L Startup Manual document provided by Nuvoton.
Supported Nuvoton boards
The following is a list of currently supported Nuvoton targets. For more information on all the targets supported by Qt Quick Ultralite, see Supported target boards and development hosts.
Tier 2: Verified targets
| Hardware board | MCU / MPU | Compiler | Operating system(s) | Host(s) |
|---|---|---|---|---|
| Nuvoton Gerda-4L Board | KM2KSD4AZ0UA | IAR Build Tools for Arm V9.40 | µITRON 4.0 | Windows host only |
Available under certain Qt licenses.
Find out more.
