C
Generating GHS Multi IDE projects
This page covers extra information regarding the generation of Green Hills Software's (GHS) MULTI IDE projects.
Note: Read the generic instructions for Qt Quick Ultralite project generation for more details.
Refer to Generated GHS project content for more information about the GHS project structure.
There are three modes of exporting a GHS project from qmlprojectexporter:
- Generating a GHS project - To generate a new GHS project from a
.qmlprojectfile - Extending a GHS project - To add Qt for MCUs platform and UI sources for an existing GHS project which was NOT configured by
qmlprojectexporter - Updating a GHS project - To update the Qt for MCUs -specific parts of an existing GHS project which already was configured by
qmlprojectexporter.
Generating a GHS project
Use this method when generating a new GHS project from an existing .qmlproject file. You will get a GHS project configured by qmlprojectexporter containing exported platform sources and generated UI sources. See Generating a project for the first time for more general details about this process.
Note: If you are working on multiple Qt Quick Ultralite platforms that require different GHS Multi IDE versions and you have more than one GHS IDE version installed, you may have to manually start the correct GHS IDE version and open the GHS project file from there.
The following is an example command which generates a ready-to-build GHS project complete with the required source files, options and libraries:
<QUL_ROOT>/bin/qmlprojectexporter.exe --platform rh850-d1m1a-baremetal --toolchain ghs --project-type ghs --outdir my_project --include-ide-generated-hw-code --board-sdk /path/to/board-sdk my_project.qmlproject --generate-entrypointNote: qmlprojectexporter is not a replacement for a build system. If your project relies on additional source files and/or header files not specified in the .qmlproject file, you have to add these to the generated project manually. Add them, for example, in application.gpj.
Extending a GHS project
If you have an existing GHS project which has not been configured by qmlprojectexporter, you can use --extend-project to extend this project with Qt for MCUs sources based on a .qmlproject file. In addition to the GHS project to extend, performing this command requires the same information as Generating a GHS project.
To extend a GHS project, specify the main project file using the --extend-project argument. The main project must include a project of the type Program among its direct children. The qmlprojectexporter looks for the first valid Program project file, and adds the Qt for MCUs parts to it. Refer to the GHS MULTI IDE help menu and documentation for more information about the different project types.
Note: When using this argument, qmlprojectexporter will make changes to your existing project files.
By default, qmlprojectexporter exports platform sources into the project directory and includes them in a separate subproject. If your project already has the sources required for Qt for MCUs to run on the target platform, skip this step using the --export-platform false argument. You can also instruct qmlprojectexporter to add a subproject with the drivers from the target platform's SDK by using the --include-ide-generated-hw-code and --board-sdk arguments.
Note: The Qt for MCUs platform export adds linker scripts and other options which may be incompatible with the existing configuration. Make sure to edit these after exporting to ensure the board configuration is correct.
The following example command extends a project with all the platform, board SDK, and generated UI sources and options:
<QUL_ROOT>/bin/qmlprojectexporter.exe --platform rh850-d1m1a-baremetal --toolchain ghs --project-type ghs --extend-project my_project/project.gpj --include-ide-generated-hw-code --board-sdk /path/to/board-sdk my_project.qmlprojectThe generated project files are in the prj directory, relative to the Program project-file path.
Updating a GHS project
When you have a GHS project which already contains Qt for MCUs platform and UI sources, you can update its Qt for MCUs -specific contents using the --update-project command-line argument. Run this command after making changes to any UI code or assets to re-export sources to the GHS project:
<QUL_ROOT>/bin/qmlprojectexporter.exe my_project.qmlproject --update-project my_project/main_project_file.gpjNote: You can also update a GHS project from the UI using the generated GHS Multi IDE QUL Workspace
Generated GHS project content
The generated project consists of the following GHS MULTI IDE project files:
Note: When extending an existing project, the main project file and the Program file are already parts of the GHS project and may have different names.
<outdir>/GHS/project.gpjThe main project file defines the target architecture and some macros simplifying paths in subprojects.<outdir>/GHS/prj/program.gpjThe main program file contains program-wide compile defines, compile options, linker directives, include directories and linker scripts. It also lists the subprojects used by the application.<outdir>/GHS/prj/drivers.gpjThe subproject file includes all the low level drivers included from the board SDK which are needed by Qt for MCUs. This project may be empty if the --include-ide-generated-hw-code flag is not set.<outdir>/GHS/prj/application.gpjAn empty subproject for your convenience. Addmain.cppand other backend code to this subproject. This subproject is only added when generating a project from scratch usingqmlprojectexporter.<outdir>/GHS/prj/QtMCUs/qul_platform.gpjA subproject for the exported Qt for MCUs platform sources.<outdir>/GHS/prj/QtMCUs/qul_app.gpjA subproject that adds UI files generated from the main.qmlprojectfile.<outdir>/GHS/prj/QtMCUs/qul_module_<ModuleName>.gpjA subproject for each.qmlprojectmodule that adds the UI source files generated for the module.
When updating existing project files, qmlprojectexporter relies on guarded sections in the main program file. The platform-specfic parts are enclosed with ## QUL_PLATFORM BEGIN ## and ## QUL_PLATFORM END ##. The sections of the project file originating from the .qmlproject file are enclosed with ## QUL_APP BEGIN ## and ## QUL_APP END ##.
Note: All content inside those enclosed sections may be overwritten without warning when you update the corresponding part. Make sure that you avoid these sections when manually adding files to a project.
When updating an existing project, qmlprojectexporter modifies the project files to reflect the latest changes in the .qmlproject file. This means that the contents enclosed with QUL_APP in the GHS program file will change. Additionally, qmlprojectexporter replaces the contents of the corresponding subprojects in <project-outdir>/prj/QtMCUs. The platform subproject (qul_platform.gpj) and content enclosed with QUL_PLATFORM remain unchanged, unless a platform update is explicitly requested using --export-platform.
The following Program project-file example demonstrates how qmlprojectexporter updates an existing project:
#!gbuild

[Program]
    -DSDOME_PREPROCESSOR_DEFINE
    -o application.elf
## QUL_APP BEGIN ##
    -DSOME_UNRELATED_DEFINE                 <- Unrelated to QUL. Will be removed
    -I/path/to/qmlproject
    -DSOME_DEFINE_NEEDED_BY_GENERATED_FILES
## QUL_APP END ##
## QUL_PLATFORM BEGIN ##
    -I${QUL_PLATFORM_DIR}/platform/common
    # cxx compile options
    --C++17
## QUL_PLATFORM END ##

application.gpj
drivers.gpj
## QUL_APP BEGIN ##
QtMCUs/qul_app.gpj
## QUL_APP END ##
## QUL_PLATFORM BEGIN ##
QtMCUs/qul_platform.gpj
## QUL_PLATFORM END ##
After you add a new module and update the project (using qmlprojectexporter ./main.qmlproject --update-project <outdir>/GHS/project.gpj), the QUL_APP sections are overwritten. Notice that the line with -DSOME_UNRELATED_DEFINE is removed, because it is not used by the code generated by qmlprojectexporter. Similarly, a new include path and subproject for the new module is found within the guarded sections. All other parts of the project remain unchanged:
#!gbuild

[Program]
    -DSDOME_PREPROCESSOR_DEFINE
    -o application.elf
## QUL_APP BEGIN ##
    -I/path/to/qmlproject
    -I/path/to/MyNewModule                  <- Newly added include path
    -DSOME_DEFINE_NEEDED_BY_GENERATED_FILES
## QUL_APP END ##
## QUL_PLATFORM BEGIN ##
    -I${QUL_PLATFORM_DIR}/platform/common
    # cxx compile options
    --C++17
## QUL_PLATFORM END ##

application.gpj
drivers.gpj
## QUL_APP BEGIN ##
QtMCUs/qul_app.gpj
QtMCUs/qul_module_MyNewModule.gpj           <- Newly added subproject
## QUL_APP END ##
## QUL_PLATFORM BEGIN ##
QtMCUs/qul_platform.gpj
## QUL_PLATFORM END ##
GHS Multi IDE QUL Workspace
After generating a new project or extending an existing one, you might want to change the design layout in a Qml file or replace a resource with another. This requires running the correct update command with each modification to the Qt Quick Ultralite project.
To simplify this process, the generated or extended project will have a workspace file that qmlprojectexporter will add to the project at the first run. It contains a sequence of commands that will run qmlprojectexporter with the correct arguments and build the project with the newly updated, added or removed files. An alternative to using workspaces is to compose the sequence of commands manually on a terminal.
The name of the workspace file is <project_name>_qul_workspace.gmb and it's located in the same folder as the main .gpj file. Use one of the following methods to import it:
- Using the Launcher. If you open the launcher, the quickest way to locate the
.gmbfile is to go toFile->"Load Workspace from file..."and locate the file in the<outdir>/GHSfolder. The command sequence contains a step that will open theProject Manageras well.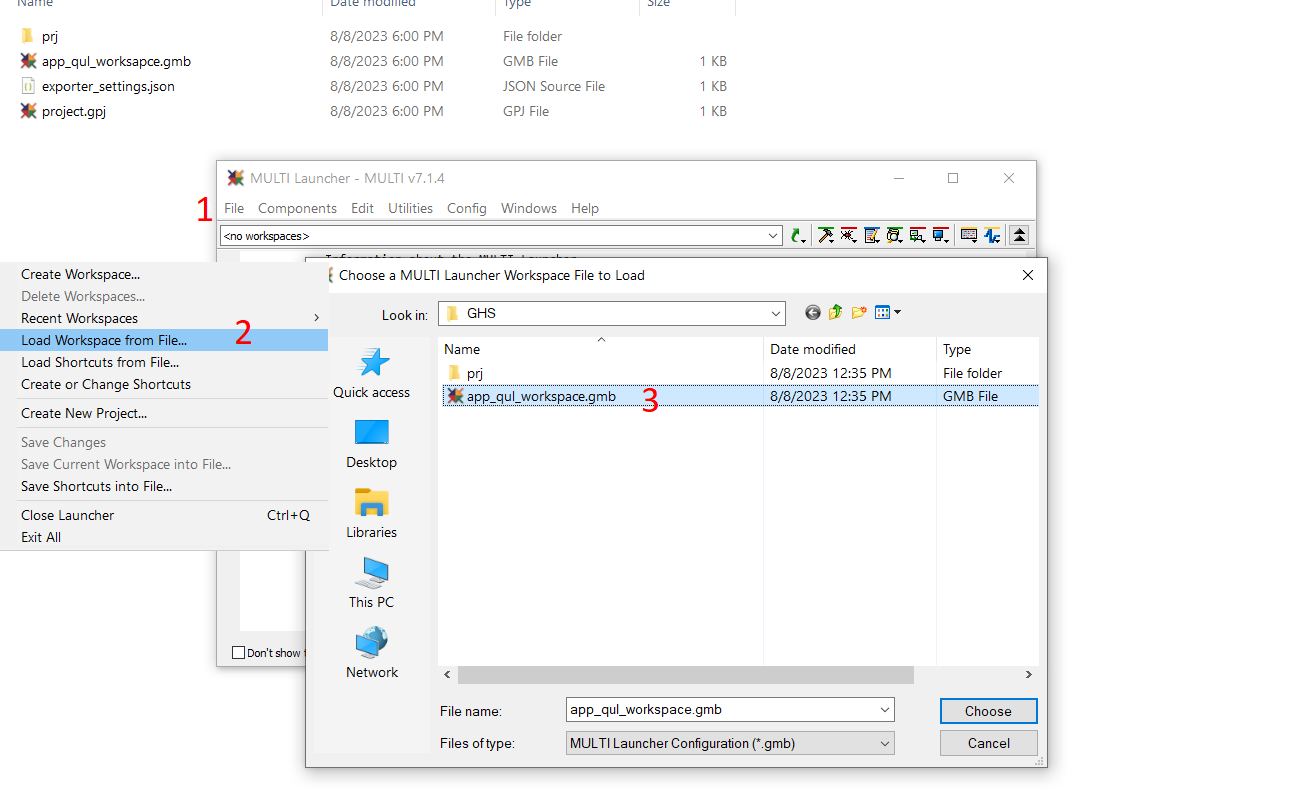
- Using the Project Manager. It is also possible to open the Project Manager by double-clicking the
<outdir>/GHS/project.gpjfile. To quickly add the Qt Quick Ultralite workspace and display the Launcher, double-click the workspace file and accept to load it to the existing workspaces.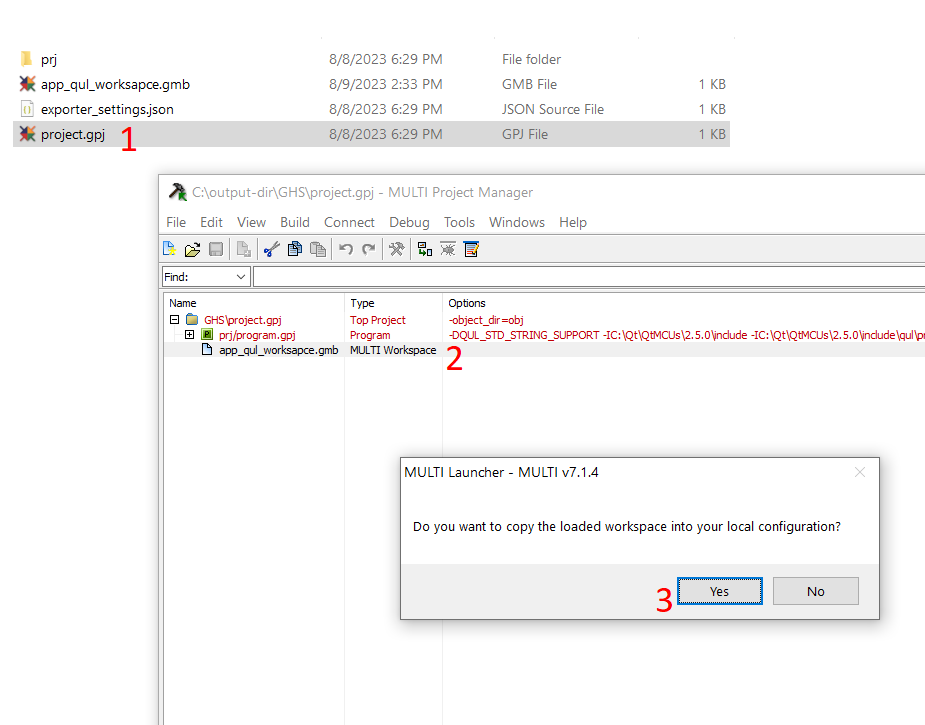
At this point, you will have a ready-to-use workspace containing the update command sequence.
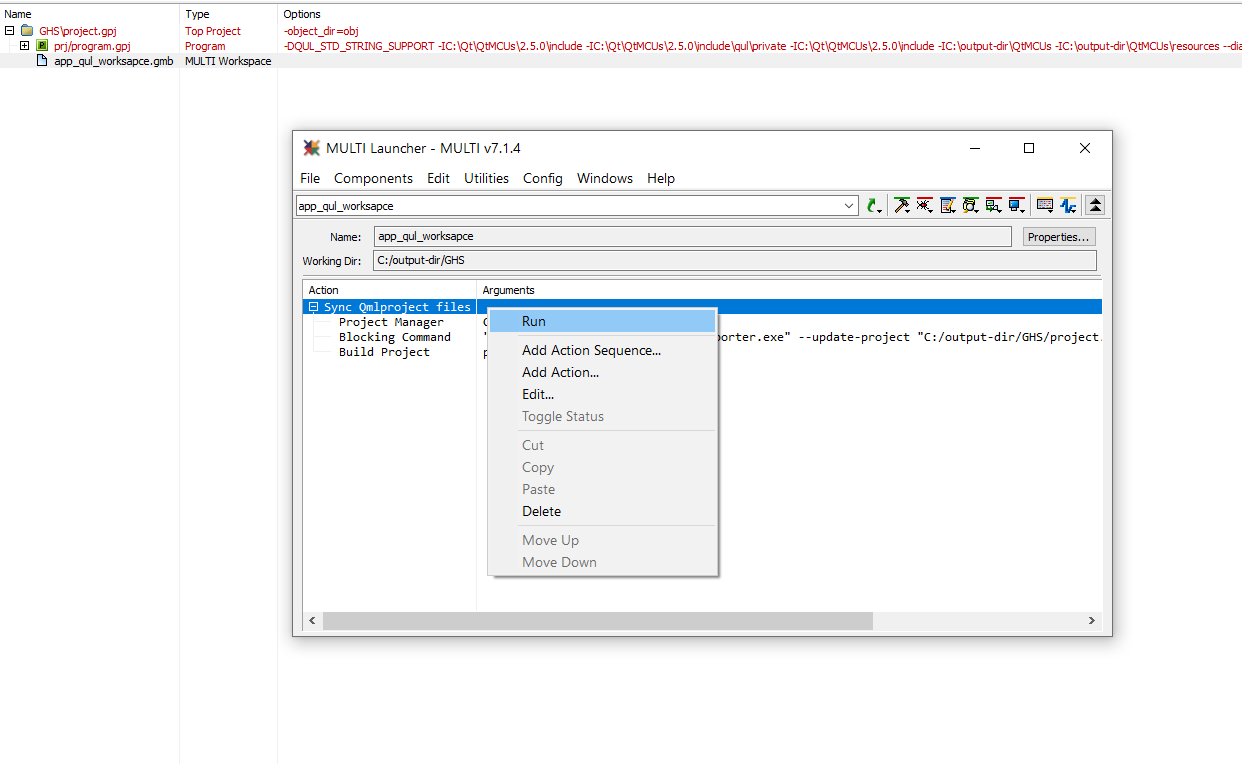
Note: You can skip qmlprojectexporter update by running the commands directly instead of the whole sequence
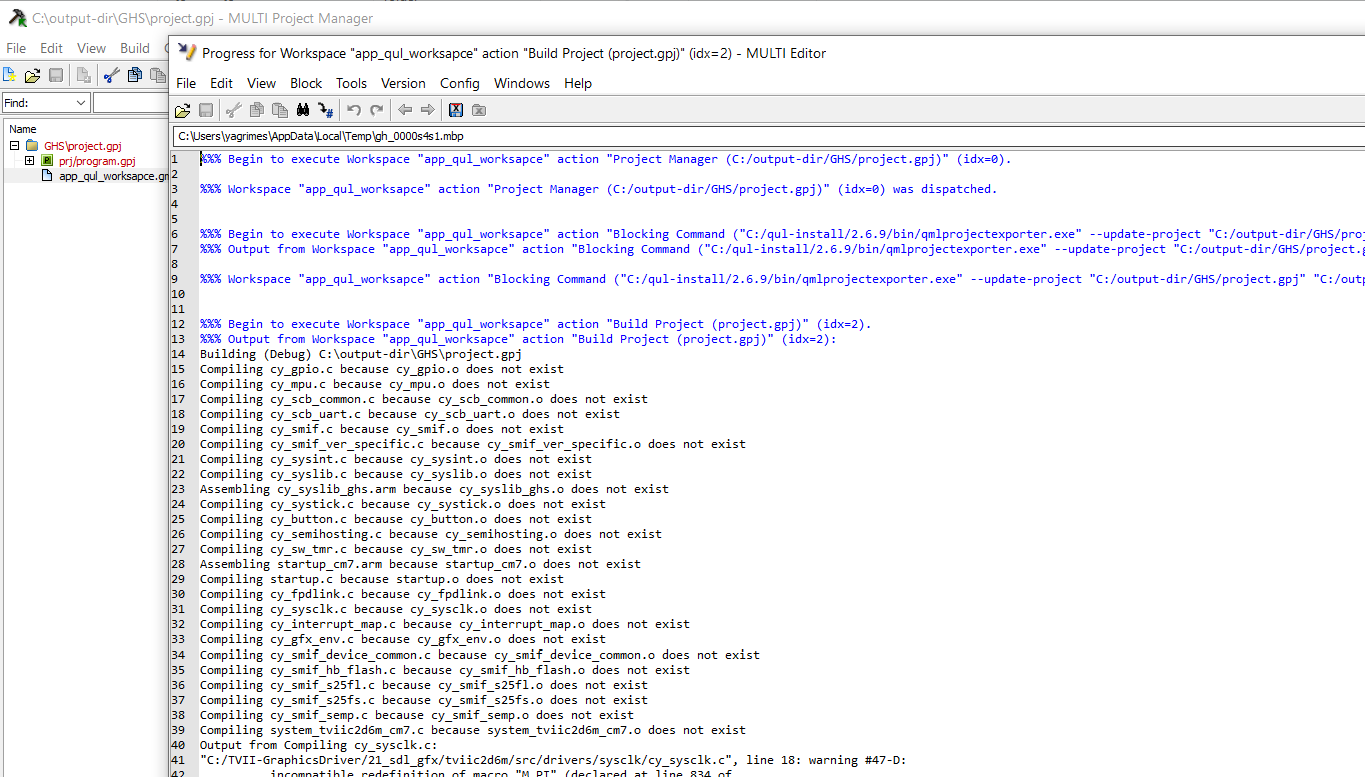
If everything is configured correctly, running the sequence should show that qmlprojectexporter has run successfully and the project should start building.
Flashing
In addition to GHS project files, qmlprojectexporter generates some helpful files you can use for flashing the application onto the target hardware. The type of file and the method for flashing differs by platform.
When updating an existing project, qmlprojectexporter will first look for existing copies of the expected flashing files. If a file already exists, it will not be overwritten. This is to keep any manual changes. To regenerate these files, simply rename or remove the existing file from the project directory.
If the methods described here do not work for your project, refer to Flashing Applications for instructions on how to flash.
Renesas RH850 D1M1A
When generating a project for the Renesas RH850, qmlprojectexporter will add two connection files to the main project, qul_probe_E1.con and qul_probe_E2.con. These files contain metadata for making a connection to the E1 and E2 probes. When opening the project in GHS MULTI IDE, these the connection files are opened automatically and are ready to use. Follow the steps below to connect to the probe:
- Make sure the probe is connected to the target board and the computer.
- Select F4 or select Connect > Connect... in the UI to open the Connection Chooser.
- Select either
QUL_PROBE_E1orQUL_PROBE_E2, depending on your probe. - Push Connect and make sure the connection was established successfully.
Once the connection is established, you can use GHS MULTI IDE to flash the application onto the board and debug using the capabilities in the IDE.
The connection files are dependent on files installed with the GHS toolchain. The paths are hardcoded in the generated files, and they assume that the toolchain is installed in C:\ghs\comp_202514. Edit the files with the correct path if it differs on your environment.
Note: Since GHS MULTI IDE may make changes to the connection file when opening or closing it, it is recommended to edit the file in a separate text editor prior to opening the project in GHS MULTI IDE to avoid unexpected changes.
Infineon boards
When exporting a project for one of the supported Infineon platforms, qmlprojectexporter will add batch files with commands used for flashing the application using either the MiniProg4 or the J-Link probe. Shortcuts for running these commands are also added to the workspace file for convenient access. The batch files, named qul_flash_jlink.bat and qul_flash_miniprog.bat, are placed in the same directory as the main project file.
The commands run from the generated batch files are the commands listed in Flashing Instructions for Infineon boards.
The batch file assumes that the Infineon Flash Utility 1.4 is installed in the default location, or that its path is stored in the environment variable INFINEON_AUTO_FLASH_UTILITY_DIR.
Note: Since the commands rely on the path to the application binary, the batch files will not be generated if qmlprojectexporter is unable to detect this path while processing the project. It will look for the -o-option in the main program file in your GHS project to locate the binary output file.
Available under certain Qt licenses.
Find out more.
