Integrate repositories
Administrators can specify different types of repositories and link them to projects. This enables you to quickly access your test sources from the results shown in the Verifications view or easily compare your visual verification points (VVP) with the expected VVP from a repository.
Set up a repository
To add and configure repositories, select Global Settings > Repository Integration. To add a repository for Test Center to use, click the Add Repository button. In the Add Repository dialog, select the type of repository to add. You can find more information on the supported types of repositories below.
Fill in the required repository settings and click Submit. To change repository settings, click the Update button. Project mappings and subfolders are updated separately. Click Connect a Project and select the Test Center project that will use this repository. Click Connect to confirm the connection. You can link multiple projects to one repository this way.
Repository settings for Git integration
In the table that lists the connected projects, click the Edit button to specify subfolders for each project. Subfolders are used to limit the search to one repository. You can use them to avoid possible search duplicates and to increase performance. If at least one subfolder is specified for a project, only its specified subfolders are searched.
Note: The repository settings will always include the path to the root of your repository. Make sure this path points to the root and not any subfolder of your repository.
Enable or disable repositories by clicking the switch next to the repository name. To remove a repository and all its settings (including project specific mappings), click the trashcan icon.
Access test source files
If a project is connected to an active repository, click the file paths and stack traces below a verification to open the Verifications view, which displays the contents of the file with the line from which the verification originates highlighted.

Viewing the test source in the Verifications view
Note: An error will be shown if the file cannot be found. Contact your administrator in case this happens. Adding a subfolder mapping for your project might solve this problem.
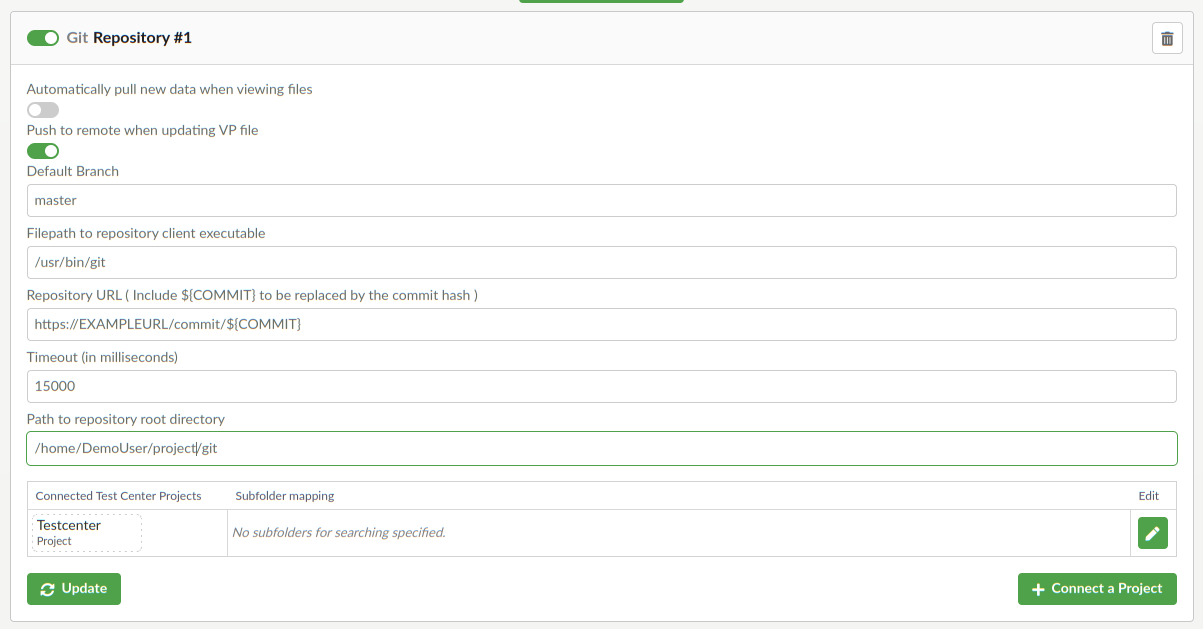
Git repository settings
This repository type requires a Git client and a clone of your repository on the machine that runs Test Center. Specify the following settings:
- Push to remote when updating VP file determines whether updating a verification point file will only create a local commit or whether the change should also be pushed to a remote repository.
- Default Branch specifies the branch to use for verification point file updates when no branch is specified via the .git.branch label. In most cases you should specify a remote branch like origin/main.
- Repository URL stores the URL Template for the Source Control Managment (SCM). It must contain the tag
$\{COMMIT\}, as Test Center will replace it with the commit SHA in order to create a link to the SCM. - Filepath to repository client executable stores the filepath to the Git executable on the machine that runs Test Center.
- Timeout (in milliseconds) determines how long Git is allowed to search for a file until the request is canceled.
- Path to workspace directory where revision of the repository can be stored during execution stores the path to the directory that will store copies of the repository for Test Execution. It is recommended to configure a directory that is not inside the Path to repository root directory.
- Path to repository root directory stores the path to the Git repository root folder on the machine that runs Test Center.
For the Git integration to work correctly, make sure the following applies to your Git repository:
- The repository checkout location provided to Test Center shouldn't be used by other applications nor for development.
- Pull conflicts, from updating verification point files need to be resolved by an admin. Test Center itself provides no conflict resolution.
For most repository operations the Git integration will use fetch --all to retrieve information from remote repositories. The test import and test execution will always do a fetch first, while all other operations will update the repository state within 10 to 30 second intervals.
Repository Setup For GitLab
When running a pipeline for a GitLab merge request and GitLab is configured to use "merged results", the commit it uses is a temporary merge commit between the HEAD of the source branch and the target branch. By default, a git fetch does not fetch that commit, which in turn means that Test Center can not resolve files mentioned in test results to show the code. The according error is "Looking up file '<path>' in '<commit hash>' failed."
In order to make Test Center fetch the commit, modify the .git/config in the repository:
© 2024 The Qt Company Ltd.
Documentation contributions included herein are the copyrights of
their respective owners.
The documentation provided herein is licensed under the terms of the GNU Free Documentation License version 1.3 as published by the Free Software Foundation.
Qt and respective logos are trademarks of The Qt Company Ltd. in Finland and/or other countries worldwide. All other trademarks are property
of their respective owners.
