Effect Composer
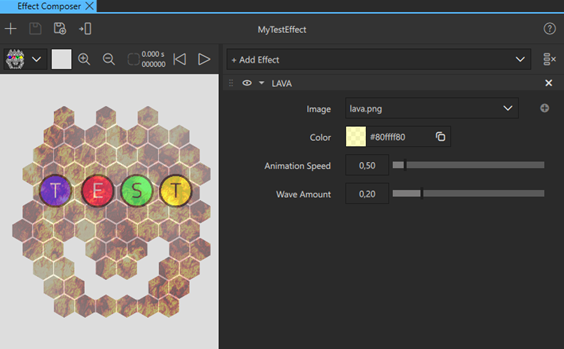
Use Effect Composer to create post-processing effect compositions that can be applied to 2D components or 3D views. The compositions created with Effect Composer are shader effects, which can be used in any Qt Design Studio projects. To create an effect composition, select and adjust one or several of the pre-made effects or customize empty effect nodes as you wish.
Creating an effect composition
- To create a new effect composition, do one of the following:
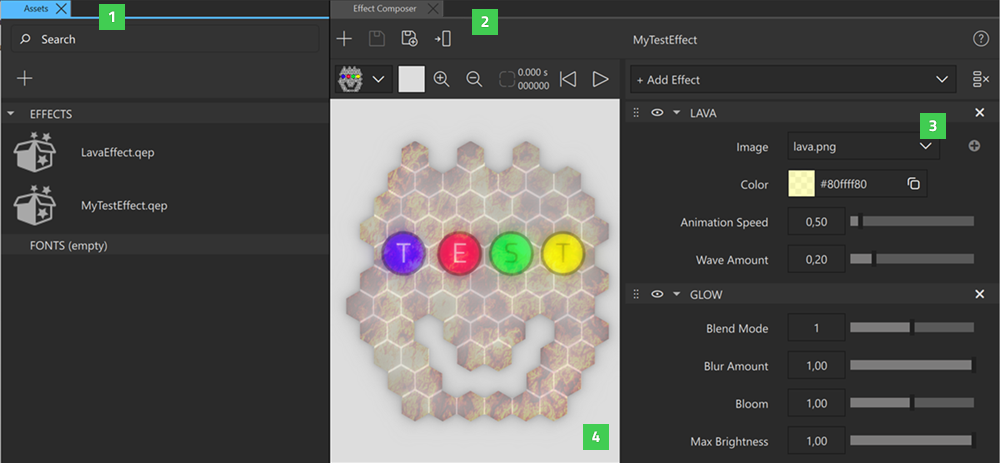
- Right-click anywhere in the Assets view (1) and select New Effect. Name your effect composition and select Create.
- Open the Effect Composer view (2). If Effect Composer shows a previous effect composition, select
 to create a new one.
- To add effects to your composition, select Add Effect, and then select the effects you wish to use from the effects library (3). You can also add a Custom effect as a part of your effect composition. The added effects appear in the effect stack (4). You cannot add the same pre-made effect twice to the composition. You can, however, add more than one custom effect to the same composition.
- Adjust the effect parameters to modify your effect composition. View the preview window (5) to see how the composition affects a component before assigning it to one. Use the preview window toolbar to select the preview image and the preview window background color.
- Finally, select
 to save your effect composition. If the composition is still Untitled, name it, and then select Save. Select
  to save the custom effect under a different name, for example, to create variations of the effect composition.
The saved effect compositions appear in the Assets > Effects. To delete an effect composition, right-click it in the Assets view, and then select Delete File.
Creating a custom effect for an effect composition
In addition to using the pre-made effects as described above, you can also add empty custom effects into your composition. To add a custom effect to your Effect Composer composition:
- Open the Effect Composer view (2), select Add Effect, and then select Custom to add an empty effect node to your effect.
- Select Add Properties or Show Code to customize the custom effect.
You can save the custom effect to the effect library to use it in any composition. To save the custom effect to the effect library:
- Select
 , and name the effect.
 - Select Add to Library.
The saved effect appears in the Custom section of the effect library.
Modifying pre-made effects
To modify the pre-made effects in the Effect Composer, edit their properties and change the property values. You can also add custom properties to effects and save the customized pre-made effects to the effect library.
Adding custom properties to an effect
You can add custom properties to effects in your effect composition, for example, to modify pre-made effects or to create completely unique effects. You can set the name, description, type, and default value for your custom property.
To add a custom property to any effect in your effect composition:
- Select
 to enable the advanced mode.
 - Select Add Property.
- Edit the property and select Apply.
To make properties effective, use them in the shader code. For more information, see Modifying the shader code of an effect.
You can edit the custom properties you create and also customize the properties of pre-made effects. To edit a property, select  > Edit.
To remove a property from your effect composition, select > Remove.
Saving customised pre-made effects to the effect library
- Select to enable the advanced mode.
- Select , and name the effect.
- Select Add to Library.
Similarly to custom effects, the modified pre-made effects appear in the Custom section of the effect library after saving.
Modifying the shader code of an effect
You can modify the shader code of an effect in your effect composition using Shaders Code Editor.
To open Shaders Code Editor:
- Select to enable advanced mode.
- Select Show Code.
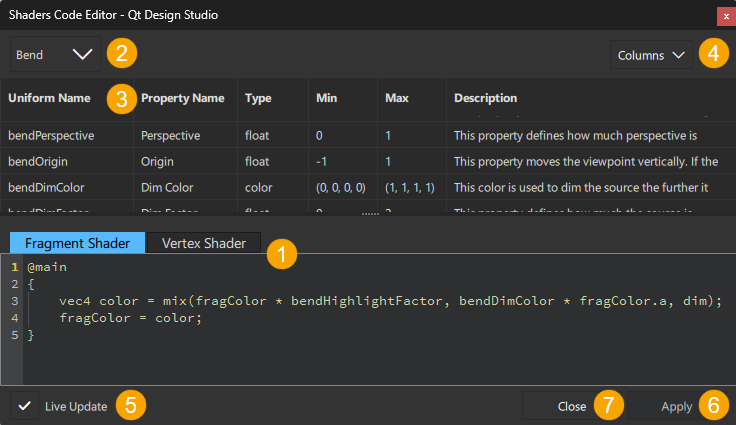
In the code section (1), you can switch between editing the Fragment shader and Vertex shader.
To switch between the effect nodes in your effect composition, select the effect node from the dropdown menu (2). To edit the main effect shader, select Main.
The properties in the effect node are visible in the property table (3). To change the visible columns in the property table, select columns from the dropdown menu (4).
To automatically update the effect as you edit it, select Live Update (5). If Live Update is not selected, select Apply (6) to update the effect composition with the latest changes.
If there are issues or errors in the code, they are visible in the Effect Composer view.
To close Shaders Code Editor, select Close (7).
Using tags in shader code
The following table describes @-tags in shader code.
| Tag | Description |
|---|---|
| @main | Indicates that code before this tag is inserted before the main function in the shader code. Code after this tag is inserted inside the main function at the position of the @nodes tag. |
| @nodes | Specifies the location of node specific shader code inside the main function. |
| @mesh | Specifies the size of the mesh in effects that modify vertices, such as the Swirl effect. |
| @requires | Indicates that the effect depends on another node, typically used to include a helper node, such as BlurHelper or NoiseHelper. |
Using shaders from external sources
You can use shader code from external sources, such as Shadertoy and l{https://thebookofshaders.com}{The Book of Shaders} to create custom effects that you can use as a part of your effect composition. For some sources, such as The Book of Shaders, you may have to re-name the uniforms to use them in the Qt Design Studio Effect Composer. For more information, see Working with shader code in Effect Composer.
Using shaders from Shadertoy
First, add a custom effect to your effect composition. Then, copy the shader code and paste it to the Fragment Shader tab of Shaders Code Editor with some adjustments:
- Copy the functions of the shader and paste them above the
@maintag. - Copy the code inside
mainImageand paste it below the@maintag, inside {}.
Effect Composer doesn't support all the features of Shadertoy:
- Effects with multipass (buffer tabs) can't be created.
- Audio, cubemaps and 3D textures are not supported.
- Currently iMouse has not been implemented
For more information, see Using a shader from Shadertoy in Effect Composer.
Note: Shadertoy only supports fragment shaders and built-in textures. You may achieve better performance by moving some of the calculations to a vertex shader.
Note: The origin (0,0) of the Qt coordinate system is in top-left corner, while it is in the bottom-left corner in the Shadertoy and OpenGL coordinate systems. If this is important for the effect, consider flipping the y-coordinate of the shader in a suitable way. For example, to flip fragCoord in Main node, switch to fragCoord = vec2(qt_Vertex.x, iResolution.y - qt_Vertex.y). You may need to adjust texCoord in a similar manner.
Using shaders from The Book of Shaders
First, add a custom effect to your effect composition. Then, copy the shader code and paste it to the Fragment Shader tab of Shaders Code Editor with some adjustments:
- Copy the functions of the shader and paste them above the
@maintag. - Copy the code inside
void mainand paste it below the@maintag, inside {}. - Edit the uniforms of the original shader code in Shaders Code Editor as described in Working with Shadercode in Effect Composer.
For more information, see Using a shader from The Book of Shaders in Effect Composer.
Assigning an effect composition to a component
To assign your newly created effect composition to a component, do one of the following:
- Select a component in Navigator or the 2D view, and then select
 in Effect Composer.
 - Drag the composition from Assets to the component in Navigator or the 2D view.
Note: To assign a composition to a component, you need to save it first.
Editing effect compositions
To edit an effect composition in Effect Composer, do one of the following:
- In the Assets view, double-click the name of the effect composition.
- In the Navigator or Assets view, right-click and select Edit in Effect Composer.
- Drag the composition from the Navigator or Assets view to the Effect Composer view.
Stacking effects
To create complex effect compositions, add multiple effects to your stack in Effect Composer. The order of effects in the Effect Composer stack determines the order they are rendered, which affects the final output of the effect composition.
To change the position of an effect in the stack, drag the effect by the handle ( ) to the desired position.
Some pre-made effects, such as effects with blur, always operate on the original item ignoring any effect nodes before them.
To determine whether or not each of the effects in the stack is rendered, toggle the visibility on ( ) and off (
 ).
).
To clear the effect stack, select  .
.
Using animated effects
Some of the effects in Effect Composer are animated. Preview the animation in the preview window using the play, pause, and restart animation buttons.
When a composition including an animated effect has been applied to a component, the animation plays by default in Live Preview and when you run the project. To define whether the animation plays or not, select the assigned effect in Navigator, and in Properties > Exposed Custom Properties, select or clear the Running checkbox. To specify the exact point in time in the animation that is shown, set the Time property. You cannot set the Time property if the Running checkbox is selected.
Using opacity mask effects
Use Opacity Mask effects as a part of your effect composition to mask components in your scene with an image or another component.
To use a component as the source for the Opacity Mask effect:
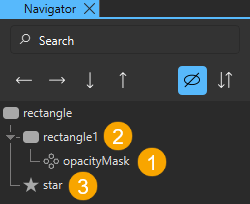
- In the Effect Composer view, create an Opacity Mask effect (1) with a placeholder image as Source.
- Save the effect (1) and assign it to a component in your scene (2).
- In the Navigator view, select the effect (1).
- In Properties > Opacity Mask > Source Item, select a component (3) in your scene.
- In the Navigator view, select the Source Item (3) component.
- In Properties > Visibility, clear the Visibility checkbox to hide the Source Item component (3).
The Source Item component is automatically scaled to fit the component the effect is assigned to.
To use an unscaled component as the Source Item:
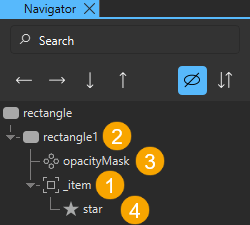
- In Components > Default Components, add an Item component (1) to your scene as a child to the component (2) that the effect (3) is applied to.
- In Properties > Visibility, clear the Visibility checkbox to set the Item component (1) as not visible.
- In Properties > Layout > Anchors, select
 to fill the parent component.
 - In the Navigator view, drag the Source Item component (4) as the child of the Item component (1).
- In Properties > Visibility, select the Visibility checkbox to show the Source Item component (4).
- In the Navigator view, select the effect (3).
- In Properties > Opacity Mask, set the Item (1) added in the first step as Source Item.
See also Effect Composer example, Using a shader from Shadertoy in Effect Composer, Using a shader from The Book of Shaders in Effect Composer, Using AI-generated shader code in Effect Composer, and Working with shader code in Effect Composer.
Available under certain Qt licenses.
Find out more.
