Custom shaders
In Qt Design Studio projects created with Qt 6 as Target Qt Version, you create custom shaders in code and use custom shader utilities to create post- processing effects. In projects created with Qt 5 as Target Qt Version, you can use custom shader utilities to to create custom materials and effects.
Note: Creating custom effects and materials as described here is not supported in the Qt Design Studio projects created with Qt 6 as Target Qt Version.
Custom shader utilities in Qt 6
In projects created with Qt 6 as Target Qt Version, you create custom shaders used for custom materials in code. In Qt 6, the custom materials no longer support multipass rendering, and therefore you don't need to use the custom shader utilities to create custom materials.
Use the custom shader utilities available in Components > QtQuick3D to customize the Effect component used for post-processing effects.
Creating shader files
In Qt 6, you need to create custom shaders for custom materials in code using Text Editor or the Edit mode. For more information about creating custom materials, see Qt Quick 3D - Custom Materials Example in the Qt Quick 3D documentation.
The requirements set for shaders that you can use in custom effects and materials are described in Qt Quick 3D Custom Material Reference.
If you use custom uniforms in the shader files, you must specify them as QML properties for the custom effect or material component. Qt Design Studio automatically generates the uniforms based on the property values.
For example, the following code snippet shows fragment shader code that uses two uniforms: uTextureInUse and uInputTexture.
out vec4 fragColor;

in vec3 pos;
in vec3 texCoord0;

void main() {

    vec4 textCol;
    if (uTextureInUse)
        textCol = texture( uInputTexture, texCoord0.xy );

    fragColor = vec4(pos.x * 0.02 * textCol.x, pos.y * 0.02 * textCol.y, pos.z * 0.02, 1.0);
}
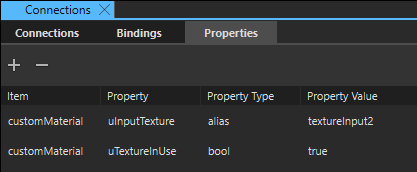
To use the above fragment shader in a custom effect or material component, you must remove the uniforms from the shader code and define them as properties for the component on the Properties tab in the Connections view.

For more information about adding properties, see Specifying custom properties.
Creating Post-Processing Effects
You can use the custom shader utilities available in Components to create custom post-processing effects.
Note: ExtendedSceneEnvironment provides a set of built-in effects, such as depth of field, glow/bloom, lens flare, color grading, and vignette. These effects can be defined as properties, as described in Applying Post-Processing Effects in the Extended Scene Environment. To ensure optimal performance for your application, we recommend using these built-in effects instead of applying custom post-processing effects.
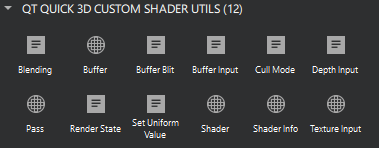
To create a post-processing effect, drag an Effect from Components > QtQuick3D > Components to a scene environment in Navigator. To customize the effect, drag the required shader utilities from Components > QtQuick3d > Custom Shader Utils to Effect in Navigator. To define settings for a shader utility, select it in Navigator and edit its properties in the Properties view.
Custom shaders in Qt 5
Use the 3D shader utilities and commands available in Components > Qt Quick 3D > Qt Quick 3D Custom Shader Utilities to create your own effects and materials. The Effect component, used as the base component for custom effects, is located in Qt Quick 3D Effects > Qt Quick 3D Custom Shader Utilities. To use the Effect component, you may need to add add the QtQuick3D.Effects module to your project. The Custom Material is located in Qt Quick 3D Materials > Qt Quick 3D Custom Shader Utilities. To use the Custom Material component, you may need to add the QtQuick3D.Materials module to your project.
If the custom shader utilities are not displayed in Components, add the QtQuick3D module to your project, as described in Adding and Removing Modules.
Note: In some Qt Design Studio versions the location of the custom shader utilities in Components may differ from what is described here. Use the search function in Components to locate any available component.

For more information about using the shaders, see Custom effects and materials in Qt 5.
See the following tables for available shader utilities and commands.
Available custom shader utilities and base components
| Component | Qt 5 only | Description |
|---|---|---|
| Buffer | No | A buffer to be used for a pass of Custom Material or Effect instances. The Name property identifies the Buffer instance. When the value of this property is empty, the buffer will refer to the default output texture of the render pass instead of allocating a buffer. This can be useful to override certain settings of the output, such as the texture format, without introducing a new, separate intermediate texture. The Format property specifies the format of the buffer. The Filter property specifies the filter operation when a render pass is reading a buffer that differs in size in comparison to the current output buffer. The Coordinate operation property specifies the texture coordinate operation for coordinates outside [0, 1] range. Select the ClampToEdge operation to clamp coordinates to edges. The Repeat operation wraps the coordinates at the edges to tile the texture, while MirroredRepeat also mirrors every other repeat of the texture while tiling it. The Allocation flags property defines allocation flags for the Buffer instance. Select SceneLifeTime to allocate the buffer for the whole lifetime of the scene. Size multiplier specifies the size of the Buffer instance. Value of 1.0 creates a buffer with the same size, while 0.5 creates a buffer with width and height halved. |
| Custom Material | No | The base component for creating custom materials used to shade model instances. The Shading mode property specifies whether the material is Shaded or Unshaded. The Vertex shader and Fragment shader properties define the vertex and fragment shader files for the material. Select the shader files from the dropdown menus. You can select The Source blend and Destination blend properties specify the source and destination blend factors. The Always dirty property determines whether the material is refreshed every time it is used. The Line Width property defines the width of the lines when the geometry is using lines or line strips. Specify the attributes of the Custom Material by defining the Transparency, Refraction and Always dirty properties. The Shader Info specifies the shader info of the material. For more information, see Custom effects and materials in Qt 5. Note: In Qt 5 you can also define render passes for Custom Material by using the Passes property, which lists render passes implemented by the material. |
| Effect | No | A base component for creating post-processing effects. The Passes property contains a list of render passes implemented by the effect. You can add more entry fields to the list by selecting |
| Pass | No | A render pass of an Effect instance. In Qt 5 you can also use render passes for Custom Materials. The Commands property specifies the list of render commands for the Pass instance, while the Shaders property lists the shaders for it. Use the dropdown menus to select the render commands and shader files of your choice. The Buffer property specifies an output buffer for the Pass instance. |
| Shader | No | A container component for defining shader code used by Effect instances. The Source property specifies the shader file to be used by the Shader instance, and the Stage property defines a Vertex or Fragment stage for it. Note: In Qt 5 you can also set the Stage property to Shared, Geometry, or Compute. |
| Shader Info | Yes | Basic information about custom shader code for Custom Materials. The Version property specifies the shader code version, while the Type property defines the shader code type. The Key property specifies the options used by the shader using the combination of shader key values, such as diffuse or specular lighting, refraction, transparency, displacement, transmissiveness, glossiness, and alpha cutout. The Key property specifies the options used by the shader using the combination of shader key values. Use the dropdown list to select the one of available shader keys:
|
| Texture Input | No | A texture channel for Custom Material and Effect instances. The Texture property specifies the texture to input, while Enabled determines whether the texture is enabled. In Effect instances, setting Enabled to false causes the shaders to sample a dummy, opaque black texture instead of the one specified by texture. |
Available custom shader commands
| Command | Qt 5 only | Description |
|---|---|---|
| Blending | Yes | A pass command that specifies the source blending function. The Source property specifies the source blending function, while the Destination property specifies the destination for it. |
| Buffer Blit | Yes | A copy operation between two buffers in a pass of a Custom Material or an Effect. The Source and Destination specify the source and the destination buffers for the copy-operation. |
| Buffer Input | No | An input buffer to be used for a pass of a Custom Material or an Effect. The Buffer property specifies the input buffer for an instance of the Pass instance. The Parameter specifies the name of the input parameter in the shader. |
| Cull Mode | Yes | A culling mode for a render pass. The Mode property specifies the culling mode in a pass when the State property of the Render State is set to CullFace. Use the dropdown menu to set the culling mode to BackFaceCulling, FrontFaceCulling, or NoCulling. |
| Depth Input | Yes | An output texture for the depth buffer. The Parameter property specifies the name of the texture the depth buffer will bind to. |
| Render State | Yes | The render state to be enabled or disabled in a pass of a Custom Material or an Effect instance. The State property specifies the render state to enable or disable in a pass. Use the dropdown menu to set the State to Blend, CullFace, DepthTest, StencilTest, ScissorTest, DepthWrite, or Multisample. The Enabled property defines the Enable state for the Render State. |
| Set Uniform Value | No | A value to be set during a single pass. The Target property specifies the name of the uniform that will have its value changed during the pass, while the Value specifies the value that will be set on the target uniform. |
Available under certain Qt licenses.
Find out more.

 to add new shader files to the dropdown menus.
 . For more information, see