Squish for Windows: Model-based Testing
Tutorial: Model-based Testing
This tutorial shows you how to utilize models for testing your application. The approach is called Model-Based Testing (MBT). You will learn how to use Squish to create, run, and modify MBT models and tests. You will use the Addressbook application. By the end of the tutorial, you will be able to create models for testing your own applications.
Introduction to Model-based Testing
Model-Based Testing is a test approach using models for testing. The basic idea is to design models for the AUT, and use these models in the test design specification.
The models should provide formal and detailed information that is sufficient to create test cases, both manually and automatically, by following paths through the models.
This way of working with your tests, similar to BDD, aims to be closely integrated with the development process and lifecycle of the AUT. It can bring stakeholders closer, unify communication language, and streamline the process of test automation.
MBT Concepts
- Model - An abstract representation of a test basis. It can be used to model different aspects, such as the test itself, a workflow, the behavior of the AUT, or test data.
- Step - Abstractly describes an activity that should happen during a test. For example, starting the AUT, adding a new contact to an address book, or editing an existing address in an address book. Steps are visually represented by rounded rectangles with a descriptive name inside.
- Connection - A directed relation between a source and a target step. It is visually represented as an arrow between two steps indicating the direction.
- Squish Step Diagram - A diagram representing an MBT model or just its part. The diagram is intended to focus on the workflow of the application and not the data. It consists of Steps and connections between them. Each connection shows a possible sequence in which steps can be performed. Only a single diagram per model is supported in the initial release of Squish's MBT feature.
- Path - A path is a concrete way through a given model. It describes the exact consecutive steps to be taken in a model-based test. The model should not contain invalid paths - performing consecutive steps in a path should not lead to failures if the AUT works correctly.
Implementation
The following instructions will guide you through the iterative process of designing a comprehensive MBT model and creating test cases based on it.
Get the example test suites
The <SQUISHDIR>/examples/win/Addressbook directory contains example test suites (suite_mbt_01_* and suite_mbt_02_*) showing different stages of this tutorial. We encourage you to examine them whenever you wish to cross-check your solution.
Select File > Open Test Suite... and locate the test suite. Click the Next and Finish buttons to open it.
Creating a Test Suite
First, we need to create a Test Suite, which is a container for all Test Cases. Start the Squish IDE and select File > New Test Suite. Please follow the New Test Suite wizard, provide a Test Suite name, choose the Windows Toolkit and scripting language of your choice, and finally, register the Addressbook.exe application as AUT. Please refer to Creating a Test Suite for more details about creating new Test Suite.
Creating an MBT model
Once the test suite is ready it's time to create a model file. To do so, select File > New > MBT Model File This should open the New MBT Model dialog
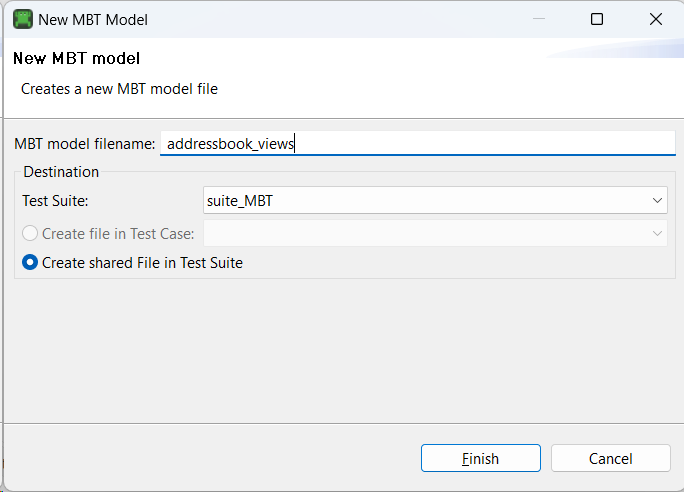
In the dialog, provide the MBT model filename "manage_contacts" and pick your test suite. Select Create shared File in Test Suite so the model can be used by multiple test cases.
After clicking the Finish button, the MBT model editor for a new Squish Step Diagram is going to be opened.
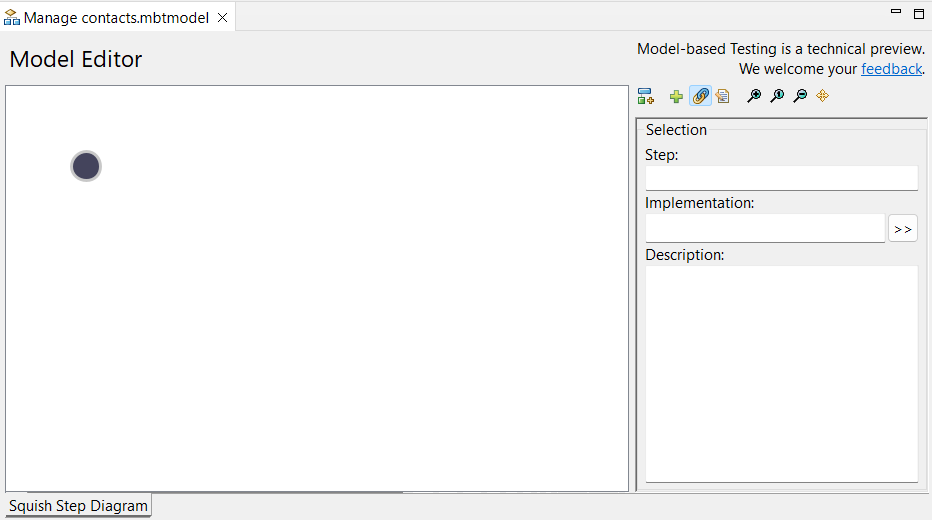
At this point, you can start creating your first MBT model. The diagram you see is a Squish Step Diagram with one black dot which is the Initial Step.
Note: Initial Step - A dedicated step that acts as an entry point for a Squish step diagram. It is visually represented as a filled circle and does not have a corresponding step implementation.
Iteration 1
During this iteration we are going to create a simple model allowing us to test the workflow of adding a single entry to the address book.
Adding steps
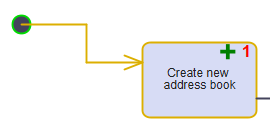
To add a new step ensure that Editor Mode: Add Steps is active, e.g. by clicking the  button in the model editor. Next, click the location where the new step should be added. Type the step name and confirm by pressing the Enter key or clicking out of the rectangle.
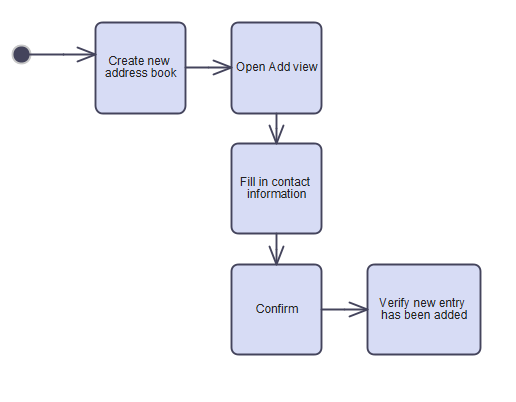
Add the following steps to the diagram:
- Create new address book
- Open Add view
- Fill in contact information
- Confirm
- Verify new entry has been added
Note: In the Squish Step Diagram, we recommend naming the steps so that they start with a verb, even for verification steps.
Use Validate that button is disabled rather than Button should be disabled.
This will help keeping the steps style consistent.
After adding all the entries your diagram may look similar to this one:

Connecting steps
Once all the steps are already in the diagram, it's time to connect them in a way that demonstrates a workflow possible to execute in the application. To do that, activate the Editor Mode: Connect Steps by clicking the  icon. Now, use the mouse cursor to connect diagram steps
At this point, you may need to use the Editor Mode: Edit Steps ( ) to move the steps around and make the model cleaner and easier to understand.
Creating a test case
Once all the steps are added and connected, it's time to create the first MBT test case.
You can create a New MBT Test Case in the following ways:
- Select File > New Test Case to open the New Squish Test Case wizard
- Expand the New Script Test Case (
 ) toolbar button to the right of the Test Cases label in the Test Suites view. Select MBT Test case from the list. This will open the New Squish Test Case wizard,
Once the Wizard is opened, ensure that MBT Test Case is selected, and choose a model file. Finally, click the Finish button.
It is also possible to create a new test case for the opened model. To do so, click the New MBT Test Case ( ) toolbar button of the Model Editor. This creates a new test case with a default name, which you can easily change.
After the new test case has been created, an MBT test case editor is opened.
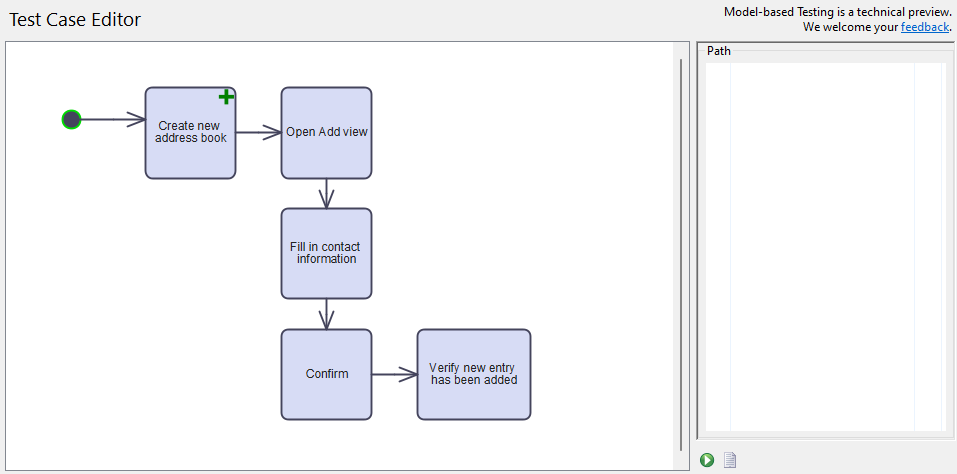
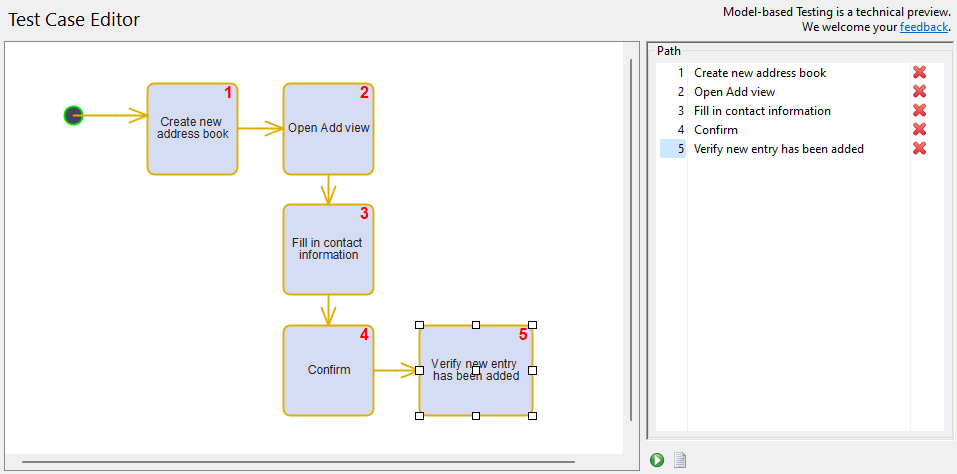
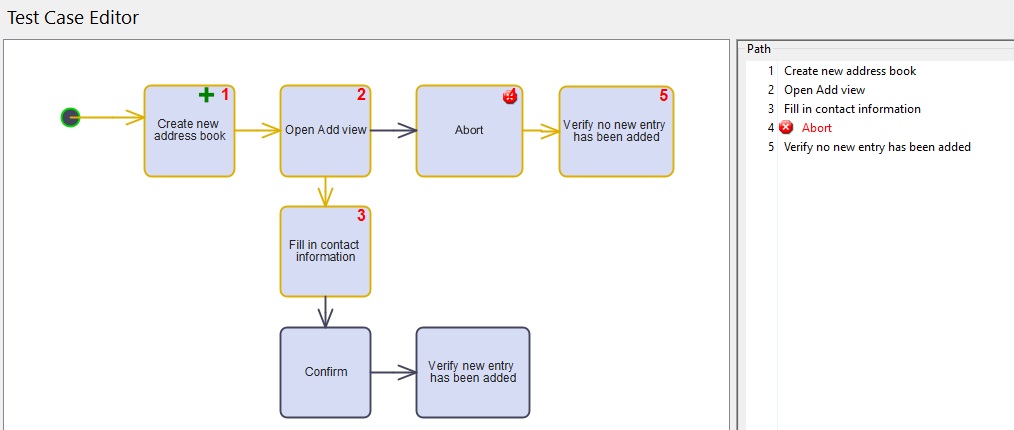
The editor displays the model used for its creation. Now, select the sequence of steps on the diagram. The path starts at the initial step that is initially selected. Each step that is connected to the selected one displays a green plus button.
Clicking it highlights the step rectangle, displays a step number on it, and adds the step to the path list. Follow the connections added in the previous tutorial steps - start with Create new address book and finish with Verify new entry has been added. This way, you create a path that represents the workflow of the test cases:
Step implementation
Now, it's time to implement logic behind the steps. The step scripts can be recorded as snippets or written by test developers.
Record steps by recording snippets
Note: To learn more about recording snippets visit How to Edit and Debug Test Scripts
First, create a missing step implementation for all the added steps. Go back to the Model Editor, activate the Editor Mode: Edit Steps mode(), and select any step. Click the ( ) button next to this field and select Create Missing Step Implementations option. This will open a script editor for the
 manage_contacts.py file with five new step functions. At this point, they all call the test.warning() function to report missing step implementation.
Add a breakpoint at every line with the test.warning() call. Click that line and select Run > Toggle Breakpoint from the main menu. You should end up with five breakpoints in your script.
To record a snippet during test execution, Squish needs to be hooked to the AUT. Call the startApplication(autName) function using the registered application name just before the warning in the function representing the first step.
@mbt.step("Create new address book")
def step():
    startApplication("Addressbook")
    test.warning("TODO implement Create new address book")
mbt.step("Create new address book", function() {
    startApplication("Addressbook");
    test.warning("TODO implement Create new address book");
});
mbt::step("Create new address book", sub {
    startApplication("Addressbook");
    test::warning("TODO implement Create new address book");
});
Mbt::step("Create new address book") do
    startApplication("Addressbook");
    Test.warning "TODO implement Create new address book"
end
mbt step "Create new address book" {} {
    startApplication "Addressbook"
    test warning "TODO implement Create new address book"
}
This will launch the AUT as soon as you trigger the test execution. You can do it by:
- clicking the Run MBT Test Case
 button below the Path list
 - clicking the Run Test button text to the test case name in the Test Cases list
- selecting Run > Run Test Case from the Squish IDE menu
Wait until Squish reaches the first break point in the create_new_addressbook step. You will see a debug perspective of the IDE. Start recording a Snippet and perform all actions required to create a new address book, i.e., click the New button in the AUT. Next, use the Squish Control Bar and Stop Recording. Once you are back in the Squish IDE, resume execution by clicking the Resume button of the main toolbar.
Repeat that process for all the breakpoints you created. Every time you record a snippet, perform only actions described by the step you are currently in.
- Open Add view - Click the green Add button
- Fill in contact information - Type Forename, Surname, Email, and Phone in
- Confirm - Click the OK button
- Verify new entry has been added - Add a rowCount property verification point for the address book table
Use provided examples
The example suite_mbt_01_* test suite already contains implementation for all the steps you created so far. If you got lost at any point, we encourage you to take a look at this test suite and fix your code if needed.
Executing test case
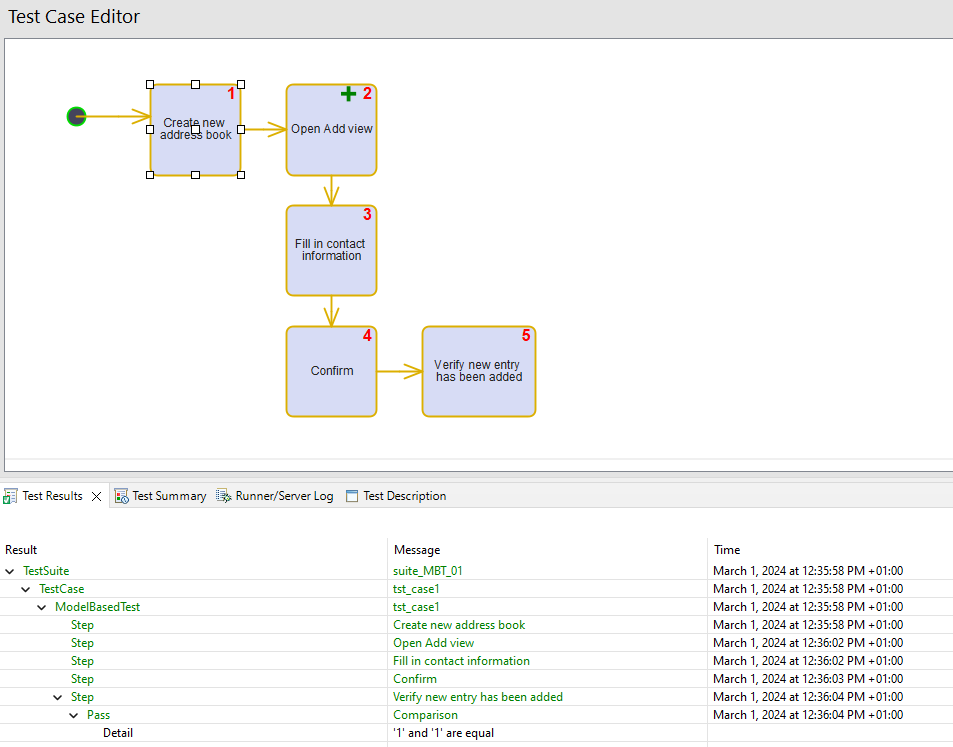
Remove all the breakpoint you added by selecting Run > Remove All Breakpoints Remove all test.warning(...) calls. When the execution is finished, you can inspect the execution result in the Test Results view. Double-clicking the result entry representing a step will change the current focus to the respective step in the model. To jump to a step implementation, expand the step message and double-click any of the internal test result entries.
Iteration 2
In this iteration, you are going to extend the diagram and create new MBT test cases.
Adding steps
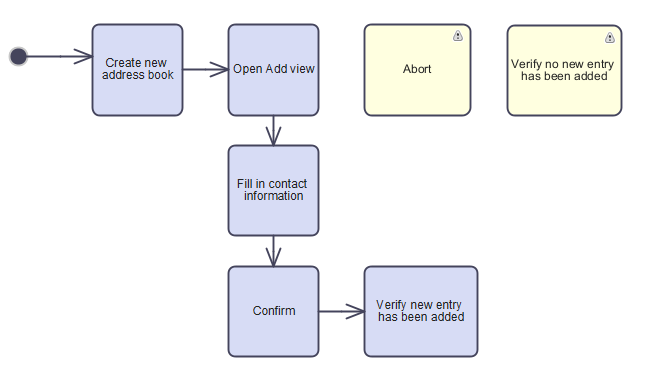
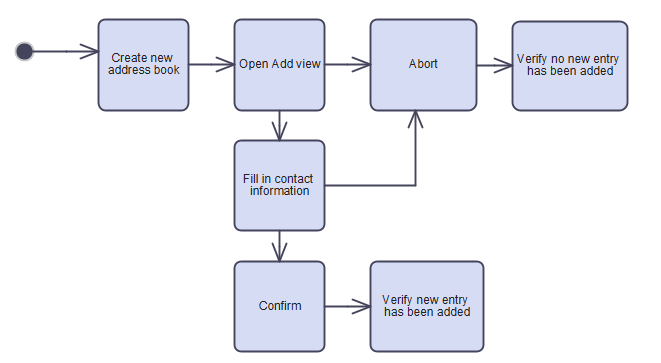
Add the following steps to the diagram:
- Abort
- Verify no new entry has been added
After adding all the entries, your diagram may look similar to this one:
Connecting steps
Activate Editor Mode: Connect Steps () and connect new steps in a way that demonstrates two possible workflows.
Creating more test cases
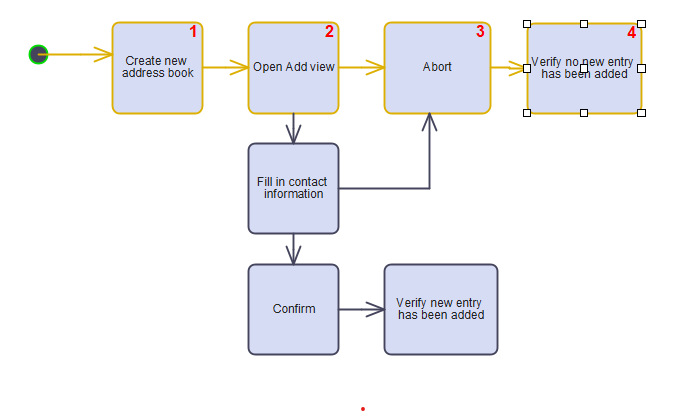
These new steps and connections allow us to create two more paths, i.e. two more test cases. Like previously, create a new test case out of the existing model and create the following path by selecting steps:
Create new address book > Open Add dialog > Abort > Verify NO new entry has been added
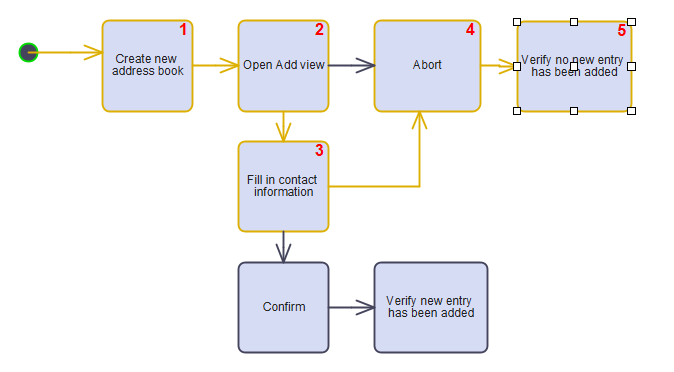
After that, create another test case that covers the last possible path:
Create new address book > Open Add dialog > Insert contact information > Abort > Verify NO new entry has been added
Step implementation
Just like during the first iteration, you can create missing step implementations and add breakpoints in the new functions. Then, execute newly created test cases and record missing snippets.
The Abort step should click the Cancel button. The Verify no new entry has been added should verify the number of address book entries is equal to 0.
You can also use the below snippets:
@mbt.step("abort")
def step():
    clickButton(waitForObject({"type":"Button", "text":"Cancel"}))

@mbt.step("vp_no_new_entry")
def step():
    test.compare(
        waitForObjectExists({"name": "addressGrid", "type": "Table"}).rowCount,
        0,
        "There should be 0 entries in the address book"
    )
mbt.step("abort", function() {
    clickButton(waitForObject({"type":"Button", "text":"Cancel"}));
});

mbt.step("vp_no_new_entry", function() {
    test.compare(waitForObjectExists({"name": "addressGrid", "type": "Table"}).rowCount,
        0, "There should be 0 entries in the address book");
});
mbt::step("abort", sub {
    clickButton(waitForObject({"type" => "Button", "text" => "Cancel"}));
});

mbt::step("vp_no_new_entry", sub {
    test::compare(
        waitForObjectExists({"name" => "addressGrid", "type" => "Table"})->rowCount,
        0, "There should be 0 entries in the address book"
    )
});
Mbt::step("abort") do
    clickButton(waitForObject({:type =>"Button", :text => "Cancel"}))
end

Mbt::step("vp_no_new_entry") do
    Test.compare(
        waitForObjectExists({:type => "Table"}).rowCount,
        0, "There should be 0 entries in the address book"
    )
end
mbt step "abort" {} {
    invoke clickButton [waitForObject [::Squish::ObjectName text Cancel type Button]]
}

mbt step "vp_no_new_entry" {} {
    test compare [property get [waitForObjectExists [::Squish::ObjectName name addressGrid type Table]] rowCount] 0 "There should be 0 entries in the address book"
}
In such a case, remember to fill out the Implementation Identifier: field of the new steps, so it matches the Step Implementation Identifier of the step definition.

Executing test suite
This time, execute the whole test suite by clicking Run Test Suite ( ). The results of the execution of all three MBT test cases will be available in the the Test Results view.
Use provided examples
The example suite_mbt_02_* test suite implements all the steps of this tutorial. Feel free to use it for a comprehensive reference or to compare your implementation.
Common Issues
Test case does not match the model
Due to changes made in the model, some of the previously created paths may not be valid anymore, e.g., a connections between two steps was removed.
This will be reported with an error indicator in the test case and will lead to an error during execution. Models may evolve over time, remember to review and update your test cases and paths accordingly.
Missing step implementation
If the step's Implementation Identifier is not referencing a valid step implementation, Squish will throw a Missing Step Implementation error when a test execution goes through that step.
© 2025 The Qt Company Ltd.
Documentation contributions included herein are the copyrights of
their respective owners.
The documentation provided herein is licensed under the terms of the GNU Free Documentation License version 1.3 as published by the Free Software Foundation.
Qt and respective logos are trademarks of The Qt Company Ltd. in Finland and/or other countries worldwide. All other trademarks are property
of their respective owners.
