Squish for MCU Tutorials
Learn how to test applications written in QUL (Qt Quick Ultralite) running on MCUs (Micro Controller Units).
Tutorial: Starting to test QUL Applications using Squish for MCU
Limitations of Squish for MCU
Squish for MCU does not support all of the features that are offered in other Squish Toolkit Editions. In particular, Squish for MCU can not do these things:
- Introspect objects
- Record touch events from the device
- Use the Remote Control window
People typically use Squish for MCU to test QUL AUTs by using a mixture of Image Based Testing and OCR, both of which allow you to Insert ( ) actions and Verify (
 ) things about your AUT in your test cases.
Creating a Test Suite
The MCU features of Squish are only enabled when a MCU Test Suite is open. This section will show you how to create one.
Creating Test Suites from Squish IDE
Start up the Squish IDE, by clicking or double-clicking the Squish IDE icon, by launching Squish IDE from the taskbar menu or by executing squishide on the command line, whichever you prefer and find suitable for the platform you are using.
Once Squish starts up, you might be greeted with a Welcome Page. Click the Workbench button in the upper right to dismiss it. Then, the Squish IDE will look similar to the screenshot.
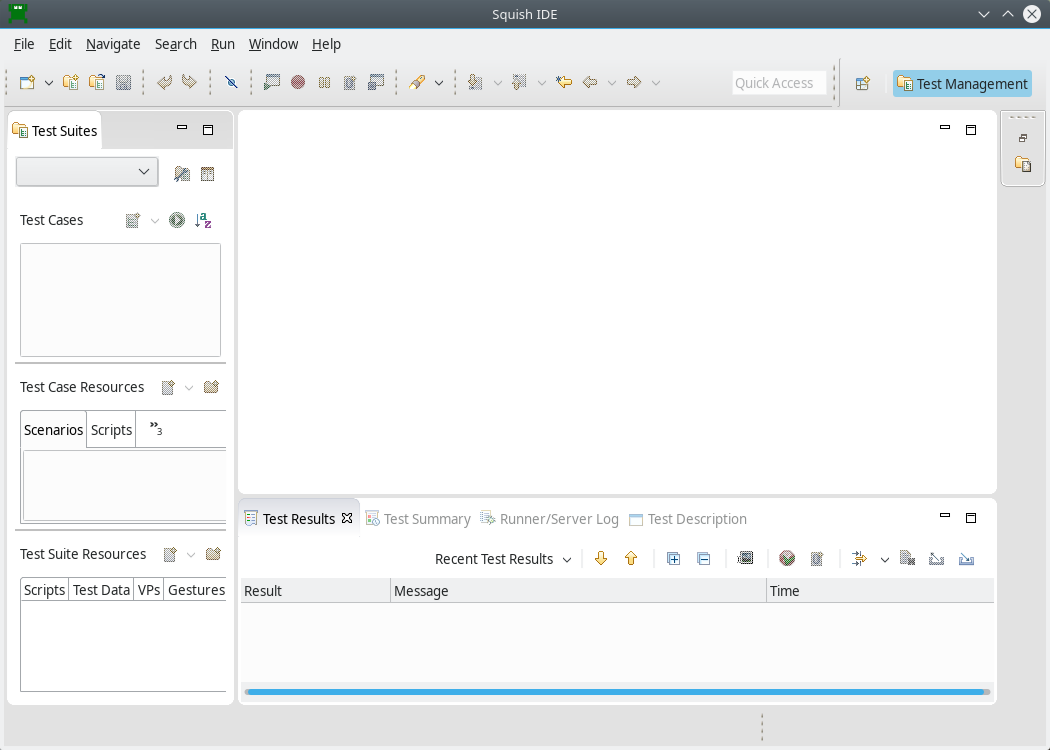
The Squish IDE with no Test Suites
Once Squish has started, click File > New Test Suite to pop-up the New Squish Test Suite wizard shown below.
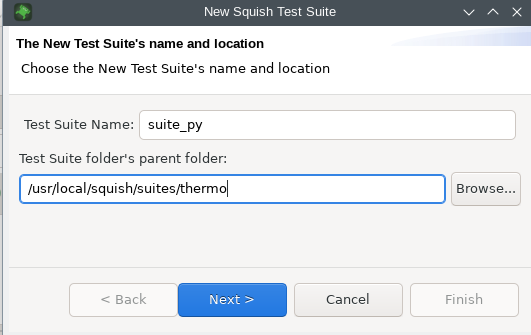
Test Suite name and location page
Enter a name for your test suite and choose the folder where you want the test suite to be stored. In the screenshot we have called it thermo_py.
Naturally, you can choose whatever name and folder you prefer. Once the details are complete, click Next to go on to the Toolkit (or Scripting Language) page.
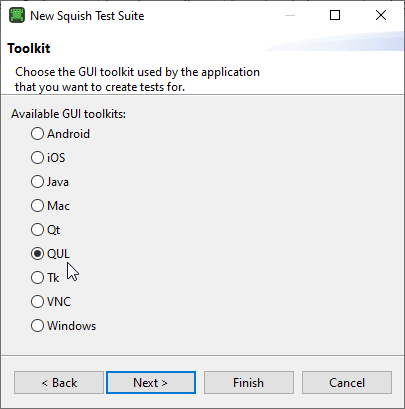
Toolkit / Edition page
On this wizard page, we choose the Squish Toolkit / Edition we are using. For this example, we select MCU since we are automating an application that is running on an MCU. Then click Next to go to the Scripting Language page.
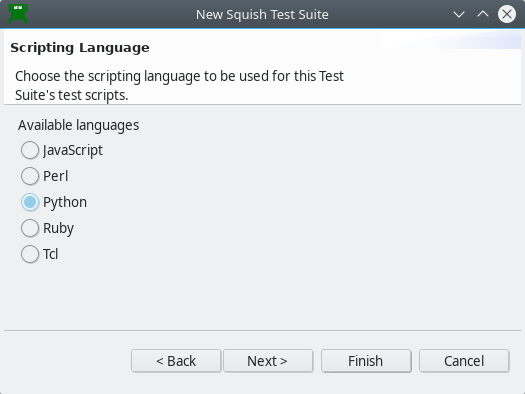
Scripting Language page
Choose whichever scripting language you want. The functionality offered by Squish is the same from all languages. Having chosen a scripting language, click Next once more to get to the wizard's last page.
Now, if your MCU device is connected correctly over USB, because the open test suite has MCU as the selected Toolkit/Edition, you should see a dropdown menu beneath the Test Suite dropdown in the Test Suites window, which shows your MCU device(s).
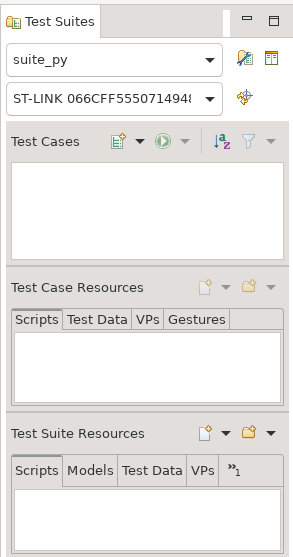
New MCU Test Suite
If you are unable to see your device in the drop-down, double-check the USB connection and click Refresh ( ) to the right of it. You will not be able to flash, Record (
 ) or Run Test Case (
 ) until you can select your device in it.
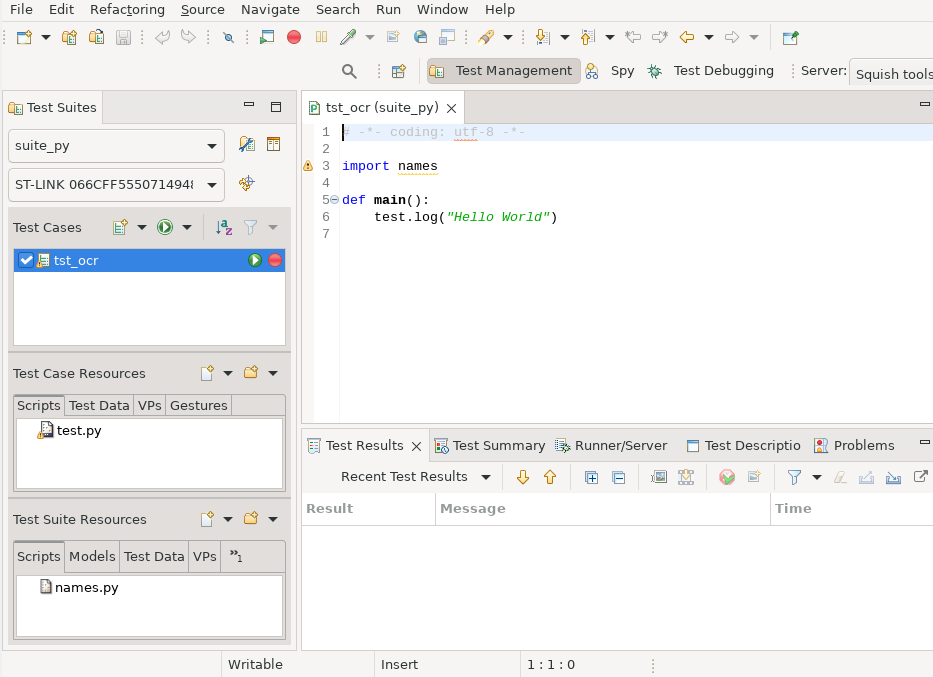
Squish after creating a new test case
We are now ready to start creating tests.
Creating Tests
Recordings are made into existing test cases. You can create a New Script Test Case in the following ways:
- Select File > New Test Case to open the New Squish Test Case wizard, enter the name for the test case, and select Finish.
- Click the New Script Test Case (
 ) toolbar button to the right of the Test Cases label in the Test Suites view. This creates a new test case with a default name, which you can easily change.
Give the new test case a name, for example, tst_ocr.
Squish automatically creates a sub-folder inside the test suite's folder with this name and also a test file, for example test.py. If you choose JavaScript as the scripting language, the file is called test.js, and similarly for Perl, Ruby, or Tcl.
Click the Record ( ) toolbar button to the right of the
 tst_ocr test case shown in the Test Suites view's Test Cases list. This will cause Squish to connect to the squishserver, hide the Squish IDE, and open the Squish Control Bar. This window will be your way to Insert ( ) or Verify (
 ) things in your test case.

The Squish Control Bar
qul.connect() and resetDevice()
When Record ( ) is clicked, this causes a call to qul.connect(), inserted into your script, which by default, will reset the device and the AUT. This ensures that each test case starts testing the AUT at a known initial state.
If for some reason, you wish to connect to the running AUT without resetting it, you can call qul.connect({"reset": "no"}).
To cause an AUT restart in the middle of a test case, we can insert a call to resetDevice() at the appropriate point of the script.
Flashing an AUT onto an MCU device
For Squish for MCU to be able to test them, QUL AUTs must be built with DeviceLink enabled. This section assumes your AUT is already built that way, and packaged in a testcrate archive. If your AUT is not yet built with devicelink enabled, see Making your QUL AUT testable.
With the testable AUT packaged as a testcrate archive, you can use Squish to flash the AUT onto your device. Execute a test script like the one below which connects and flashes your AUT in one step.
qul.connect({"flash": "yes", "testcrate": "/path/to/testcrate.tar.gz"})
qul.connect({"flash": "yes", "testcrate": "/path/to/testcrate.tar.gz"});
Qul::connect({:flash => "yes", :testcrate => "/path/to/testcrate.tar.gz"})
qul::connect({"flash" => "yes", "testcrate" => "/path/to/testcrate.tar.gz"});
qul connect [dict create flash "yes" testcrate "/path/to/testcrate.tar.gz"]
Inserting Taps and Verifications using OCR
Click here for instructions on getting Squish set up with OCR: OCR setup
You can use Squish to insert tapObject(waitForOcrText()) or test.ocrTextPresent() statements. This is done from the Control Bar, from the Insert ( ) or Verify (
 ) drop-down buttons.
After an Insert ( ) of a TapObject(<OCR>), you will see the OCR Select Text dialog.
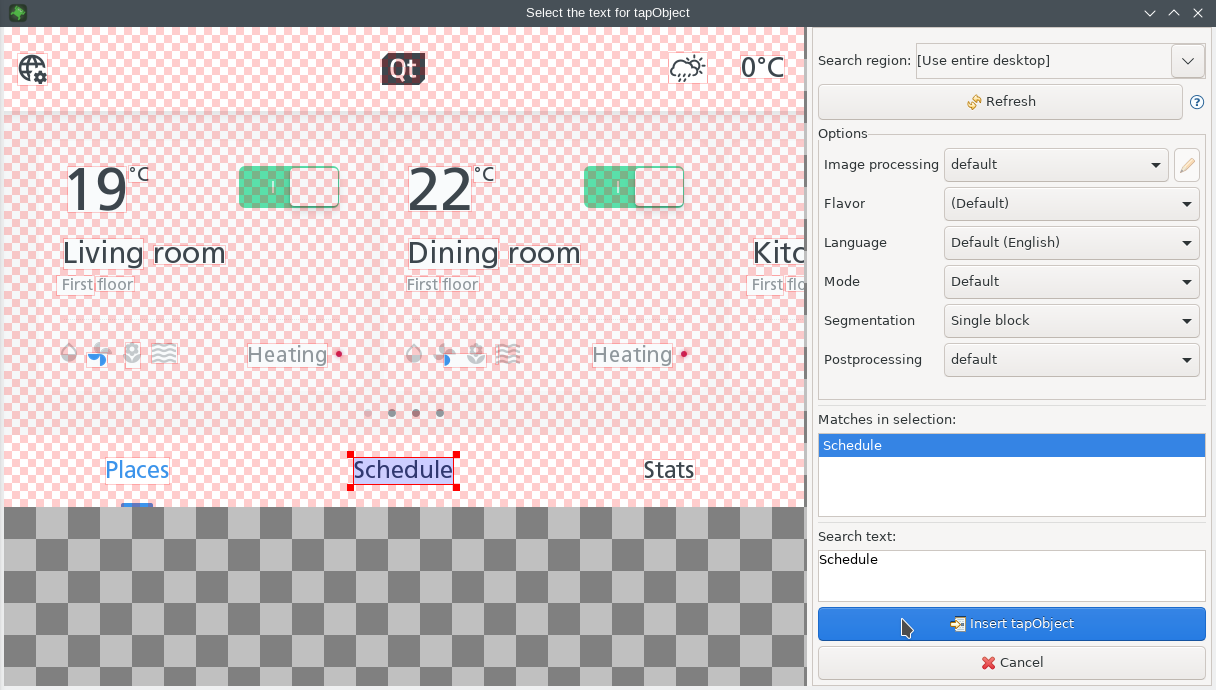
Select text using OCR
When this dialog is present, you can click on text to select it, and adjust the rectangular region. You should see the selected text properly scanned by the OCR engine in the Search Text: text field. Click on Insert TapObject and you will get back to the Control Bar where you can Stop Recording( ), Insert (
 ), or Verify (
 ) other things.
For this test, insert these operations:
- TapObject<OCR> "Schedule"
- Verify<OCR Text> "Kitchen"
- TapObject<OCR> "Stats"
- Verify<OCR Text> "Year"
- TapObject<OCR> "Year"
After you are done with recording, click Stop Recording( ) to save it as a script.
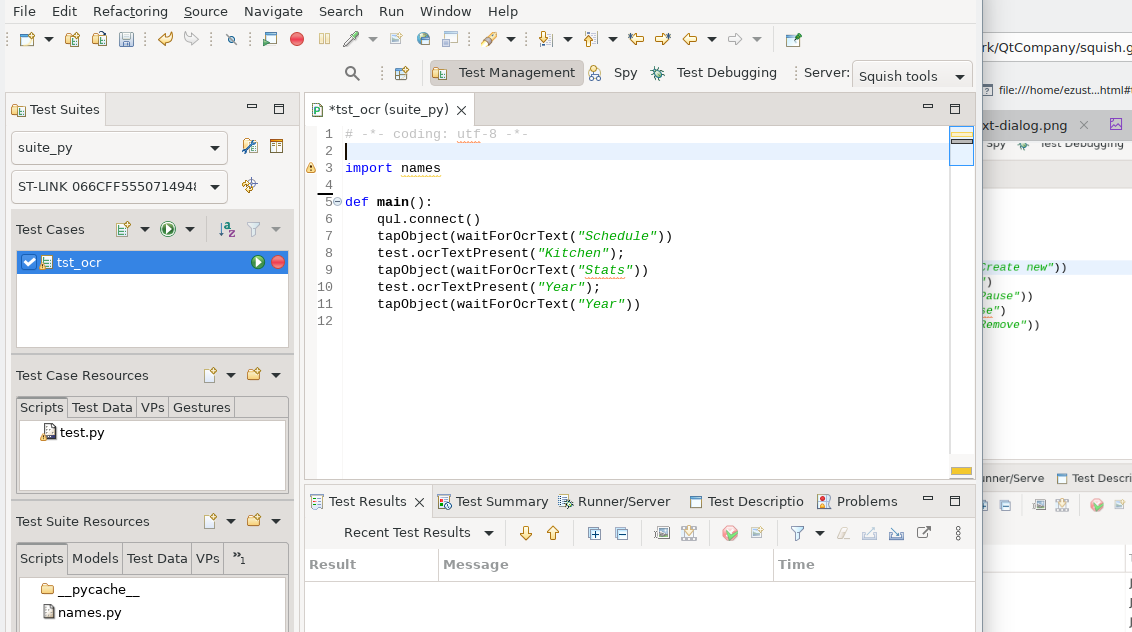
A newly recorded OCR test case
Here is an example test case. It is actually not necessary to Insert ( ) OCR statements using the Control Bar if you prefer writing scripts, since unlike Image Search, there is no image that gets captured as a side-effect of the process.
# -*- coding: utf-8 -*-

import names

def main():
    qul.connect()
    tapObject(waitForOcrText("Schedule"))
    test.ocrTextPresent("Kitchen")
    tapObject(waitForOcrText("Stats"))
    test.ocrTextPresent("Year")
    tapObject(waitForOcrText("Year"))
import * as names from 'names.js';
function main()
{
qul.connect();
tapObject(waitForOcrText("Schedule"));
test.ocrTextPresent("Kitchen");
tapObject(waitForOcrText("Stats"));
test.ocrTextPresent("Year");
tapObject(waitForOcrText("Year"));
}# encoding: UTF-8
require 'squish'
require 'names'
include Squish
def main
Qul::connect()
mouseClick(waitForOcrText("Schedule"))
Test.ocrTextPresent("Kitchen");
mouseClick(waitForOcrText("Stats"))
Test.ocrTextPresent("Year");
mouseClick(waitForOcrText("Year"))
enduse strict;
use warnings;
require 'names.pl';
sub main
{
qul::connect();
tapObject(waitForOcrText("Schedule"));
test::ocrTextPresent("Kitchen");
tapObject(waitForOcrText("Stats"));
test::ocrTextPresent("Year");
tapObject(waitForOcrText("Year"));
}source [findFile "scripts" "names.tcl"]
proc main {} {
qul connect
invoke tapObject [waitForOcrText "Schedule"]
test ocrTextPresent "Kitchen"
invoke tapObject [waitForOcrText "Stats"]
test ocrTextPresent "Year"
invoke tapObject [waitForOcrText "Year"]
}If the recorded test doesn't appear, click (or double-click depending on your platform and settings) the tst_ocr test case; this will make Squish show the test script in an editor window as shown in the screenshot.
Now that we've recorded the test we can try replay it. This in itself is useful in that if the playback failed, it might mean that we forgot to insert a tap somewhere. Furthermore, every verification we inserted will be checked.
Inserting Taps and Verifying based on Images
Now we will create a New Script Test Case ( ) called
 imagesearch, and Insert ( ) and Verify (
 ) things based on Search Images.
Click the record button on tst_imagesearch and from the Squish Control Bar, we will exercise Image Search features of Squish.
Use the Insert ( ) drop-down button, combined with TapObject<Image> to pick the location of the desired tap.

Select a Search Image
Adjust the rectangular area you wish to capture and enter a good Name: for it. Choose Insert TapObject and you will see the Control Bar again.
Try recording a test that does this:
- TapObject<Image> "langSelect"
- TapObject<OCR> "Deutsch"
- TapObject<Image> "Close"
- Verify<OCR Text> "Wohnzimmer"
- TapObject<Image> "langSelect"
- TapObject<OCR> "English"
- TapObject<Image> "Close"
- Verify<OCR Text> "Living room"
- Verify<Search Image> "langSelect"
Notice that you can reuse previous images on subsequent image search operations, so it is not necessary to do image capture for each image search operation.
After you click Stop Recording( ), you should see a test case like this:
# -*- coding: utf-8 -*-

import names

def main():
    qul.connect()
    tapObject(waitForImage("langSelect"))
    mouseClick(waitForOcrText("Deutsch"))
    tapObject(waitForImage("close"))
    test.ocrTextPresent("Wohnzimmer")
    tapObject(waitForImage("langSelect"))
    mouseClick(waitForOcrText("English"))
    tapObject(waitForImage("close"))
    test.ocrTextPresent("Living room")
    test.imagePresent("langSelect")
import * as names from 'names.js';
function main()
{
qul.connect()
tapObject(waitForImage("langSelect"));
mouseClick(waitForOcrText("Deutsch"));
tapObject(waitForImage("close"));
test.ocrTextPresent("Wohnzimmer");
tapObject(waitForImage("langSelect"));
mouseClick(waitForOcrText("English"));
tapObject(waitForImage("close"));
test.ocrTextPresent("Living room");
test.imagePresent("langSelect");
}# encoding: UTF-8
require 'squish'
require 'names'
include Squish
def main
Qul::connect()
tapObject(waitForImage("langSelect"))
mouseClick(waitForOcrText("Deutsch"))
tapObject(waitForImage("close"))
Test.ocrTextPresent("Wohnzimmer");
tapObject(waitForImage("langSelect"))
mouseClick(waitForOcrText("English"))
tapObject(waitForImage("close"))
Test.ocrTextPresent("Living room")
Test.imagePresent("langSelect")
enduse strict;
use warnings;
require 'names.pl';
sub main
{
qul::connect();
tapObject(waitForImage("langSelect"));
tapObject(waitForOcrText("Deutsch"));
tapObject(waitForImage("close"));
test::ocrTextPresent("Wohnzimmer");
tapObject(waitForImage("langSelect"));
tapObject(waitForOcrText("English"));
tapObject(waitForImage("close"));
test::ocrTextPresent("Living room");
test::imagePresent("langSelect");
}source [findFile "scripts" "names.tcl"]
proc main {} {
qul connect
invoke tapObject [waitForImage "langSelect"]
invoke tapObject [waitForOcrText "Deutsch"]
invoke tapObject [waitForImage "close"]
test ocrTextPresent "Wohnzimmer"
invoke tapObject [waitForImage "langSelect"]
invoke tapObject [waitForOcrText "English"]
invoke tapObject [waitForImage "close"]
test ocrTextPresent "Living Room"
test imagePresent "langSelect"
}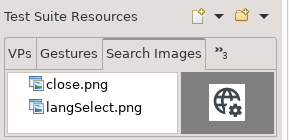
The Test Suite Resources > Search Images tab shows recorded/expected images.
Now try Run Test Case ( ) to see that it works.
When Image Search Fails
With Image Search, playback may fail due to a single different pixel in the expected versus actual image. For example, there could be differences due to changes in hardware, color profile, brightness of surroundings (in the case where a device has a light sensor), time of day (for example Day Mode vs Night Mode), lossy compression, or sub-pixel antialiasing rendering. Or maybe the image is different and needs to be acquired again.
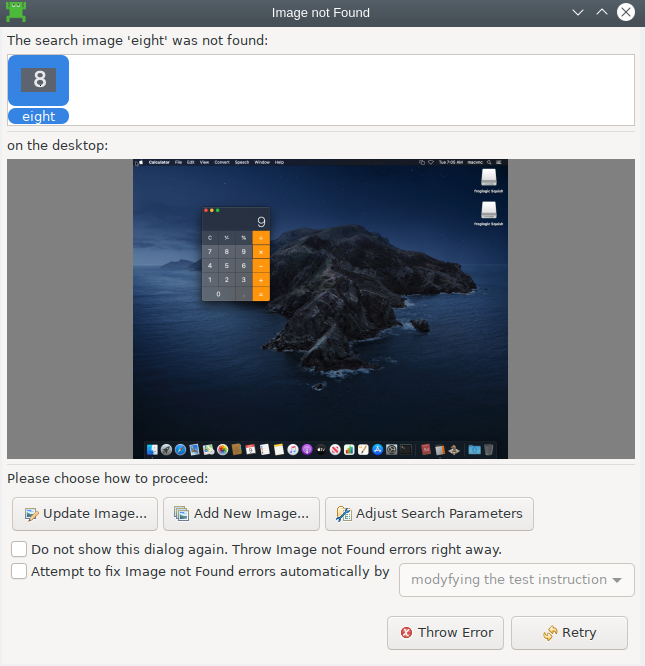
Image Not Found dialog
If this happens, the Image Not Found dialog pops up. At this point, there are lots of things you can do.
- If the expected image is out of date, you can Update the image from the current desktop.
- If you wish to add this image as an acceptable image, you can Add New Image... which will create (if necessary) an Image Group and add your image to it.
- If you want to relax the image search parameters for that particular statement, you can click Adjust Search Parameters.
- If you want to apply a default tolerant image search for your test suite based on how closely the current actual matches the expected, click Attempt to fix image search errors automatically followed by Change Defaults.
You can view or set default tolerance levels for the test suite in Test Suite Settings > Image Search.
See How to Do Image-Based Testing for more information.
Recording Snippets
After playback is finished, the MCU connection terminates. By selecting Launch AUT ( ), the connection to your AUT is re-established.
The Squish IDE is now in Spy perspective, neither recording nor playing back a test case. Click to focus the cursor anywhere in your test script, and then Record ( ) a snippet to be inserted at that location. Click Stop Recording(
 ) to see the snippet inserted into your test script.
Making your QUL AUT testable
Before Squish for MCU can be used for testing your Qt Ultralite AUT, it must be made testable.
If your AUT already includes QUL in the build tree (or vice-versa), simply rebuilding your project with the compiler define QUL_PLATFORM_DEVICELINK_ENABLED should be sufficient.
After the AUT is built and flashed onto the device, it should be possible to record and playback test cases on it.
If your AUT is separate from the QUL source, you can follow the steps described in the next sections:
- Build QUL for your device from sources with compiler define
QUL_PLATFORM_DEVICELINK_ENABLED. - Build your AUT against that custom build of QUL.
Building a DeviceLink Enabled QUL AUT
Before building QUL (or a QUL AUT which probably includes QUL), you need to install the following software:
- Qt for MCUs, with QUL sources, and support for your device.
- protoc, the Google Protocol Buffers compiler
- Python (3.10 or later)
- python-protobuf 4.x or later module.
- python-grpcio 1.50.0 or later module.
You can install the required python packages with
pip.> pip install --force-reinstall -v "protobuf==4.25.3" "grpcio==1.51.1"
On most Linux Distributions, you can probably use the package manager to install them:
$ sudo apt-get install python3-grpcio python3-protobuf
Installing the grpcio package using pip may require compilation of its binary components. If the compiler for the host platform is not available or the installation cannot be completed for any reason, the build script can use the native protocol buffers compiler instead. Please make sure to add the protoc installation directory to the PATH environment variable before building QUL.
Note: When using the protocol buffers compiler (protoc) please make sure that the versions of protoc and python-protobuf packages are the same.
In our example, we built QUL using cmake by following the instructions, but we added one extra compiler define, QUL_PLATFORM_DEVICELINK_ENABLED to enable the DeviceLink option, required by Squish.
Here is an example build script that uses cmake to build QUL for the STM32F769I Discovery board, and also installs a demo AUT called thermo_big.
rem This script builds QUL with devicelink enabled, and then
rem installs a demo called "thermo_big" to the STM32F769I Discovery board

set QUL_ROOT=C:\Qt\QtMCUs\2.7.1
set QUL_TOOLS=C:\Qt\Tools\QtMCUs
set QUL_PLATFORM=stm32f769i-discovery-baremetal
set QUL_GENERATORS=%QUL_ROOT%\lib\cmake\Qul\QulGenerators.cmake
set QUL_BOARD_SDK_DIR=%QUL_TOOLS%\STM\STM32Cube_FW_F7_V1.17.1
set STM32=C:\Program Files\STMicroelectronics\STM32Cube\STM32CubeProgrammer\bin
set PATH=%STM32%:%PATH%

cd %QUL_ROOT%
mkdir build
cd build

mkdir .cmake\api\v1\query && echo . > .cmake\api\v1\query\codemodel-v2
cmake .. -G "Ninja" -DQul_ROOT=%QUL_ROOT% -DQUL_PLATFORM_DEVICELINK_ENABLED=ON -DCMAKE_BUILD_TYPE=MinSizeRel -DCMAKE_TOOLCHAIN_FILE=%QUL_ROOT%\lib\cmake\Qul\toolchain\armgcc.cmake -DQUL_TARGET_TOOLCHAIN_DIR=%QUL_TOOLS%\arm_gcc_10 -DQUL_BOARD_SDK_DIR=%QUL_BOARD_SDK_DIR% -DQUL_GENERATORS=%QUL_GENERATORS% -DQUL_PLATFORM=%QUL_PLATFORM%

rem This step is only necessary when using MSVC, and is here because of a bug in a cmake recipe.
ninja platform\deviceinformationexchangeprotocol.pb.h

rem Build QUL
cmake --build .

rem flash demo AUT, "thermo_big" to device
cmake --build . --target flash_thermo_big
# This script builds QUL with devicelink enabled, and then
# installs a demo called "thermo_big" to the STM32F769I Discovery board

export QUL_ROOT=/usr/local/Qt/QtMCUs/2.7.1
export QUL_TOOLS=/usr/local/Qt/Tools/QtMCUs
export QUL_BOARD_SDK_DIR=$QUL_TOOLS/STM/STM32Cube_FW_F7_V1.17.1
export QUL_PLATFORM=stm32f769i-discovery-baremetal
export STM32=/usr/local/STMicroelectronics/STM32Cube/STM32CubeProgrammer/bin
export PATH=$STM32:$PATH

cd $QUL_ROOT
mkdir build
cd build
mkdir -p .cmake/api/v1/query && touch .cmake/api/v1/query/codemodel-v2
cmake .. -G "Ninja" -DQul_ROOT=$QUL_ROOT -DCMAKE_BUILD_TYPE=MinSizeRel -DQUL_PLATFORM_DEVICELINK_ENABLED=ON -DCMAKE_TOOLCHAIN_FILE=$QUL_ROOT/lib/cmake/Qul/toolchain/armgcc.cmake -DQUL_TARGET_TOOLCHAIN_DIR=$QUL_TOOLS/arm_gcc_10 -DQUL_BOARD_SDK_DIR=$QUL_BOARD_SDK_DIR -DQUL_GENERATORS=$QUL_ROOT/lib/cmake/Qul/QulGenerators.cmake -DQUL_PLATFORM=$QUL_PLATFORM

# Extra step due to a bug in a cmake recipe
ninja platform/deviceinformationexchangeprotocol.pb.h

cmake --build .

# flash demo AUT, "thermo_big" to device
cmake --build . --target flash_thermo_big
If building is successful, the last step should flash and start the AUT on your device.
© 2025 The Qt Company Ltd.
Documentation contributions included herein are the copyrights of
their respective owners.
The documentation provided herein is licensed under the terms of the GNU Free Documentation License version 1.3 as published by the Free Software Foundation.
Qt and respective logos are trademarks of The Qt Company Ltd. in Finland and/or other countries worldwide. All other trademarks are property
of their respective owners.

