Squish for JavaFX Tutorial
Learn how to test JavaFX applications.
Tutorial: Starting to Test JavaFX Applications
Note: There is a 45-minute Online course about Squish Basic Usage at the ![]() if you desire some video guidance.
if you desire some video guidance.
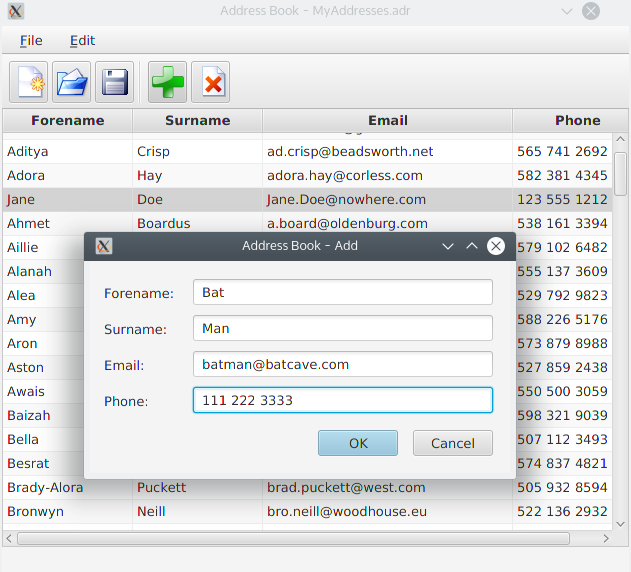
For this tutorial we will use a simple Address Book application written in JavaFX as our AUT, located in <SQUISHDIR>/examples/java/addressbook_fx. It allows users to load an existing address book, create a new one, add and remove entries.
The screenshot below shows the application in action with a user adding a new name and address.
Example Test Suites
The tests that we will discuss in the following sections are under <SQUISHDIR>/examples/java/addressbook_fx, in suite_py, with the tests written in other languages in similarly named sub-folders.
Squish Multi-Process Architecture and IPC
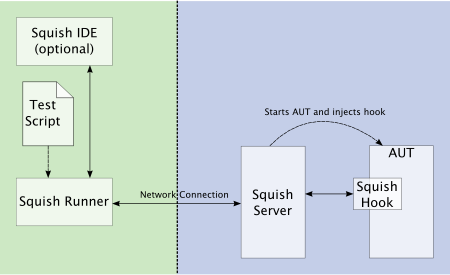
Squish runs a small server, squishserver, that handles the communication between the AUT and the test script. The test script is executed by the squishrunner tool, which in turn connects to squishserver. squishserver starts the instrumented AUT on the device, which starts the Squish Hook. With the hook in place, squishserver can query AUT objects regarding their state and can execute commands on behalf of squishrunner. squishrunner directs the AUT to perform whatever actions the test script specifies.
All the communication takes place using network sockets which means that everything can be done on a single machine, or the test script can be executed on one machine and the AUT can be tested over the network on another machine.
The following diagram illustrates how the individual Squish tools work together.
Tests can be written and executed using the Squish IDE, in which case squishserver is started and stopped automatically, and the test results are displayed in the Squish IDE's Test Results view. The following diagram illustrates what happens behind the scenes when the Squish IDE is used.
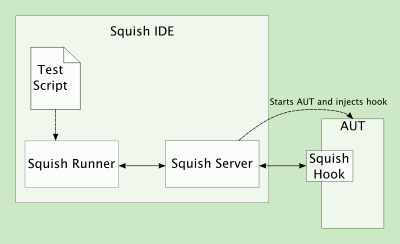
Under the covers, squishrunner is used to execute test cases. If we need to automate the execution of test cases from a script, we would use this command directly.
Making an Application Testable
In most cases, nothing special needs to be done to make a Java application testable. If you do have problems testing your own AUT with Squish, the most likely cause is a mismatch in Java versions. This is probably due to the AUT using its own packaged JRE, which is not compatible with the one Squish is configured for. You can tell Squish to use another Java by invoking the squishconfig command:
$ <SQUISHDIR>/bin/squishconfig --java=/path/to/java
See this article if you don't know which JRE is executing your AUT.
Creating Test Suites from Squish IDE
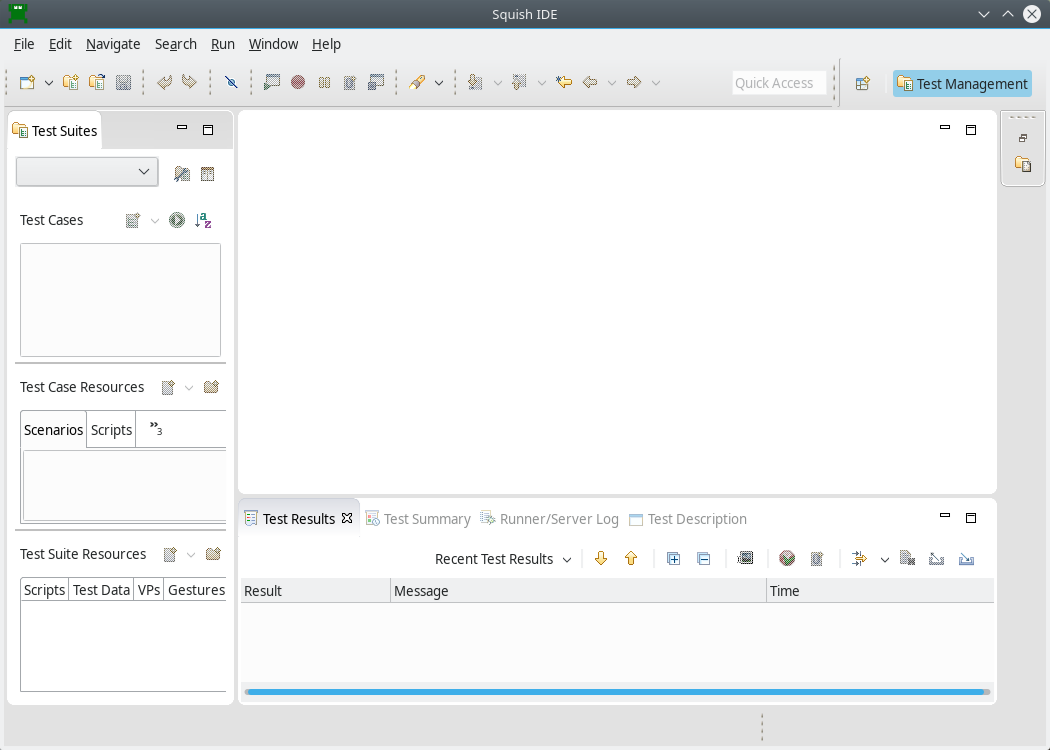
Start up the Squish IDE, by clicking or double-clicking the Squish IDE icon, by launching Squish IDE from the taskbar menu or by executing squishide on the command line, whichever you prefer and find suitable for the platform you are using.
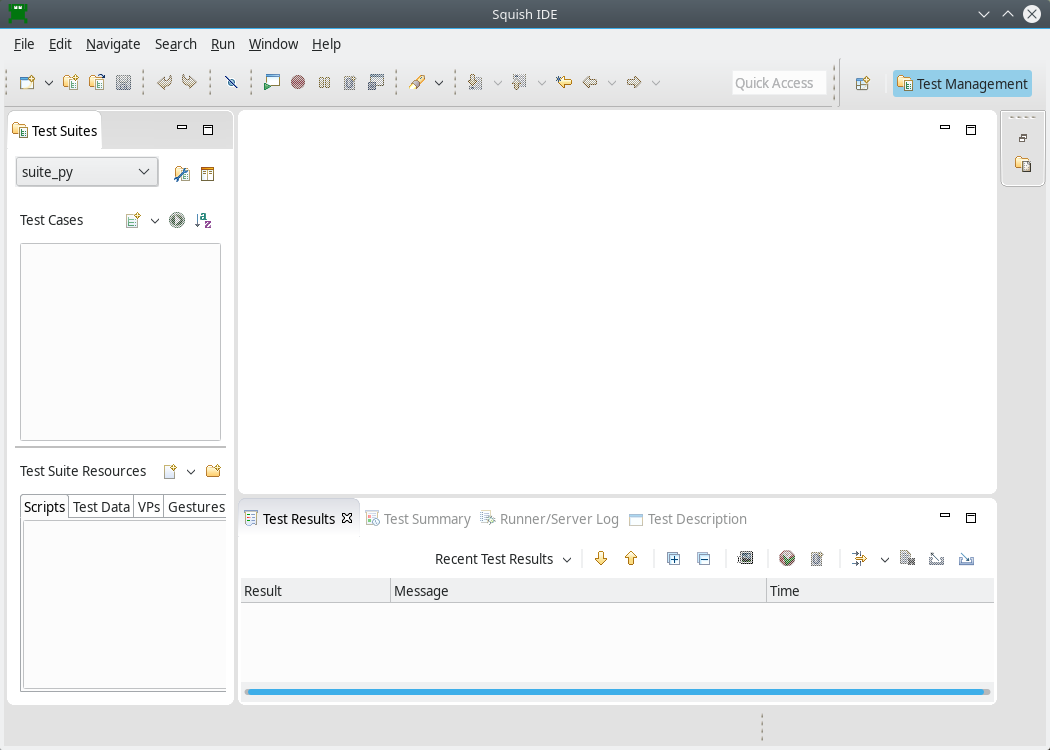
Once Squish starts up, you might be greeted with a Welcome Page. Click the Workbench button in the upper right to dismiss it. Then, the Squish IDE will look similar to the screenshot.
Once Squish has started, click File > New Test Suite to pop-up the New Test Suite wizard shown below.
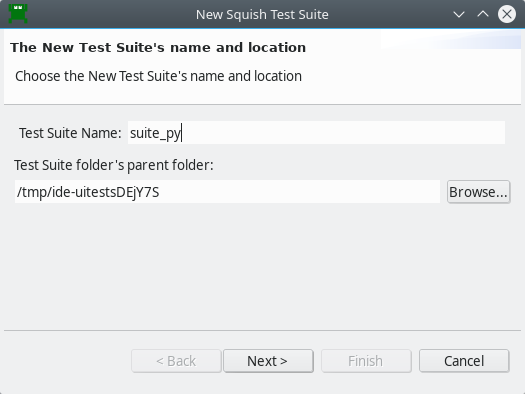
Enter a name for your test suite and choose the folder where you want the test suite to be stored. We have called it suite_py. Once the details are complete, click Next to go on to the Toolkit (or Scripting Language) page.
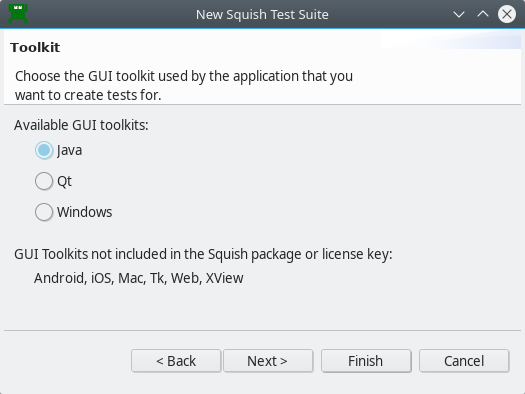
For the 'Toolkit' page, select Java, which covers AWT, Swing, SWT, and JavaFX. Then click Next to go to the Scripting Language page.
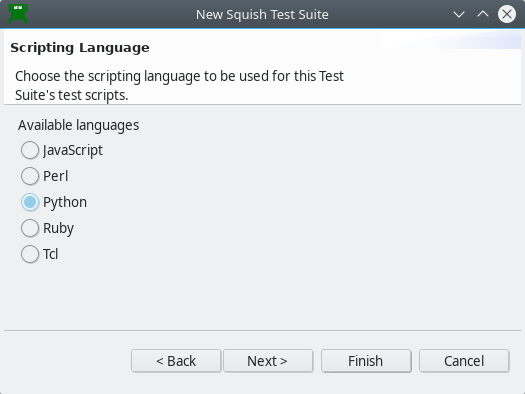
Choose your desired scripting language on this page. The functionality offered by Squish is the same for all languages.
Starting JavaFX AUTs from Squish
JavaFX is not included in current versions of Java. To launch this AUT, we use a batch file or a shell script.
In <SQUISHDIR>/examples/java/addressbook_fx, you will find startjfxaut.bat and startjfxaut.sh. Edit the more appropriate file and provide the correct path to your JavaFX jars, and test from the command line shell that the script starts the AddressBook example properly.
set JAVAFX_DIR=c:\path\to\javafx-sdk\lib
java --module-path %JAVAFX_DIR% --add-modules javafx.controls,javafx.fxml -jar AddressBook.jar
#!/bin/bash
export JAVAFX_DIR=/path/to/openjfx/jars
java --module-path $JAVAFX_DIR --add-modules javafx.controls,javafx.fxml -jar AddressBook.jar
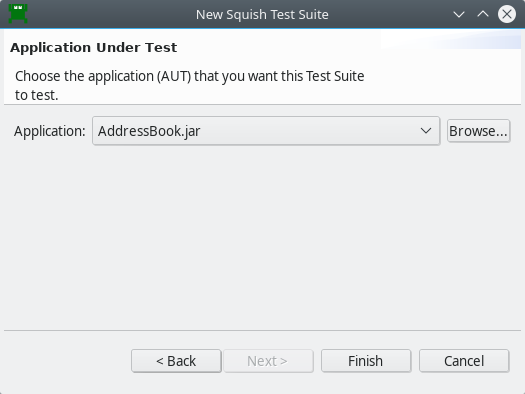
If you are creating a new test suite for an AUT that Squish already knows about, simply click the combobox to drop-down the list of AUTs and choose the one you want. If the combobox is empty or your AUT isn't listed, click the Browse button to the right of the combobox and navigate to the startjfxaut.bat or startjfxaut.sh you just modified.
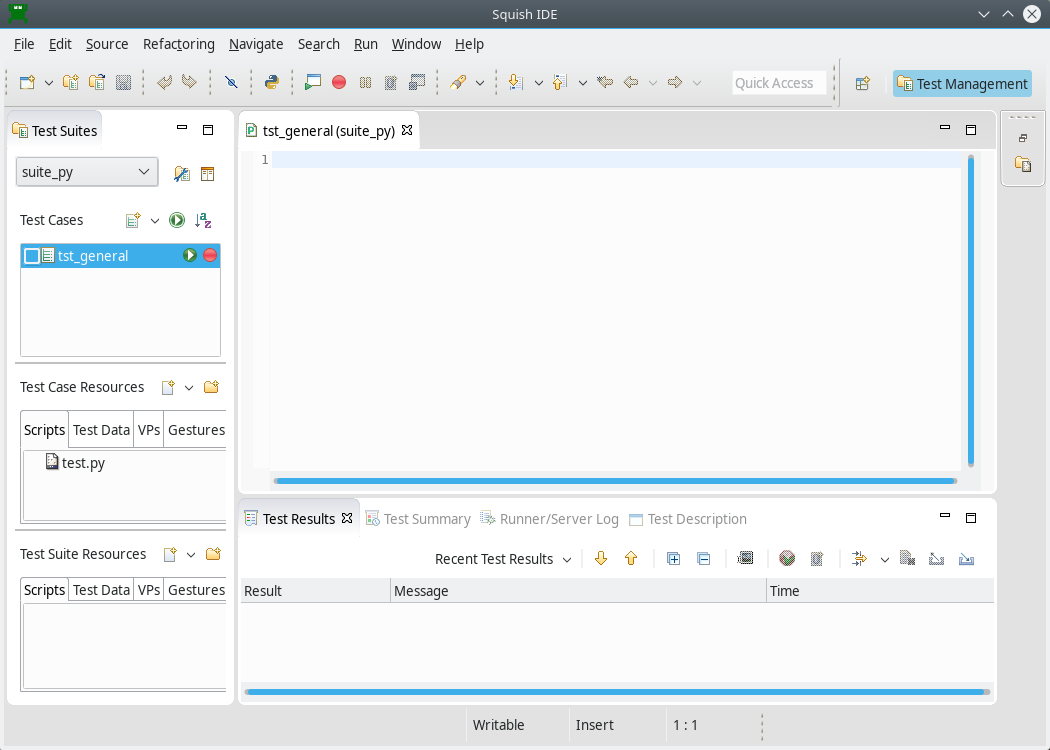
After you click Finish you will see something like the screenshot below.
Creating Tests
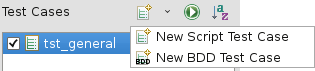
Recordings are made into existing test cases. You can create a New Script Test Case in the following ways:
- Select File > New Test Case to open the New Squish Test Case wizard, enter the name for the test case, and select Finish.
- Click the New Script Test Case (
 ) toolbar button to the right of the Test Cases label in the Test Suites view. This creates a new test case with a default name, which you can easily change.
Give the new test case the name tst_general.
Squish automatically creates a sub-folder inside the test suite's folder with this name and also a test file, for example test.py. If you choose JavaScript as the scripting language, the file is called test.js, and correspondingly for Perl, Ruby, or Tcl.
Initially, the script's main() function logs Hello World to the test results.
If you get a sample .feature file instead of a "Hello World" script, click the arrow left of the Run Test Suite ( ) and select New Script Test Case ().
To make the test script file (such as, test.js or test.py) appear in an Editor view, click or double-click the test case, depending on the Preferences > General > Open mode setting. This selects the Script as the active one and makes visible its corresponding Record ( ) and Run Test Case (
 ) buttons.
The checkboxes are used to control which test cases are run when the Run Test Suite () toolbar button is clicked. We can also run a single test case by clicking its Run Test Case () button. If the test case is not currently active, the button may be invisible until the mouse is hovered over it.
Once the new test case has been created, we are free to write test code manually or to record a test. Clicking on the test case's Record () button replaces the test's code with a new recording. Alternatively, you can record snippets and insert them into existing test cases, as instructed in How to Edit and Debug Test Scripts.
Recording Our First Test
Before we dive into recording let's briefly review our test scenario:
- Open the
MyAddresses.adraddress file. - Navigate to the second address and then add a new name and address.
- Navigate to the first address and remove it.
- Verify that the first address is now the new one that was added.
Click the Record () button to the right of the tst_general test case shown in the Test Suites view's Test Cases list. This will cause Squish to run the AUT so that we can interact with it. Once the AUT is running perform the following actions—and don't worry about how long it takes since Squish doesn't record idle time:
- Click File > Open, and once the file dialog appears, open the file
MyAddresses.adr. - Click the second row, then click Edit > Add, then click the first line edit in the Add dialog and type in "Jane". Now click (or tab to) the second line edit and type in "Doe". Continue similarly, to set an email address of "jane.doe@nowhere.com" and a phone number of "555 123 4567". Don't worry about typing mistakes—just backspace delete as normal and fix them. Finally, click the OK button. There should now be a new second address with the details you typed in.
- Click the first row, then click Edit > Remove, and then click the Yes button in the message box. The first row should be gone, so the "Jane Doe" entry should now be the first one.
- Click the Verify (
 ) toolbar button in the Squish Control Bar, and choose Properties from the drop down list. This will make the Squish IDE appear.
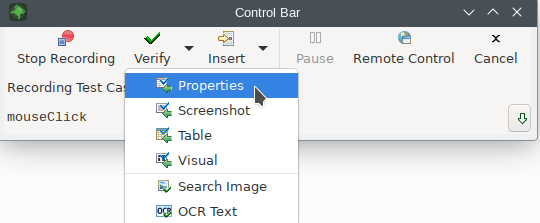
- In the Application Objects view, use the Object Picker (
 ) to select the upper-left
 TableColumn, to make its properties appear in the Properties view.Note: If you picked instead the actual
LabeledTextobject, navigate Up ( ) to its parent in the Application Objects tree before selecting the object's
 textproperty. - In Properties view find the
textproperty and check it. This should cause the Verification Point Creator to appear. - At this point, double-check in the Verification Point Creator that the Type: is set to Scriptified Property, in case it was set to something else previously.
- In the Application Objects view, Navigate Up () to the parent row, and expand its children.
Note: If Up (
) is greyed out, re-select the current tree node in Application Objects and try again. - Select the Doe child of that row, to make its properties appear in the Properties view, and then check the
textproperty's checkbox. - Click the Save and Insert Verifications button in Verification Point Creator.
- In the AUT, click File > Quit, then click No in the message box, since we don't want to save any changes.
After we quit the AUT, a recorded test will appear in Squish IDE similar to what is in this screenshot below.
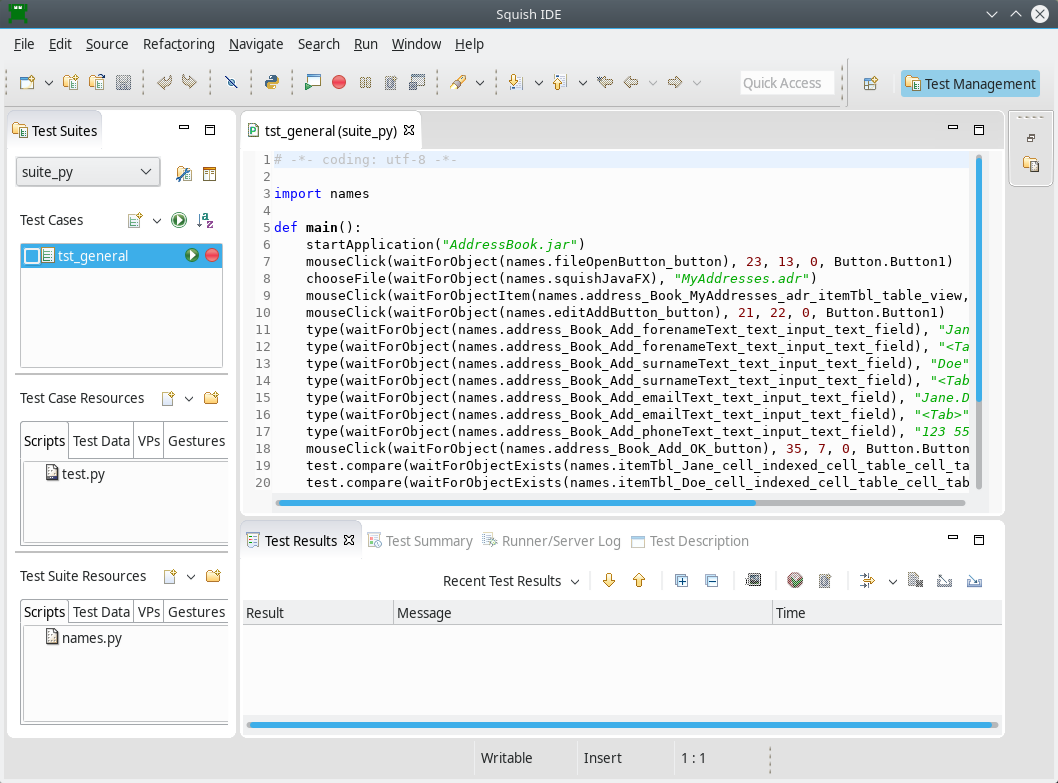
If the recorded test doesn't appear, click (or double-click depending on your platform and settings) the tst_general test case; this will make Squish show the test's test.py file in an editor window as shown in the screenshot.
The JavaFX-specific chooseFile() function takes a filename as if the user had interacted with a standard windowing-system supplied file open dialog. Squish records the absolute path of the file to ensure reliability when running tests, but the function also accepts relative paths.
Now that we've recorded the test, we should be able to play it back. The two verifications we inserted will be checked on playback.
Running Tests from IDE
To run a test case in the Squish IDE, click the Run Test Case () that appears when the test case is hovered or selected in the Test Suites view.
To run two or more test cases one after another or to run only the selected test cases, click Run Test Suite ().
Running Tests from Command Line
To playback a recorded test from the command line, we execute the squishrunner program. We provide squishrunner the path to a test suite, and optionally also the name of a test case.
A squishserver must be running when running a test, and we can provide squishrunner an IP/Port of an already running one, or use the --local option which creates one for the duration of the process. For more information, see squishserver.
For example, assuming we are in the directory that contains the test suite's directory:
squishrunner --testsuite suite_py --testcase tst_general --local
In some cases, it is possible that running the test will fail with an error message similar to this:
ERROR       Mon Mar 23 15:41:12 2009    test.py:31: Script Error
    Error in closeWindow() invocation: null object
This sometimes happens if a dialog is dispose()d too quickly. Simply go to the offending line and comment out the closeWindow() call (which is on line 18 in this case) and re-run the test. The test should now work fine.
Examining the Generated Code
If you look at the code in the screenshot (or the code snippet shown below) you will see that it consists of lots of waitForObject() and waitForObjectItem() calls as parameters to various other calls such as mouseClick(), clickButton(), and type().
The waitForObject() function waits until a GUI object is ready to be interacted with (i.e., becomes visible and enabled), and is then followed by some function that interacts with the object.
Here's an extract that shows how Squish records clicking the Edit menu's Add option, typing in Jane Doe's details into the Add dialog, and clicking OK at the end to close the dialog and update the table.
    activateItem(waitForObjectItem(names.address_Book_MyAddresses_adr_MenuBar, "_Edit"))
    activateItem(waitForObjectItem(names.address_Book_MyAddresses_adr_Edit_ContextMenu, "_Add..."))
    type(waitForObject(names.address_Book_Add_forenameText_TextField), "Jane")
    type(waitForObject(names.address_Book_Add_forenameText_TextField), "<Tab>")
    type(waitForObject(names.address_Book_Add_surnameText_TextField), "Doe")
    type(waitForObject(names.address_Book_Add_surnameText_TextField), "<Tab>")
    type(waitForObject(names.address_Book_Add_emailText_TextField), "jane.doe@nowhere.com")
    type(waitForObject(names.address_Book_Add_emailText_TextField), "<Tab>")
    type(waitForObject(names.address_Book_Add_phoneText_TextField), "123 555 1212")
    mouseClick(waitForObject(names.address_Book_Add_OK_Button), 35, 7, 0, Button.Button1)
activateItem(waitForObjectItem(names.addressBookMyAddressesAdrMenuBar, "_Edit"));
activateItem(waitForObjectItem(names.addressBookMyAddressesAdrEditContextMenu, "_Add..."));
type(waitForObject(names.addressBookAddForenameTextTextField), "Jane");
type(waitForObject(names.addressBookAddForenameTextTextField), "<Tab>");
type(waitForObject(names.addressBookAddSurnameTextTextField), "Doe");
type(waitForObject(names.addressBookAddSurnameTextTextField), "<Tab>");
type(waitForObject(names.addressBookAddEmailTextTextField), "jane.doe@nowhere.com");
type(waitForObject(names.addressBookAddEmailTextTextField), "<Tab>");
type(waitForObject(names.addressBookAddPhoneTextTextField), "123 555 1212");
mouseClick(waitForObject(names.addressBookAddOKButton), 50, 5, 0, Button.Button1); activateItem(waitForObjectItem($Names::address_book_myaddresses_adr_menubar, "_Edit"));
activateItem(waitForObjectItem($Names::address_book_myaddresses_adr_edit_contextmenu, "_Add..."));
type(waitForObject($Names::address_book_add_forenametext_textfield), "Jane");
type(waitForObject($Names::address_book_add_forenametext_textfield), "<Tab>");
type(waitForObject($Names::address_book_add_surnametext_textfield), "Doe");
type(waitForObject($Names::address_book_add_surnametext_textfield), "<Tab>");
type(waitForObject($Names::address_book_add_emailtext_textfield), "Jane.doe\@nowhere.com");
type(waitForObject($Names::address_book_add_emailtext_textfield), "<Tab>");
type(waitForObject($Names::address_book_add_phonetext_textfield), "123 555 1212");
mouseClick(waitForObject($Names::address_book_add_ok_button), 36, 14, 0, Button->Button1); activateItem(waitForObjectItem(Names::Address_Book_MyAddresses_adr_MenuBar, "_Edit"))
activateItem(waitForObjectItem(Names::Address_Book_MyAddresses_adr_Edit_ContextMenu, "_Add..."))
type(waitForObject(Names::Address_Book_Add_forenameText_TextField), "Jane")
type(waitForObject(Names::Address_Book_Add_forenameText_TextField), "<Tab>")
type(waitForObject(Names::Address_Book_Add_surnameText_TextField), "Doe")
type(waitForObject(Names::Address_Book_Add_surnameText_TextField), "<Tab>")
type(waitForObject(Names::Address_Book_Add_emailText_TextField), "jane.doe@nowhere.com")
type(waitForObject(Names::Address_Book_Add_emailText_TextField), "<Tab>")
type(waitForObject(Names::Address_Book_Add_phoneText_TextField), "123 555 1212")
mouseClick(waitForObject(Names::Address_Book_Add_OK_Button), 35, 15, 0, Button::BUTTON1) invoke activateItem [waitForObjectItem $names::Address_Book_MyAddresses_adr_MenuBar "_Edit"]
invoke activateItem [waitForObjectItem $names::Address_Book_MyAddresses_adr_Edit_ContextMenu "_Add..."]
invoke type [waitForObject $names::Address_Book_Add_forenameText_TextField] "Jane"
invoke type [waitForObject $names::Address_Book_Add_forenameText_TextField] "<Tab>"
invoke type [waitForObject $names::Address_Book_Add_surnameText_TextField] "Doe"
invoke type [waitForObject $names::Address_Book_Add_surnameText_TextField] "<Tab>"
invoke type [waitForObject $names::Address_Book_Add_emailText_TextField] "jane.doe@nowhere.com"
invoke type [waitForObject $names::Address_Book_Add_emailText_TextField] "<Tab>"
invoke type [waitForObject $names::Address_Book_Add_phoneText_TextField] "123 555 1212"
invoke mouseClick [waitForObject $names::Address_Book_Add_OK_Button] 32 11 0 [enum Button Button1]You can record this script in different ways. In a recorded script, we might see <TAB> between our inputs. They can be removed for brevity since the type() specifies which object to send the key events to.
If the tester had moved the focus by clicking the mouse and clicked the OK button by tabbing to it and pressing Spacebar, or any other combination of interactions, the outcome should be the same, but since TMTOWTDI, each of the ways can be recorded and tested separately by Squish.
Notice in the code snippet that there are no explicit delays. (It is possible to force a delay using Squish's snooze() function.) This is because the waitForObject() function delays until the object is ready — thus allowing Squish to run as fast as the GUI toolkit can cope with, but no faster.
Symbolic Names
Squish recordings refer to objects using variables that begin with a names. prefix. These are known as Symbolic Names. Each variable contains, as a value, the corresponding Real Name.
The advantage of using symbolic names (instead of real names) in your scripts, is that if the application changes in a way that results in different names being needed, it is possible to update Squish's Object Map and thereby avoid the need to change our test scripts.
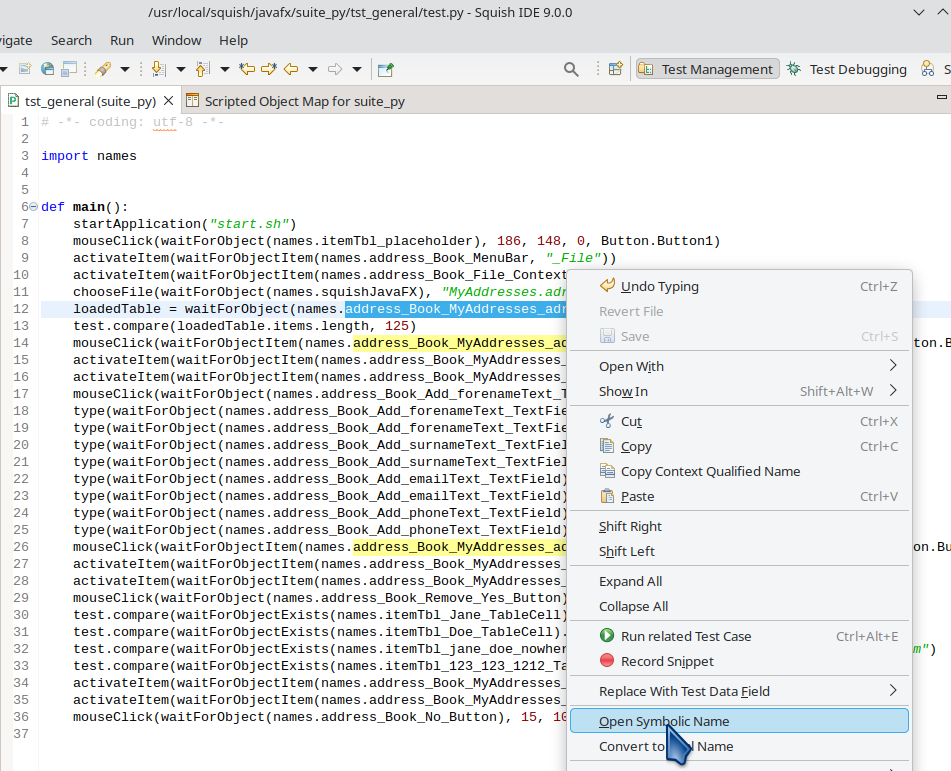
When a Symbolic Name is under the cursor, the editor's context menu allows you to Open Symbolic Name, showing its entry in the Object Map, or Convert to Real Name, which places an inline mapping in your script language at the cursor, allowing you to hand-edit the properties in the script itself.
See How to Identify and Access Objects for more details.
Verification Points Explained
In the previous section we saw how easy it is to insert verification points during the recording of test scripts. They can be inserted into existing test scripts by recording snippets, or by editing a test script and calling Squish's test. functions such as test.compare() and test.verify().
Squish can verify different kinds of data:
- Properties VPs, which can be Scriptified or XML-based. They verify that 1 or more properties of 1 or more objects have certain values.
- Table VPs, which verify the contents of an entire table.
- Screenshot VPs, for verifying images of widgets.
- Visual VPs, which contain properties and screenshots for an entire tree of objects.
Note: Image Search, a newer feature of Squish, is recommended as another way to verify images. It uses external image files instead of encoding the expected values in XML files.
Regular Verification Points are stored as XML files in the test case or test suite resources, and contain the value(s) that need to be compared. This includes images in the case of Screenshot or Visual VPs. These verification points can be reused across test cases, and can verify many values in a single line of script code.
Scriptified Property Verification points are direct calls to the test.compare function and look like regular script code.
Further reading: How to Create and Use Verification Points.
We will verify that the "Jane Doe" entry's email address and phone number match the ones entered, and put the verifications immediately after the ones we inserted during recording.
To insert a verification point using the Squish IDE, we start by putting a break point in the script (on an executable line of code — empty lines won't work), at the point where we want to verify.
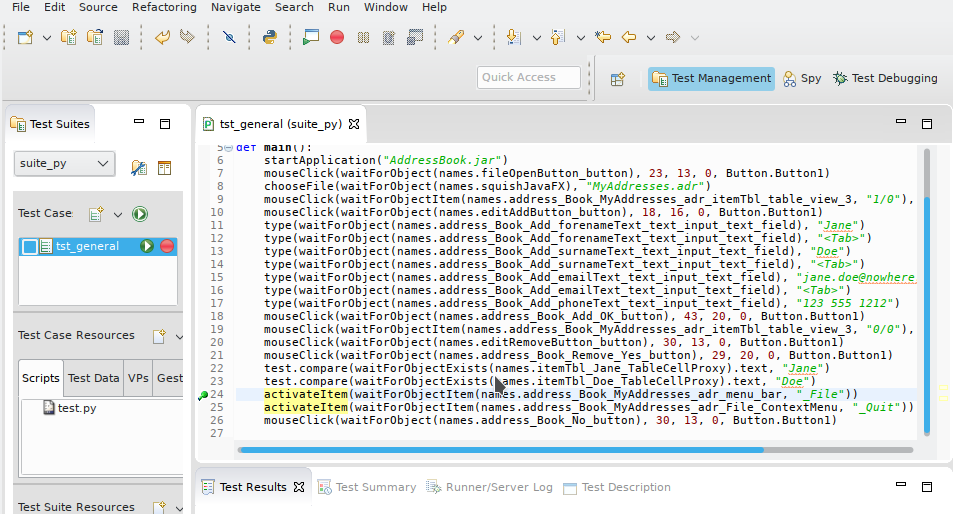
As the above screenshot shows, we have set a breakpoint just before the test case exits the AUT.
This is done by double-clicking, or right-clicking in the gutter (next to the line number in the editor) and selecting the Add Breakpoint context menu item.
Having set the breakpoint, we Run Test Case (). The will stop when the breakpoint is reached. Squish's main window will reappear (which may obscure the AUT). At this point, the Squish IDE will switch to the Test Debugging Perspective.
Perspectives and Views
The Squish IDE works just like the Eclipse IDE. If you aren't used to Eclipse, it is crucial to understand the following key concepts: Views and Perspectives. In Eclipse, and therefore in the Squish IDE, a View is essentially a child window, such as a dock window or a tab in an existing window. A Perspective is a collection of views arranged together. Both are accessible through the Window menu.
The Squish IDE is supplied with the following perspectives:
- Test Management Perspective that the Squish IDE starts with, and that is shown in all previous screenshots
- Test Debugging Perspective
- Spy Perspective
You can modify these perspectives to show additional views, to hide views that you don't want, or to create your own perspectives with exactly the views you want.
If you notice all of your Views change dramatically, it just means that the perspective changed. Use the Window menu to change back to the perspective you want. Keep in mind, Squish automatically changes perspectives to reflect the current situation, so you should not need to change perspective manually very often.
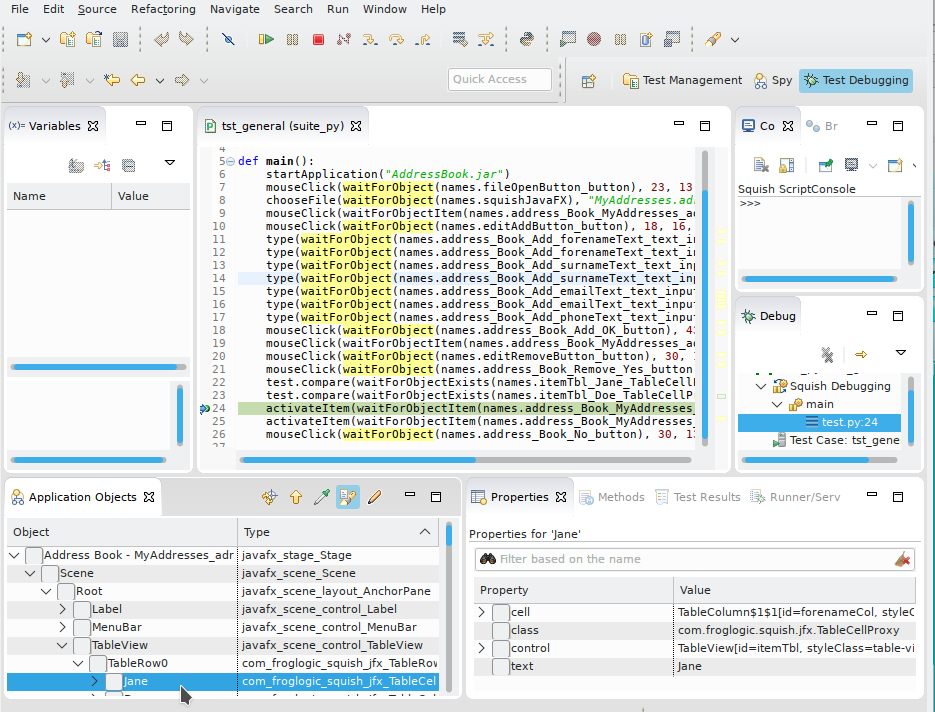
When Squish stops at a breakpoint, the Squish IDE automatically changes to the Test Debugging Perspective. The perspective shows the Variables view, the Editor view, the Debug view, the Application Objects view, and the Properties view, Methods view, and Test Results view.
The normal Test Management Perspective can be returned to at any time by choosing it from the Window menu (or by clicking its toolbar button), although the Squish IDE will automatically return to it if you Terminate( ) or Resume(
 ) to completion.
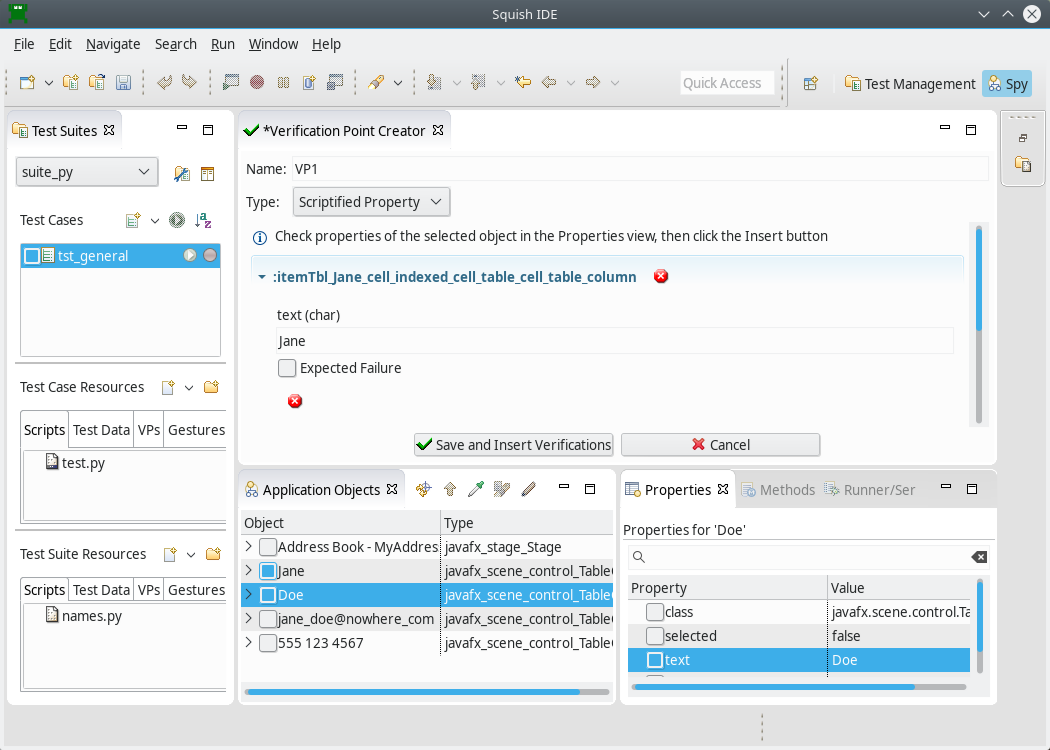
Inserting Additional Verification Points
Picking an object to verify in the Application Objects view
We want to verify the text property of the last 2 columns of the top row, containing Email Address and Phone.
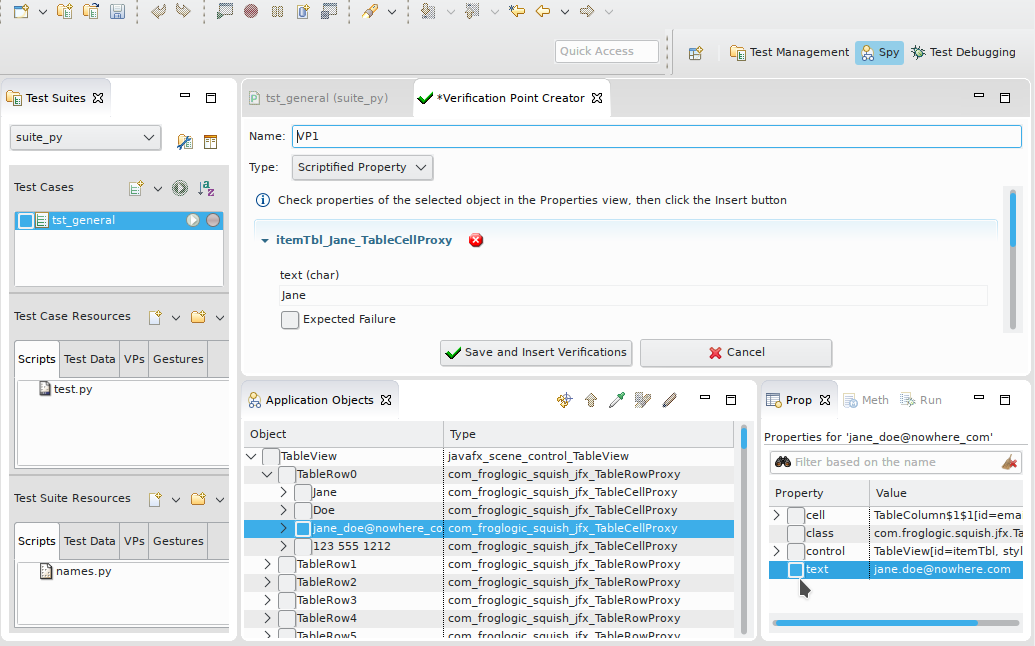
- To insert the first verification point, use the Object Picker () to select the Jane Doe's E-Mail
TableColumn, and then check thetextproperty in the Properties View.Note: If you select instead the actual
LabeledTextobject, navigate Up () to its parent in the Application Objects tree. - After it is checked, the Verification Point Creator appears with one verification value.
- Navigate Up () in the Application Objects tree, expand its children to see the other cells of this row.
- Select the last
TableColumn(Phone Number) Application Object, and then check itstextcheckbox in Properties.
Now, both verifications should appear in the Verification Point Creator as the screenshot shows.
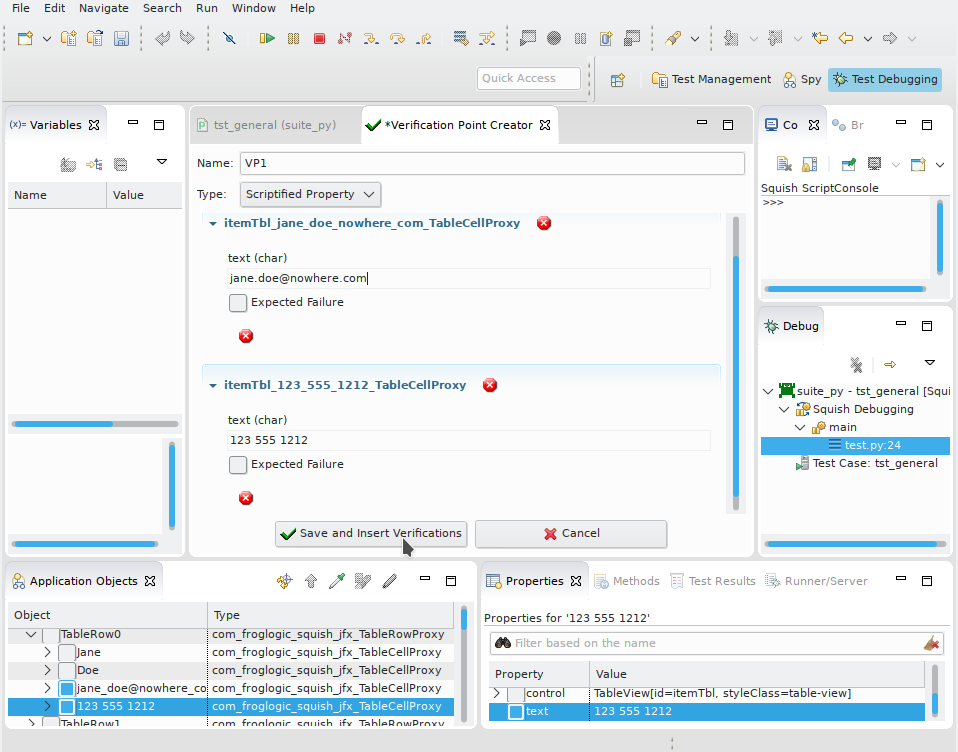
Click Save and Insert Verifications to insert the verifications.
At this point, we can Terminate(). We will see the new verifications after the AUT terminates.
We should now disable the break point. Right click the break point and click the Disable Breakpoint menu option in the context menu.
Test Results
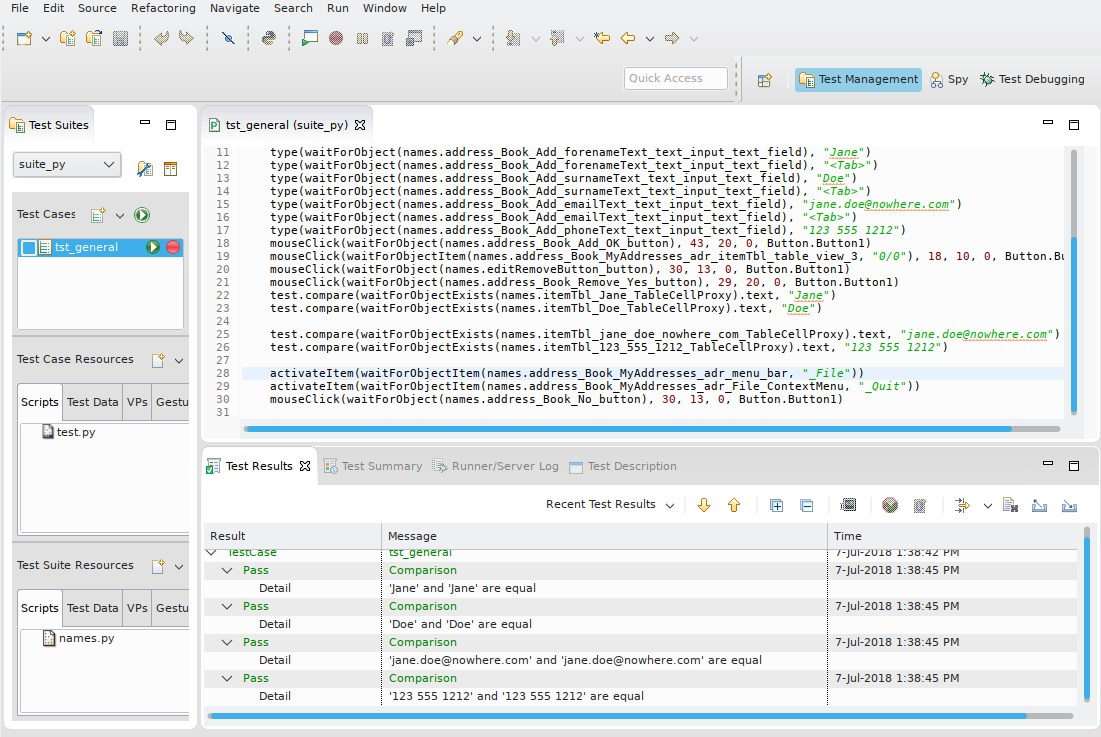
After each test run finishes, the test results—including those for the verification points—are shown in the Test Results view at the bottom of the Squish IDE.
This is a detailed report of the test run and would also contain details of any failures or errors, etc. If you click on a Test Results item, the Squish IDE highlights the script line which generated it. If you expand the item, you can see additional details of it.
Squish's interface for reporting test results is very flexible. The default report generator simply prints the results to stdout when Squish is run from the command line, or to the Test Results view when Squish IDE is being used. You can save the test results from the Squish IDE as XML by right clicking on the Test Results and choosing the Export Results menu option. For a list of report generators, see squishrunner –reportgen: Generating Reports.
It is possible to Upload the Results to Test Center, where they are stored in a database for analysis later.
Manually Written Property Verifications
Another way to insert verification points is to write the code manually. We can add our own calls to Squish's test. functions, such as test.compare() and test.verify() in an existing script.
- Set a breakpoint where we intend on adding our verifications.
- Run Test Case () until it stops there.
- Use the Object Picker () or navigate in the Application Objects tree for the object we want to verify.
- Right click the Application Object entry and select the Copy Symbolic Name context menu option—this adds the object to the Object Map if necessary.
Now we can edit the test script, paste the name into the script where we need to find the object.
(Don't forget to disable the break point once it isn't needed any more.)
For this manual verification, we want to check the number of addresses present in the table after reading in the MyAddresses.adr file, then after the new address is added, and finally after the first address is removed. The screenshot shows two of the lines of code we entered to get one of these three verifications, plus the results of running the test script.
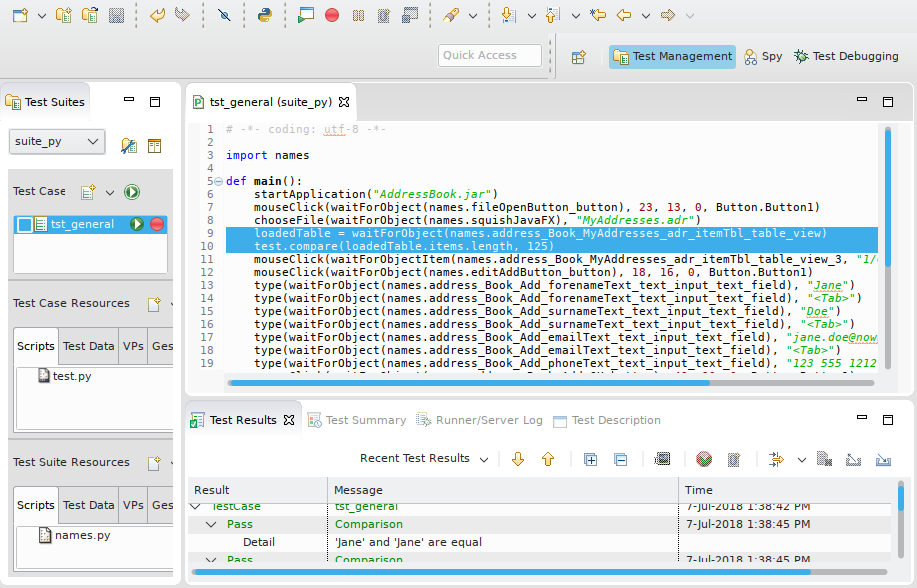
We begin by retrieving a reference to the object we are interested in. Using the waitForObject() function is standard practice for manually written test scripts. This function waits for the object to be available (i.e., visible and enabled), and then returns a reference to it. We then use this reference to access properties—in this case the TableView's items.length.
We verify that the value is what we expect it to be using the test.compare() function.
Here is the code we entered manually.
    loadedTable = waitForObject(names.address_Book_MyAddresses_adr_itemTbl_TableView)
    test.compare(loadedTable.items.length, 125)
loadedTable = waitForObject(names.addressBookMyAddressesAdrItemTblTableView);
test.compare(loadedTable.items.length, 125) my $loadedTable = waitForObject($Names::address_book_myaddresses_adr_itemtbl_tableview);
test::compare($loadedTable->items->length, 125); loadedTable = waitForObject(Names::Address_Book_MyAddresses_adr_itemTbl_TableView)
Test.compare(loadedTable.items.length, 125) set loadedTable [waitForObject $names::Address_Book_MyAddresses_adr_itemTbl_TableView]
test compare [property get [property get $loadedTable items] length] 125For more examples of manually written code, see Creating Tests by Hand, How to Create Test Scripts, and How to Test Applications - Specifics.
Creating Tests by Hand
Now that we have seen how to record a test and modify it by inserting verification points, we are ready to see how to create tests manually. The easiest way to do this is to modify and refactor recorded tests, although it is also perfectly possible to create manual tests from scratch.
For each object of interest, we need a Symbolic or Real Name to access it.
If we have not interacted yet with the object of interest, we can get a name for it in a couple of ways.
- Record a dummy snippet: click somewhere in your test case that is out of the way, Record (), click on the object(s) of interest, Stop Recording(
 ), and throw away the snippet.
 - Use Application Objects: Click the Launch AUT (
 ) toolbar button. This starts the AUT and switches to the Spy Perspective. From Application Objects, use the Object Picker () or tree navigation to choose the desired object. Then use the context menu to Add to Object Map or Copy (Symbolic | Real) Name to Clipboard (so that we can paste it into our test script).
We can view the Object Map by clicking the Object Map( ) toolbar button, or from the Script Editor context menu, Open Symbolic Name when right-clicking on an object name in the script editor.
Every application object that Squish interacts with is listed here, either as a top-level object, or as a child object (the view is a tree view).
We can retrieve the symbolic name used by Squish in recorded scripts by right-clicking the object we are interested in and then clicking the context menu's Copy Object Name, or we can Copy Real Name (to get the actual key-value pairs stored in the variable). This is useful for when we want to modify existing test scripts or when we want to create test scripts from scratch, as we will see later on in the tutorial.
Modifying and Refactoring Recorded Tests
Suppose we want to test the AUT's Add functionality by adding three new names and addresses. We could record such a test but it is just as easy to do everything in code. The steps we need the test script to do are:
- Create a new address book
- For each new name and address, Add, then fill in the details, and then click Ok.
We want to verify at the start that there are no rows of data, and at the end that there are three rows. We will refactor as we go, to make our code as neat and modular as possible.
First, we must create a new test case. Click New Script Test Case () and set the test case's name to be tst_adding.
We begin by starting the application with a call to the startApplication() function.
The string we pass to this function can be
- The AUT name, as registered with the
squishserver - An absolute or relative path to the AUT.
The AUT can be an executable, or a batch file, or a shell script. When testing Java AUTs, we can also pass the name of a .jar or a .class file that contains a Java class with a main method.
Next, we invoke an action. Here are the first few lines from the example tst_general script:
import names
import os

autname = "startjfxaut.sh"
if os.name == "nt":
    autname = "startjfxaut.bat"

def main():
    startApplication(autname)
    activateItem(waitForObjectItem(names.address_Book_MenuBar, "_File"))
    activateItem(waitForObjectItem(names.address_Book_File_ContextMenu, "_Open..."))
import * as names from 'names.js';
var autname = "startjfxaut.sh";
if (OS.name == "Windows") {
autname = "startjfxaut.bat";
}
function main() {
startApplication(autname);
activateItem(waitForObjectItem(names.addressBookMenuBar, "_File"));
activateItem(waitForObjectItem(names.addressBookFileContextMenu, "_Open..."));require 'names.pl';
use English qw( -no_match_vars $OSNAME ); # Import only $OSNAME
my $autname = "startjfxaut.sh";
if ($OSNAME eq 'MSWin32') {
$autname = "startjfxaut.bat";
}
sub main
{
startApplication($autname);
activateItem(waitForObjectItem($Names::address_book_menubar, "_File"));
activateItem(waitForObjectItem($Names::address_book_file_contextmenu, "_Open..."));require 'squish'
require 'names'
include Squish
def main
autname = "startjfxaut.sh"
if RUBY_PLATFORM.downcase.include?('mswin') || RUBY_PLATFORM.downcase.include?('mingw') || RUBY_PLATFORM.downcase.include?('cygwin')
autname = "startjfxaut.bat"
end
startApplication(autname)
activateItem(waitForObjectItem(Names::Address_Book_MenuBar, "_File"))
activateItem(waitForObjectItem(Names::Address_Book_File_ContextMenu, "_Open..."))source [findFile "scripts" "names.tcl"]
proc main {} {
if { $::tcl_platform(platform) == "windows" } {
startApplication "startjfxaut.bat"
} else {
startApplication "startjfxaut.sh"
}
invoke activateItem [waitForObjectItem $names::Address_Book_MenuBar "_File"]
invoke activateItem [waitForObjectItem $names::Address_Book_File_ContextMenu "_Open..."]In this example, we have used the waitForObjectItem() function. This function is used for multi-valued objects (such as lists, tables, trees—or in this case, a menubar and a menu), and allows us to access the object's items, by passing the name of the object containing the item and the item's text as arguments.
Object Not Found Dialog
If the AUT appears to freeze during test execution, wait for Squish to time out the AUT (about 20 seconds), and show the Object Not Found dialog, indicating an error like this:
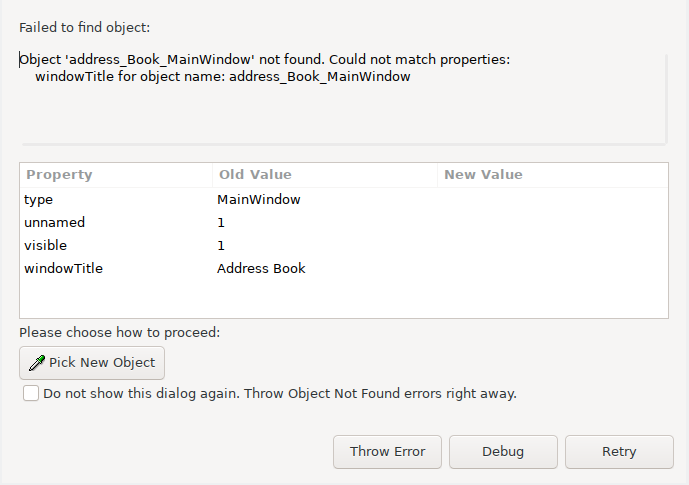
This usually means that Squish doesn't have an object with the given name, or property values, in the Object Map. From here, we can Pick a new object, Debug, Throw Error or, after picking a new object, Retry.
Picking a new object will update the object map entry for the symbolic name. In addition to the Object Picker (), we can use the Spy's Application Objects view to locate the objects we are interested in and use the Add to the Object Map context menu action to access their real or symbolic names.
Naming is important because it is probably the part of writing scripts that leads to the most error messages, usually of the object ... not found kind shown above. Once we have identified the objects to access in our tests, writing test scripts using Squish is very straightforward. Especially, as Squish most likely supports the scripting language you are most familiar with.
Improving Object Names
Create a new test case, and record the following steps against the addressbook.
- Click in the (empty) table
- File - New
- Click in the empty table again
- File - Open -
MyAddresses.adr - Click somewhere in the table
- Edit - Add
- Cancel
- File - Quit
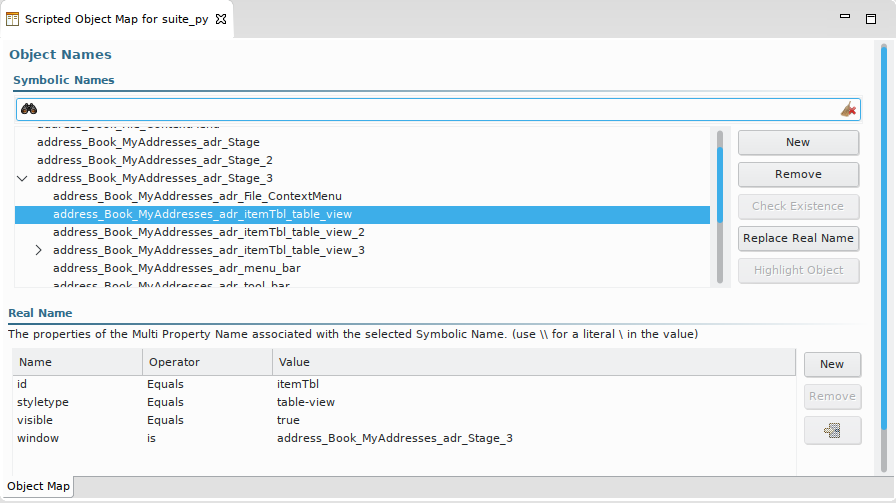
After this, open the Object Map and enter MenuBar in the search field. You should see 3 entries for MenuBar. If you search for TableView, you'll find 2 entries for that.
This particular AUT will only show one MenuBar and one TableView at a given time, so effectively, we have extra Object Map entries for these objects which are too specific for our purposes. These entries are children (because of the window property) of different Stage entries.
The functions we are about to write should have object names for a TableView and MenuBar that are general enough to be used regardless of the window's caption. There are 2 approaches one can take. The first is to make the object map entry more general, and the second is to craft a a real name instead of a symbolic name.
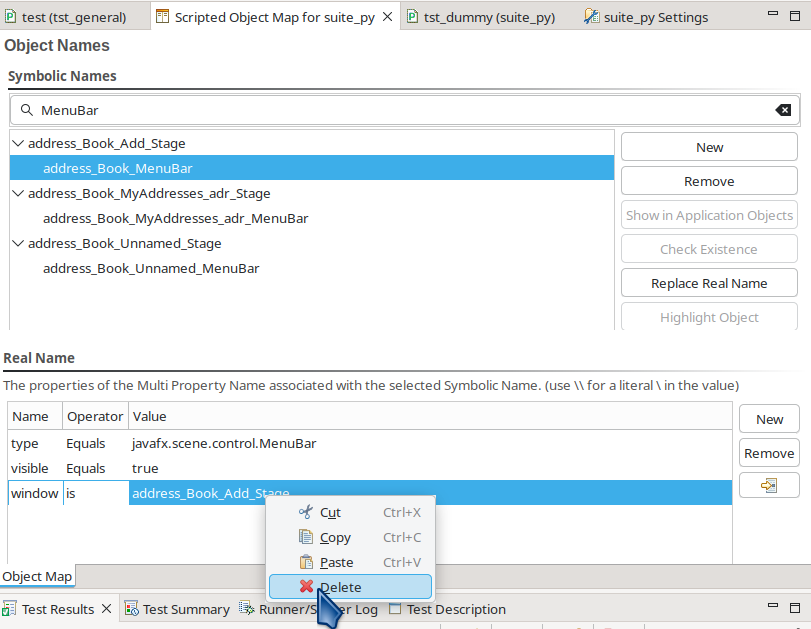
Select address_Book_MenuBar in the Object Map Editor, so that we can make changes to its entry.
Under Real Name right-click the window property, and Delete. Save the Object Map and observe an Eclipse Refactoring operation. We can use this symbolic name in our invokeMenuItem() function. It will also be used as a parent for newly added menu entries if there are not more specific/appropriate entries that already exist in the object map at record-time.
The customized object map entry looks like this. A symbolic name is acquiring its real name.
address_Book_MenuBar = {"type": "javafx.scene.control.MenuBar", "visible": True}export var addressBookMenuBar = {"type": "javafx.scene.control.MenuBar", "visible": true};our $address_book_menubar = {"type" => "javafx.scene.control.MenuBar", "visible" => "true"};Address_Book_MenuBar = {:type => "javafx.scene.control.MenuBar", :visible => true}set Address_Book_MenuBar [::Squish::ObjectName type javafx.scene.control.MenuBar]
For the TableView, we will take the second approach: start by right-clicking names.address_Book_itemTbl_TableView and Copy Real Name. We paste this into our hand-written script as an argument to waitForObject(), and remove the window property.
import names
import os

autname = "startjfxaut.sh"
if os.name == "nt":
    autname = "startjfxaut.bat"

def main():
    startApplication(autname)
    invokeMenuItem("_File", "_New...")
    tableView = waitForObject({"id": "itemTbl", "type": "javafx.scene.control.TableView"})
    test.verify(tableView.items.length == 0)
    data = [("Andy", "Beach", "andy.beach@nowhere.com", "555 123 6786"),
            ("Candy", "Deane", "candy.deane@nowhere.com", "555 234 8765"),
            ("Ed", "Fernleaf", "ed.fernleaf@nowhere.com", "555 876 4654")]
    for fields in data:
        addNameAndAddress(fields)
    test.verify(tableView.items.length == len(data))
    closeWithoutSaving()
import * as names from 'names.js';
var autname = "startjfxaut.sh";
if (OS.name == "Windows") {
autname = "startjfxaut.bat";
}require 'names.pl';
use English qw( -no_match_vars $OSNAME ); # Import only $OSNAME
my $autname = "startjfxaut.sh";
if ($OSNAME eq 'MSWin32') {
$autname = "startjfxaut.bat";
}require 'names'
include Squish
def main
autname = "startjfxaut.sh"
if RUBY_PLATFORM.downcase.include?('mswin') || RUBY_PLATFORM.downcase.include?('mingw') || RUBY_PLATFORM.downcase.include?('cygwin')
autname = "startjfxaut.bat"
end
startApplication(autname)
invokeMenuItem("_File", "_New...")
tableView = waitForObject({:id => "itemTbl", :type => "javafx.scene.control.TableView"})
Test.verify(tableView.items.length == 0)
data = [["Andy", "Beach", "andy.beach@nowhere.com", "555 123 6786"],
["Candy", "Deane", "candy.deane@nowhere.com", "555 234 8765"],
["Ed", "Fernleaf", "ed.fernleaf@nowhere.com", "555 876 4654"]]
data.each do |oneNameAndAddress|
addNameAndAddress(oneNameAndAddress)
end
Test.compare(tableView.items.length, data.length)
closeWithoutSaving
endsource [findFile "scripts" "names.tcl"]
proc main {} {
if { $::tcl_platform(platform) == "windows" } {
startApplication "startjfxaut.bat"
} else {
startApplication "startjfxaut.sh"
}
invokeMenuItem "_File" "_New..."
set tableView [waitForObject [::Squish::ObjectName id itemTbl type javafx.scene.control.TableView]]
test compare [property get [property get $tableView items] length] 0
set data [list \
[list "Andy" "Beach" "andy.beach@nowhere.com" "555 123 6786"] \
[list "Candy" "Deane" "candy.deane@nowhere.com" "555 234 8765"] \
[list "Ed" "Fernleaf" "ed.fernleaf@nowhere.com" "555 876 4654"] ]
for {set i 0} {$i < [llength $data]} {incr i} {
addNameAndAddress [lindex $data $i]
}
test compare [property get [property get $tableView items] length] [llength $data]
closeWithoutSaving
}The waitForObject() function waits until an object is ready (visible and enabled) and returns a reference to it—or it times out and raises a catchable exception.
The invokeMenuItem() function is one we have created specially for this test. It takes a menu name and a menu option name and invokes the menu option. After using the invokeMenuItem() function to do File > New, we verify that the table's items.length is 0. The test.verify() function is useful when we want to verify boolean conditions, rather than compare two different values. For the latter case, it makes more sense to use the test.compare() function because it shows the expected and actual values in the log message.
Next, we create some sample data and call a custom addNameAndAddress() function to populate the table with the data using the AUT's Add dialog. Then we again compare the TableView's items.length, this time to the number of rows in our sample data. And finally we call a custom closeWithoutSaving() function to terminate the application.
We will now review each of the three supporting functions, so as to cover all the code in the tst_adding test case, starting with the invokeMenuItem() function.
def invokeMenuItem(menu, item):
    # Using customized Object Map entry:
    activateItem(waitForObjectItem(names.address_Book_MenuBar, menu))
    activateItem(waitForObjectItem({"caption" : menu, "type" : 'javafx.scene.control.ContextMenu'}, item))
function invokeMenuItem(menu, item)
{
// using customized object map entry:
activateItem(waitForObjectItem(names.addressBookMenuBar, menu));
activateItem(waitForObjectItem({"type": 'javafx.scene.control.ContextMenu', "caption": menu}, item));
}sub invokeMenuItem
{
my($menu, $item) = @_;
# Using customized menubar entry
activateItem(waitForObjectItem($Names::address_book_menubar, $menu));
activateItem(waitForObjectItem({"caption" => $menu, "type" => 'javafx.scene.control.ContextMenu'}, $item));
}def invokeMenuItem(menu, item)
# Using customized object map entry:
activateItem(waitForObjectItem(Names::Address_Book_MenuBar, menu))
activateItem(waitForObjectItem({:caption => menu, :type => "javafx.scene.control.ContextMenu"}, item))
endproc invokeMenuItem {menu item} {
# using customized MenuBar object map entry
invoke activateItem [waitForObjectItem $names::Address_Book_MenuBar $menu]
invoke activateItem [waitForObjectItem [::Squish::ObjectName caption $menu type javafx.scene.control.ContextMenu] $item]
}As we mentioned earlier, the object names Squish uses for menus and menu items (and other objects) can vary depending on the context, and often with the name derived from the window's title. For applications that put the current filename in the title—such as the Address Book example—names will include the filename, and for the purposes of our tests, we would like to ignore this.
Once we have identified the object we want to interact with we use the waitForObjectItem() function to retrieve a reference to it and in this case we then apply the activateItem() function to it. The waitForObjectItem() function pauses Squish until the specified object and its item are visible and enabled. So, here, we waited for the menu bar and one of its menu bar items, and then we waited for a context menu. And as soon as the waiting is over each time, we activate the object and its item using the activateItem() function.
def addNameAndAddress(fields):
    invokeMenuItem("_Edit", "_Add...")
    type(waitForObject(names.address_Book_Add_forenameText_TextField), fields[0])
    type(waitForObject(names.address_Book_Add_surnameText_TextField), fields[1])
    type(waitForObject(names.address_Book_Add_emailText_TextField), fields[2])
    type(waitForObject(names.address_Book_Add_phoneText_TextField), fields[3])
    mouseClick(waitForObject(names.address_Book_Add_OK_Button), 35, 7, 0, Button.Button1)
function addNameAndAddress(fields)
{
invokeMenuItem("_Edit", "_Add...");
type(waitForObject(names.addressBookAddForenameTextTextField), fields[0]);
type(waitForObject(names.addressBookAddSurnameTextTextField), fields[1]);
type(waitForObject(names.addressBookAddEmailTextTextField), fields[2]);
type(waitForObject(names.addressBookAddPhoneTextTextField), fields[3]);
mouseClick(waitForObject(names.addressBookAddOKButton), 18, 18, 0, Button.Button1);
}sub addNameAndAddress
{
invokeMenuItem("_Edit", "_Add...");
type(waitForObject($Names::address_book_add_forenametext_textfield), $_[0]);
type(waitForObject($Names::address_book_add_surnametext_textfield), $_[1]);
type(waitForObject($Names::address_book_add_emailtext_textfield), $_[2]);
type(waitForObject($Names::address_book_add_phonetext_textfield), $_[3]);
mouseClick(waitForObject($Names::address_book_add_ok_button), 36, 14, 0, Button->Button1);
}def addNameAndAddress(oneNameAndAddress)
invokeMenuItem("_Edit", "_Add...")
mouseClick(waitForObject(Names::Address_Book_Add_forenameText_TextField))
type(waitForObject(Names::Address_Book_Add_forenameText_TextField), oneNameAndAddress[0])
type(waitForObject(Names::Address_Book_Add_surnameText_TextField), oneNameAndAddress[1])
type(waitForObject(Names::Address_Book_Add_emailText_TextField), oneNameAndAddress[2])
type(waitForObject(Names::Address_Book_Add_phoneText_TextField), oneNameAndAddress[3])
mouseClick(waitForObject(Names::Address_Book_Add_OK_Button), 35, 15, 0, Button::BUTTON1)
endproc addNameAndAddress {fields} {
invokeMenuItem "_Edit" "_Add..."
invoke type [waitForObject $names::Address_Book_Add_forenameText_TextField] [lindex $fields 0]
invoke type [waitForObject $names::Address_Book_Add_surnameText_TextField] [lindex $fields 1]
invoke type [waitForObject $names::Address_Book_Add_emailText_TextField] [lindex $fields 2]
invoke type [waitForObject $names::Address_Book_Add_phoneText_TextField] [lindex $fields 3]
invoke mouseClick [waitForObject $names::Address_Book_Add_OK_Button] 32 11 0 [enum Button Button1]
}For each set of name and address data we invoke the Edit > Add menu option to pop up the Add dialog. Then for each value received, we populate the appropriate field by waiting for the relevant TextField to be ready, and then typing in the text using the type() function.
def closeWithoutSaving():
    invokeMenuItem("_File", "_Quit")
    mouseClick(waitForObject(names.address_Book_No_Button), 21, 11, 0, Button.Button1)
function closeWithoutSaving()
{
invokeMenuItem("_File", "_Quit");
mouseClick(waitForObject(names.addressBookNoButton), 26, 14, 0, Button.Button1);
}sub closeWithoutSaving
{
invokeMenuItem("_File", "_Quit");
mouseClick(waitForObject($Names::address_book_no_button), 22, 17, 0, Button->Button1);
}def closeWithoutSaving
invokeMenuItem("_File", "_Quit")
mouseClick(waitForObject(Names::Address_Book_No_Button), 22, 13, 0, Button::BUTTON1)
endproc closeWithoutSaving {} {
invokeMenuItem "_File" "_Quit"
invoke mouseClick [waitForObject $names::Address_Book_No_Button] 19 18 0 [enum Button Button1]
}Here we use the invokeMenuItem() function to do File > Quit, and then click the "save unsaved changes" dialog's No button.
In the next section, we will create a new version of this test, only this time we will use data from an external data source, and check that the data in the TableView is correct.
Creating Data Driven Tests
In the previous section we had hard-coded names and addresses in our test. But what if we want to test lots of data? Or what if we want to change the data without having to change our test script's source code. One approach is to import a dataset into Squish and use the dataset as the source of the values we insert into our tests. Squish can import data in .tsv (tab-separated values format), .csv (comma-separated values format), .xls, or .xlsx (Microsoft Excel spreadsheet formats).
Note: Both .csv and .tsv files are assumed to use the Unicode UTF-8 encoding, which is used for all test scripts.
We want to add a test data file to the test suite. We can copy MyAddresses.tsv directly into the suite's shared/testdata directory, or we can import it using the Squish IDE (from shared/testdata of one of the example test suites).
To import, we click File > Import Test Resource to pop-up the Import Squish Resource dialog. Inside the dialog, click the Browse button to choose the file to import (you can find this file already added to our example test suites). Make sure that the Import As combobox is set to "TestData".
By default the Squish IDE will import the test data just for the current test case, but we want the test data to be available to all the test suite's test cases: to do this check the Copy to Test Suite for Sharing radio button. Next, click the Finish button.
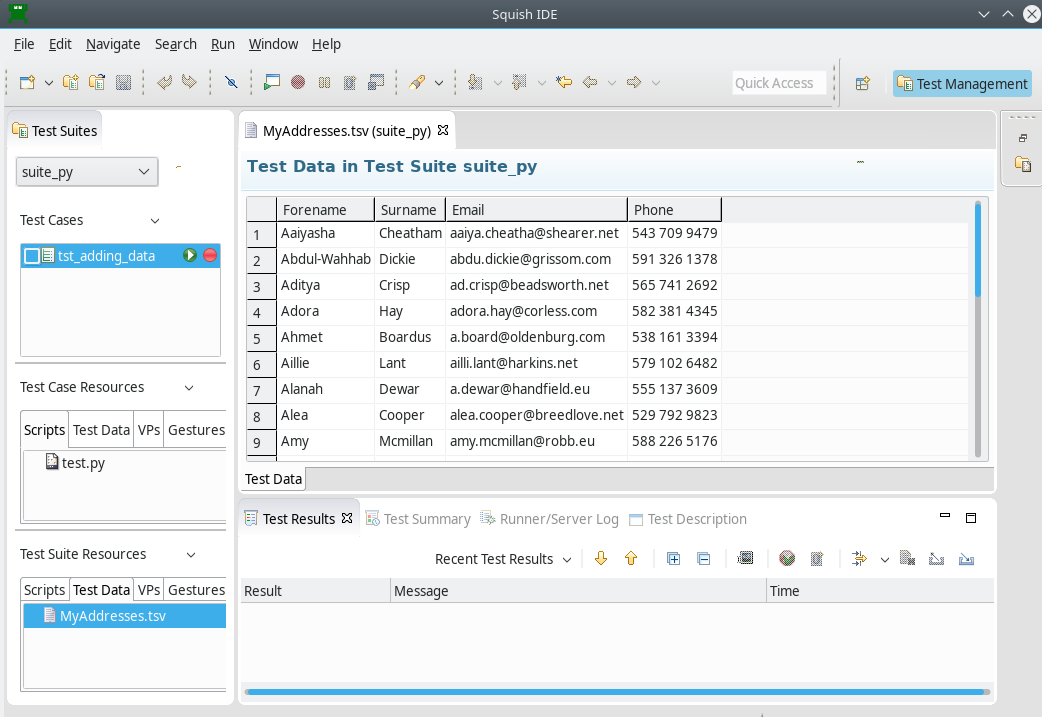
You should now see the file listed in the Test Suite Resources view (in the Test Data tab), and if you click the file's name it will be shown in an Editor view. The screenshot shows Squish IDE after some test data has been opened.
Adding a Test Case
Although in real life we would modify our tst_adding test case to use the test data, for the purpose of the tutorial we will make a new test case called tst_adding_data that is a copy of tst_adding and which we will modify to make use of the test data.
The only function we have to change is main, where instead of iterating over hard-coded items of data, we iterate over all the records in the dataset. We also need to update the expected row count at the end since we are adding a lot more records now, and we will also add a function to verify each record that's added.
import names
import os

autname = "startjfxaut.sh"
if os.name == "nt":
    autname = "startjfxaut.bat"

def main():
    startApplication(autname)
    invokeMenuItem("_File", "_New...")
    tableView = waitForObject({"id": "itemTbl", "type": "javafx.scene.control.TableView"})
    test.compare(tableView.items.length, 0)
    limit = 4 # To avoid testing 100s of rows since that would be boring
    for row, record in enumerate(testData.dataset("MyAddresses.tsv")):
        forename = testData.field(record, "Forename")
        surname = testData.field(record, "Surname")
        email = testData.field(record, "Email")
        phone = testData.field(record, "Phone")
        addNameAndAddress((forename, surname, email, phone))
        checkNameAndAddress(tableView, record)
        if row >= limit:
            break
    test.compare(tableView.items.length, row + 1)
    closeWithoutSaving()
import * as names from 'names.js';
var autname = "startjfxaut.sh";
if (OS.name == "Windows") {
autname = "startjfxaut.bat";
}require 'names.pl';
use English qw( -no_match_vars $OSNAME ); # Import only $OSNAME
my $autname = "startjfxaut.sh";
if ($OSNAME eq 'MSWin32') {
$autname = "startjfxaut.bat";
}require 'names'
include Squish
def main
autname = "startjfxaut.sh"
if RUBY_PLATFORM.downcase.include?('mswin') || RUBY_PLATFORM.downcase.include?('mingw') || RUBY_PLATFORM.downcase.include?('cygwin')
autname = "startjfxaut.bat"
end
startApplication(autname)
invokeMenuItem("_File", "_New...")
tableView = waitForObject({:id => "itemTbl", :type => "javafx.scene.control.TableView"})
Test.verify(tableView.items.length == 0)
limit = 4 # To avoid testing 100s of rows since that would be boring
rows = 0
TestData.dataset("MyAddresses.tsv").each_with_index do
|record, row|
forename = TestData.field(record, "Forename")
surname = TestData.field(record, "Surname")
email = TestData.field(record, "Email")
phone = TestData.field(record, "Phone")
addNameAndAddress([forename, surname, email, phone]) # pass as a single Array
checkNameAndAddress(tableView, record)
break if row >= limit
rows += 1
end
Test.compare(tableView.items.length, rows + 1)
closeWithoutSaving
endsource [findFile "scripts" "names.tcl"]
proc main {} {
if { $::tcl_platform(platform) == "windows" } {
startApplication "startjfxaut.bat"
} else {
startApplication "startjfxaut.sh"
}
invokeMenuItem "_File" "_New..."
set tableView [waitForObject [::Squish::ObjectName id itemTbl type javafx.scene.control.TableView]]
test compare [property get [property get $tableView items] length] 0
# To avoid testing 100s of rows since that would be boring
set limit 4
set data [testData dataset "MyAddresses.tsv"]
set columns [llength [testData fieldNames [lindex $data 0]]]
set row 0
for {} {$row < [llength $data]} {incr row} {
set record [lindex $data $row]
set forename [testData field $record "Forename"]
set surname [testData field $record "Surname"]
set email [testData field $record "Email"]
set phone [testData field $record "Phone"]
set fields [list $forename $surname $email $phone]
addNameAndAddress $fields
checkNameAndAddress $tableView $record
if {$row >= $limit} {
break
}
}
test compare [property get [property get $tableView items] length] [expr $row + 1]
closeWithoutSaving
}Squish provides access to test data through its testData module's functions—here we used the testData.dataset() function to access the data file and make its records available, and the testData.field() function to retrieve each record's individual fields.
Having used the test data to populate the TableView we want to be confident that the data in the table is the same as what we have added, so that's why we added the checkNameAndAddress() function. We also added a limit to how many records we would compare, just to make the test run faster.
def checkNameAndAddress(tableView, record):
    tableModel = tableView.getColumns()
    for column in range(len(testData.fieldNames(record))):
        value = tableModel.get(column).getCellData(0).toString()
        test.compare(value, testData.field(record, column))
function checkNameAndAddress(tableView, record)
{
var tableModel = tableView.getColumns();
for (var column = 0; column < testData.fieldNames(record).length; ++column) {
var value = tableModel.get(column).getCellData(0).toString();
test.compare(value, testData.field(record, column));
}
}sub checkNameAndAddress
{
my($tableView, $record) = @_;
my $tableModel = $tableView->getColumns();
my @columnNames = testData::fieldNames($record);
for (my $column = 0; $column < scalar(@columnNames); $column++) {
my $value = $tableModel->get($column)->getCellData(0)->toString();
test::compare($value, testData::field($record, $column));
}
}def checkNameAndAddress(tableView, record)
tableModel = tableView.getColumns()
for column in 0...TestData.fieldNames(record).length
value = tableModel.get(column).getCellData(0).toString()
Test.compare(value, TestData.field(record, column))
end
endproc checkNameAndAddress {tableView record} {
set tableModel [invoke $tableView getColumns]
set columns [llength [testData fieldNames $record]]
for {set column 0} {$column < $columns} {incr column} {
set value [toString [invoke [invoke $tableModel get $column] getCellData 0]]
test compare $value [testData field $record $column]
}
}This function accesses the TableView's underlying TableModel and extracts each cell's value. We then use Squish's test.compare() function to check that the value in the cell is the same as the value in the test data we used. Note that this particular AUT always adds a new row before the current row (or as the first row if there are no rows yet), and always makes the added row the current row. The effect of this is that every new name and address is always added as the first row, and this is why we hard-coded the row to be 0.
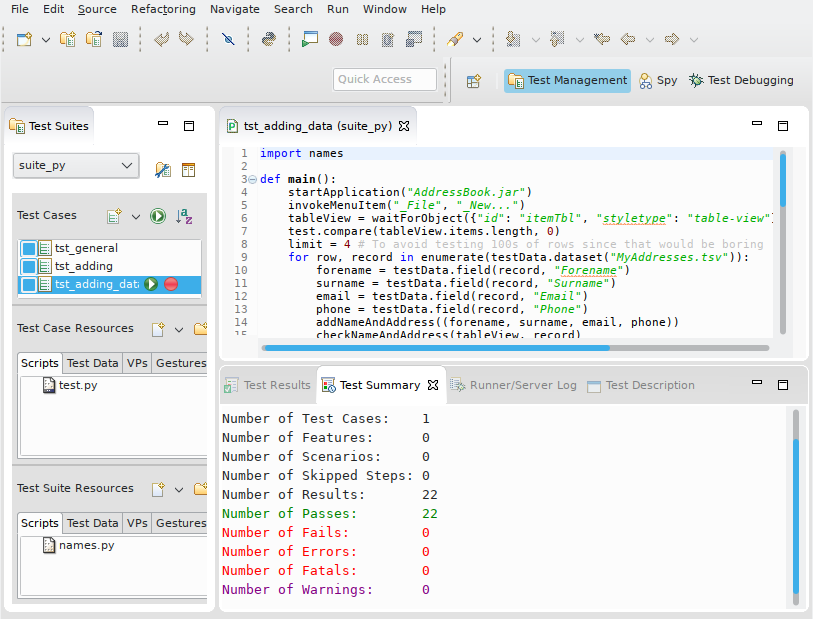
The screenshot shows Squish's Test Summary log after the data-driven tests have been run.
These test scripts could be shorter if we moved our common code into a shared location. Each script language has its own mechanism for creating and importing libraries, but in addition, Squish has Shared Scripts and Global Scripts that you can use to locate and access shared code.
Learning More
We have now completed the tutorial. Squish can do much more than we have shown here, but the aim has been to get you started with basic testing as quickly and easily as possible. The How to Create Test Scripts, and How to Test Applications - Specifics sections provide many more examples, including those that show how tests can interact with particular input elements, such as selects, select-ones, texts, and text-areas.
The API Reference and Tools Reference give full details of Squish's testing API and the numerous functions it offers to make testing as easy and efficient as possible. The time you invested will be repaid because you'll know what functionality Squish provides out of the box and can avoid reinventing things that are already available.
Java example applications and their corresponding tests are provided in <SQUISHDIR>/examples/java.
© 2025 The Qt Company Ltd.
Documentation contributions included herein are the copyrights of
their respective owners.
The documentation provided herein is licensed under the terms of the GNU Free Documentation License version 1.3 as published by the Free Software Foundation.
Qt and respective logos are trademarks of The Qt Company Ltd. in Finland and/or other countries worldwide. All other trademarks are property
of their respective owners.
