Visual Verification Point
To create visual verification points, use the Squish IDE or the createVisualVP(objectNameOrReference, vpFile) function. You can view comparison failures and edit the expected visual state stored within the verification point in the Visual Verification Point dialog.
Plain editing mode
The expectation of the visual state of an object hierarchy checked via a Boolean test.vp(name) call can be configured prior to the first test execution. To open the editor, select the verification point file and click the edit icon ( ) or double-click the file.
The dialog centers around an image of the GUI structure to be checked. On the left a tree view shows the hierarchy (Structure) of discovered sub-controls. When selecting a control through a click on the tree item or image the control's properties and activated checks will be displayed in the Properties pane on the right hand side.
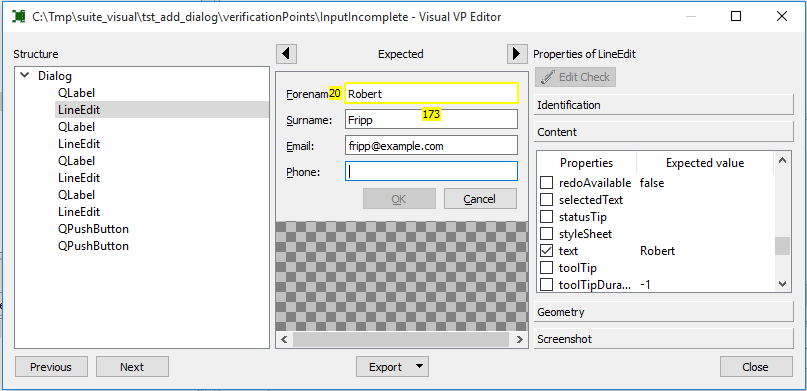
The object properties are grouped into categories: Identification, Content, Geometry, and Screenshot. This is also the order later followed during test execution after a matching object hierarchy was found.
Identifying Properties
Some object properties are not relevant to the visual appearance. But if the structures of two object snapshots are not identical they can help with mapping objects from one tree to the other.
In case an object possesses identifying properties that turn out to be unstable (like the HTML element 'id' attribute that is often assigned dynamically calculated values) they can be excluded from the list of object characteristics to be considered.
Content Properties
Content properties influence the way a UI element is rendered on the screen. Be it through textual content, a numerical value or current state of a button.
Content properties are part of the Identity Check as they can often provide a good way to tell one element from another.
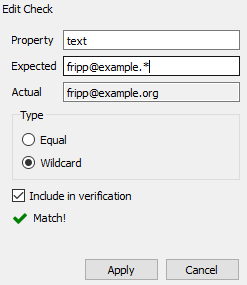
In case a property's value can be permuted a fuzzy check using wildcard characters can be configured.
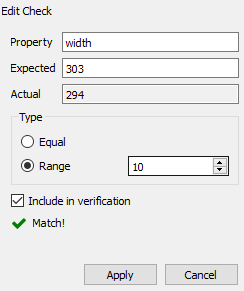
Geometry Properties
An element's geometry is specified by its x and y position (relative to the topmost element being checked) as well as its width and height.
In case the exact geometry can vary between test execution platforms an acceptable tolerance can be specified.
Screenshot
A screenshot check can be performed for a window as a whole, individual controls or groups of controls.
By default, the whole surface is checked (pixel by pixel) but in case of unstable content the check can be disabled.
View visual differences
A failed Boolean test.vp(name) test will show up in the Test Results view view with a short summary of the failed check(s).
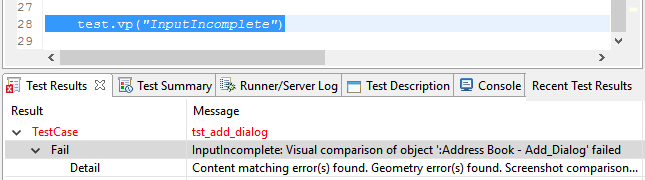
Clicking the View Differences toolbar button opens the editor in an extended mode for analysis of the difference details:

In extended mode the editor will show both the expected and actual images, a list of Failures and differences marked in red.
The Properties includes an additional Hierarchy section. This section will display possible disagreements between the two object structures.
A click on the Structure button will make the pane on the display the whole object structure. Including both identical and different objects:
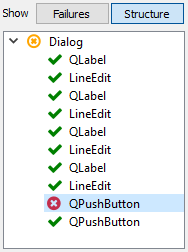
While the green checkmark denotes positive results of all active checks, the red circle is shown if at least one check failed. The yellow icons signals that an object had successful checks but a failure was found within one of its child or children's children objects.
Tuning visual verifications
Ideally, executions of Verification Points with all checks enabled produce a positive result. Due to a multitude of factors verifications may fail. At least on the first run. Many types of failures can be dealt with automatically by pressing the Relax Check button. The Accept All button, on the other hand, will simply overwrite the expected state with the now seen actual state.
Here are more specific suggested ways of "tuning" a Verification Point in case of persistent failures:
Handling screenshot check failures
Turn off screenshot checks for elements known to contain dynamic content. In case content and geometry checks alone can be considered sufficient to verify the UI layout.
Handling of Content check failures
In case property values are unstable consider the usage of wildcards. If unavoidable drop the check completely by deselecting Include in verification.
Handling of Geometry check failures
In case of varying geometries the checks can be relaxed through usage of allowable ranges for x, y, width and height. Or a complete check removal through deselection of Include in verification.
Creation vs. execution state
During test execution the application's state may slightly differ from the state seen during the interactive creation of the Verification Point. As a result an immediate failure of the layout check may occur. First, inspect the changes to validate whether they are maybe acceptable. Then use the Accept All button to accept the changes. This can make the checks work for the following runs.
Failures due to transient state
A Verification Point executed during an application state transition may be very sensitive to exact timing. Parts of the UI may still be in the setup phase. A snooze() statement inserted before test.vp() can make the check fall into a stable state of the UI.
© 2025 The Qt Company Ltd.
Documentation contributions included herein are the copyrights of
their respective owners.
The documentation provided herein is licensed under the terms of the GNU Free Documentation License version 1.3 as published by the Free Software Foundation.
Qt and respective logos are trademarks of The Qt Company Ltd. in Finland and/or other countries worldwide. All other trademarks are property
of their respective owners.
