Squish for Java BDD Tutorials
Tutorial: Designing Behavior Driven Development (BDD) Tests
This tutorial will show you how to create, run, and modify Behavior Driven Development (BDD) tests for an example application. You will learn about Squish's most frequently used features. By the end of the tutorial you will be able to write your own tests for your own applications.
Note: There is a 40-minute Online course about Behavior Driven Testing in Squish at the ![]() if you desire some video guidance.
if you desire some video guidance.
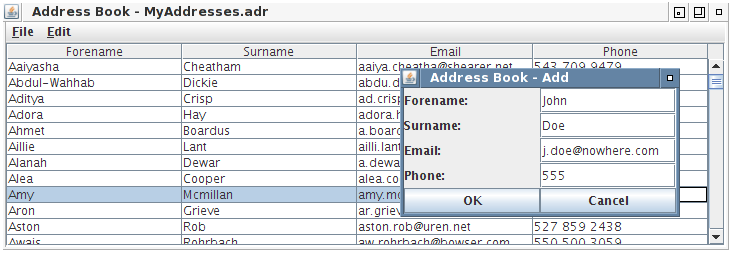
For this chapter we will use a simple Address Book application written in Java AWT/Swing as our AUT, in <SQUISHDIR>/examples/java/addressbook. It allows users to load an existing address book or create a new one, add, edit, and remove entries. The screenshot shows the application in action with a user adding a new name and address. 2 other versions are available, depending on which toolkit you want to use (AWT/Swing, SWT or JavaFX).
Example Test Suites
In the same directory as the AUT, you should find some example test suites beginning with suite_bdd_ and a script language as a suffix. Those will be similar to the test suites you produce by following this tutorial.
Introduction to Behavior Driven Development
Behavior-Driven Development (BDD) is an extension of the Test-Driven Development approach which puts the definition of acceptance criteria at the beginning of the development process as opposed to writing tests after the software has been developed. With possible cycles of code changes done after testing.
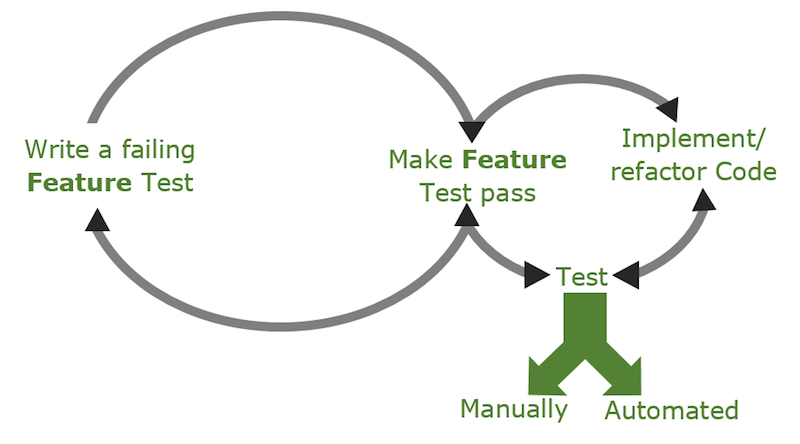
Behavior Driven Tests are built out of a set of Feature files, which describe product features through the expected application behavior in one or many Scenarios. Each Scenario is built out of a sequence of Steps which represent actions or verifications that need to be tested for that Scenario.
BDD focuses on expected application behavior, not on implementation details. Therefore BDD tests are described in a human-readable Domain Specific Language (DSL). As this language is not technical, such tests can be created not only by programmers, but also by product owners, testers or business analysts. Additionally, during the product development, such tests serve as living product documentation. For Squish usage, BDD tests shall be created using Gherkin syntax. The previously written product specification (BDD tests) can be turned into executable tests. This step by step tutorial presents automating BDD tests with Squish IDE support.
Gherkin syntax
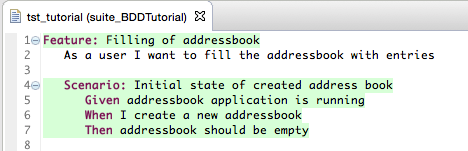
Gherkin files describe product features through the expected application behavior in one or many Scenarios. Here is an example showing the "Filling of addressbook" feature of the addressbook example application.
Feature: Filling of addressbook
    As a user I want to fill the addressbook with entries

    Scenario: Initial state of created address book
        Given addressbook application is running
        When I create a new addressbook
        Then addressbook should have zero entries

    Scenario: State after adding one entry
        Given addressbook application is running
        When I create a new addressbook
        And I add a new person 'John','Doe','john@m.com','500600700' to address book
        Then '1' entries should be present

    Scenario: State after adding two entries
        Given addressbook application is running
        When I create a new addressbook
        And I add new persons to address book
            | forename  | surname  | email        | phone  |
            | John      | Smith    | john@m.com   | 123123 |
            | Alice     | Thomson  | alice@m.com  | 234234 |
        Then '2' entries should be present

    Scenario: Forename and surname is added to table
        Given addressbook application is running
        When I create a new addressbook
        When I add a new person 'Bob','Doe','Bob@m.com','123321231' to address book
        Then previously entered forename and surname shall be at the top
Most of the above is free form text (does not have to be English). It's just the Feature/Scenario structure and the leading keywords like "Given", "And", "When" and "Then" that are fixed. Each of those keywords marks a Step defining preconditions, user actions and expected results. This application behavior specification can be passed to software developers to implement features, and at the same time it can be passed to software testers to implement automated tests.
Test implementation
Creating Test Suite
First, we need to create a Test Suite. Start the Squish IDE and select File > New Test Suite. Follow the New Test Suite wizard, provide a Test Suite name, choose the Java toolkit, scripting language of your choice, and finally register Address Book application as AUT (if necessary).
Creating Test Case
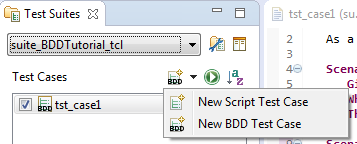
Squish supports different types of Test Cases: "Script", "BDD" and "MBT". "Script" is the default. In order to create new "BDD Test Case", use the context menu by clicking on the expander next to New Script Test Case ( ) button and choosing the option New BDD Test Case. The Squish IDE will remember your choice and the "BDD Test Case" will become the default when clicking on the button in the future.
The new BDD Test Case consists of a test.feature file (filled with a Gherkin template while creating a new BDD test case), a file named test.(py|js|pl|rb|tcl) which will drive the execution (there is no need to edit this file), and a Test Suite Resources file named shared/steps/steps.(py|js|pl|rb|tcl) where step implementation code will be placed.
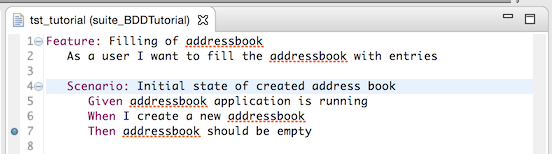
We need to replace the Gherkin template with a Feature for the addressbook example application. To do this, copy the Feature description below and paste it into the Feature file.
Feature: Filling of addressbook
    As a user I want to fill the addressbook with entries

    Scenario: Initial state of created address book
        Given addressbook application is running
        When I create a new addressbook
        Then addressbook should have zero entries
When editing the test.feature file, a warning No implementation found is displayed for each undefined step. The implementations are in the steps subdirectory, in Test Case Resources, or in Test Suite Resources. Running our Feature test now will currently fail at the first step with a No Matching Step Definition and the following steps will be skipped.
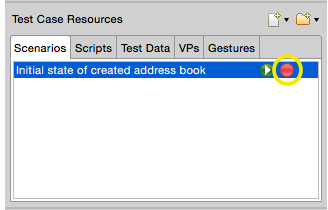
Recording Step implementation
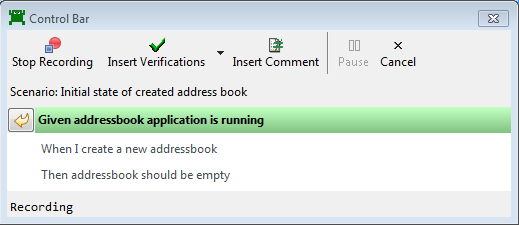
In order to record a Scenario, press the Record ( ) button next to the respective
 Scenario that is listed in the Scenarios tab of Test Case Resources.
This will cause Squish to run the AUT so that we can interact with it. Additionally, the Control Bar is displayed with a list of all steps that need to be recorded. Now all interactions with the AUT or any verification points added to the script will be recorded under the current step Given addressbook application is running (which is bolded in the Step list on the Control Bar).
In order to verify that this precondition is met, we will add a Verification Point. To do this, click on Verify ( ) in the Control Bar and select Properties.
As a result, the Squish IDE is put into Spy perspective which displays all Application Objects and their Properties. In the Application Objects View, select one of the main widgets that occupies the most space.
Selecting it will update the Properties View to its right side. Next, click on the checkbox in front of enabled in the Properties View. Finally, click on Save and Insert Verifications.
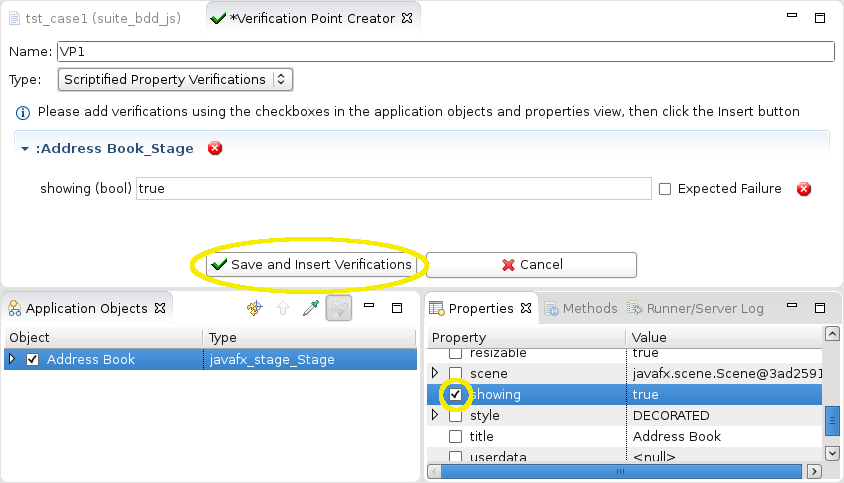
After this, the Squish IDE disappears and the Control Bar is shown again.
When we are done with each step, we can move to the next undefined step (playing back the ones that were previously defined) by clicking on Finish Recording Step( ) button in the Control Bar that is located to the left of the current step.
Next, for the step I create a new addressbook, click on the New toolbar button of the AddressBook ( ) and then click Finish Recording Step().
Finally, for the step addressbook should have zero entries verify that the table containing the address entries is empty. To record this verification, click on Verify () while recording, and select Properties. In the Application Objects view, use the Object Picker ( ) to select (not check) the table object. After that, you may need to navigate in the tree to one of its children to locate the appropriate Table-typed object (as opposed to one of its containers). Check yourself that the
 rowCount property is 0 from the Properties view and click Save and Insert Verifications. Finally, click on the last Finish Recording Step() button in the Control Bar.
As a result, Squish will generate something like following step definitions in the steps.* file (at Test Suites > Test Suite Resources):
@Given("addressbook application is running")
def step(context):
    startApplication("AddressBookSwing.jar")
    test.compare(waitForObjectExists(names.address_Book_JViewport).enabled, True)

@When("I create a new addressbook")
def step(context):
    clickButton(waitForObject(names.address_Book_JButton))

@Then("addressbook should have zero entries")
def step(context):
    test.compare(waitForObjectExists(names.address_Book_Unnamed_JTable).rowcount, 0)
Given("addressbook application is running", function(context) {
startApplication("AddressBookSwing.jar");
test.compare(waitForObjectExists(names.addressBookJViewport).enabled, true);
});
When("I create a new addressbook", function(context) {
clickButton(waitForObject(names.addressBookJButton));
});
Then("addressbook should have zero entries", function(context) {
test.compare(waitForObjectExists(names.addressBookUnnamedJTable).rowcount, 0);Given("addressbook application is running", sub {
my $context = shift;
startApplication("AddressBookSwing.jar");
test::compare(waitForObjectExists($Names::address_book_jviewport)->enabled, 1);
});
When("I create a new addressbook", sub {
my $context = shift;
clickButton(waitForObject($Names::address_book_jbutton));
});
Then("addressbook should have zero entries", sub {
my $context = shift;
test::compare(waitForObjectExists($Names::address_book_unnamed_jtable)->rowcount, 0);Given("addressbook application is running") do |context|
startApplication("AddressBookSwing.jar")
Test.compare(waitForObjectExists(Names::Address_Book_JViewport).enabled, true)
end
When("I create a new addressbook") do |context|
clickButton(waitForObject(Names::Address_Book_JButton))
end
Then("addressbook should have zero entries") do |context|
Test.compare(waitForObjectExists(Names::Address_Book_Unnamed_JTable).rowcount, 0)Given "addressbook application is running" {context} {
startApplication "AddressBookSwing.jar"
test compare [property get [waitForObjectExists $names::Address_Book_JViewport] enabled] true
}
When "I create a new addressbook" {context} {
invoke clickButton [waitForObject $names::Address_Book_JButton]
}
Then "addressbook should have zero entries" {context} {
test compare [property get [waitForObjectExists $names::Address_Book_Unnamed_JTable] rowcount] 0The application is started at the beginning of the first step due to the startApplication() call. At the end of each Scenario, the OnScenarioEnd hook function is called, causing detach() to be called on the application context. Because the AUT was started with startApplication(), the detach causes it to terminate (although not immediately - you may see multiple AUTs running at the same time).
This hook function is found in the file bdd_hooks.(py|js|pl|rb|tcl), which is located in the Scripts tab of the Test Suite Resources view. You can define additional hook functions here. For a list of all available hooks, please refer to Performing Actions During Test Execution Via Hooks.
After creating the first BDD Test Case in your suite, a shared/scripts/hooks file is created in the correct script language. From the Squish IDE, it is located in the Scripts tab of Test Suite Resources.
@OnScenarioEnd
def hook(context):
    for ctx in applicationContextList():
        ctx.detach()
OnScenarioEnd(function(context) {
applicationContextList().forEach(function(ctx) { ctx.detach(); });
});OnScenarioEnd(sub {
foreach (applicationContextList()) {
$_->detach();
}
});OnScenarioEnd do |context| applicationContextList().each { |ctx| ctx.detach() } end
OnScenarioEnd {context} {
    foreach ctx [applicationContextList] {
        applicationContext $ctx detach
    }
}
Step parametrization
So far, our steps did not use any parameters and all values were hardcoded. Gherkin supports different types of parameters like any, integer or word, allowing our step definitions to be more reusable. Let us add a new Scenario to our Feature file which will provide step parameters for both the Test Data and the expected results. Copy the below section into your Feature file.
Scenario: State after adding one entry
    Given addressbook application is running
    When I create a new addressbook
    And I add a new person 'John','Doe','john@m.com','500600700' to address book
    Then '1' entries should be present
After saving the Feature file, the Squish IDE provides a hint that only 2 steps need to be implemented: I add a new person 'John', 'Doe','john@m.com','500600700' to address book and '1' entries should be present. The remaining steps already have a matching step implementation.
To record the missing steps, hit Record () next to the test case name in the Test Suites view. The script will play until it gets to the missing step and then prompt you to implement it. Click the Add button, enter the information for a new entry and click Ok to close the dialog.
Click on Finish Recording Step() button to move to the next step.
For the second missing step, we can record an object property verification like we did for the step addressbook should have zero entries, checking that rowcount is 1.
Now we have steps with hardcoded values. We will replace them with Gherkin parameter types.
For the add step, replace the hardcoded parameters with |word|, |word|, |any|, |any|. Note that each parameter will be passed to the step implementation function in the order of appearance in the descriptive name of the step.
@Step("I add a new person '|word|','|word|','|any|','|any|' to address book")
def step(context, forename, lastname, email, phone):
    clickButton(waitForObject(names.address_Book_Unnamed_JButton))
    type(waitForObject(names.address_Book_Add_Forename_JTextField), forename)
    type(waitForObject(names.address_Book_Add_Surname_JTextField), lastname)
    type(waitForObject(names.address_Book_Add_Email_JTextField), email)
    type(waitForObject(names.address_Book_Add_Phone_JTextField), phone)
    clickButton(waitForObject(names.address_Book_Add_OK_JButton))
Step("I add a new person '|word|','|word|','|any|','|any|' to address book",
function(context, forename, lastname, email, phone) {
clickButton(waitForObject(names.addressBookUnnamedJButton));
mouseClick(waitForObject(names.addressBookAddForenameJTextField), 31, 14, 0, Button.Button1);
type(waitForObject(names.addressBookAddForenameJTextField), forename);
type(waitForObject(names.addressBookAddSurnameJTextField), lastname);
type(waitForObject(names.addressBookAddEmailJTextField), email);
type(waitForObject(names.addressBookAddPhoneJTextField), phone);
clickButton(waitForObject(names.addressBookAddOKJButton));Step("I add a new person '|word|','|word|','|any|','|any|' to address book", sub {
my ($context, $forename, $lastname, $email, $phone) = (@_);
clickButton(waitForObject($Names::address_book_unnamed_jbutton));
mouseClick(waitForObject($Names::address_book_add_forename_jtextfield), 45, 13, 0, Button->Button1);
type(waitForObject($Names::address_book_add_forename_jtextfield), $forename);
type(waitForObject($Names::address_book_add_surname_jtextfield), $lastname);
type(waitForObject($Names::address_book_add_email_jtextfield), $email);
type(waitForObject($Names::address_book_add_phone_jtextfield), $phone);
clickButton(waitForObject($Names::address_book_add_ok_jbutton));Step("I add a new person '|word|','|word|','|any|','|any|' to address book") do |context, forename, lastname, email, phone|
clickButton(waitForObject(Names::Address_Book_Unnamed_JButton))
mouseClick(waitForObject(Names::Address_Book_Add_Forename_JTextField), 50, 8, 0, Button::BUTTON1)
type(waitForObject(Names::Address_Book_Add_Forename_JTextField), forename)
type(waitForObject(Names::Address_Book_Add_Surname_JTextField), lastname)
type(waitForObject(Names::Address_Book_Add_Email_JTextField), email)
type(waitForObject(Names::Address_Book_Add_Phone_JTextField), phone)
clickButton(waitForObject(Names::Address_Book_Add_OK_JButton))Step "I add a new person '|word|','|word|','|any|','|any|' to address book" {context forename surname email phone} {
invoke clickButton [waitForObject $names::Address_Book_Unnamed_JButton]
invoke mouseClick [waitForObject $names::Address_Book_Add_Forename_JTextField] 39 15 0 [enum Button Button1]
invoke type [waitForObject $names::Address_Book_Add_Forename_JTextField] $forename
invoke type [waitForObject $names::Address_Book_Add_Surname_JTextField] $surname
invoke type [waitForObject $names::Address_Book_Add_Email_JTextField] $email
invoke type [waitForObject $names::Address_Book_Add_Phone_JTextField] $phone
invoke clickButton [waitForObject $names::Address_Book_Add_OK_JButton]Next, we will replace the hardcoded value in the second step, so we can verify any number of entries.
@Then("'|integer|' entries should be present")
def step(context, count):
    test.compare(waitForObjectExists(names.address_Book_Unnamed_JTable).rowcount, count)
Then("'|integer|' entries should be present", function(context, count) {
test.compare(waitForObjectExists(names.addressBookUnnamedJTable).rowcount, count);Then("'|integer|' entries should be present", sub {
my $context = shift;
my $count = shift;
test::compare(waitForObjectExists($Names::address_book_unnamed_jtable)->rowcount, $count);Then("'|integer|' entries should be present") do |context, count|
Test.compare(waitForObjectExists(Names::Address_Book_Unnamed_JTable).rowcount, count)Then "'|integer|' entries should be present" {context count} {
test compare [property get [waitForObjectExists $names::Address_Book_Unnamed_JTable] rowcount] $countProvide parameters for Step in table
The next Scenario will test adding multiple entries to the address book. We could use step I add a new person John','Doe','john@m.com','500600700' to address book multiple times just with different data. Instead, let's define a new step called I add new persons to address book which will handle data from a table.
Scenario: State after adding two entries
    Given addressbook application is running
    When I create a new addressbook
    And I add new persons to address book
        | forename  | surname  | email        | phone  |
        | John      | Smith    | john@m.com   | 123123 |
        | Alice     | Thomson  | alice@m.com  | 234234 |
    Then '2' entries should be present
Instead of recording it, we write the step implementation by hand. It makes use of a special variable, context.table which contains the table data.
@When("I add new persons to address book")
def step(context):
    table = context.table
    # Drop initial row with column headers
    table.pop(0)
    for (forename, lastname, email, phone) in table:
        clickButton(waitForObject(names.address_Book_Unnamed_JButton))
        type(waitForObject(names.address_Book_Add_Forename_JTextField), forename)
        type(waitForObject(names.address_Book_Add_Surname_JTextField), lastname)
        type(waitForObject(names.address_Book_Add_Email_JTextField), email)
        type(waitForObject(names.address_Book_Add_Phone_JTextField), phone)
        clickButton(waitForObject(names.address_Book_Add_OK_JButton))
When("I add new persons to address book", function(context) {
var table = context.table;
for (var i = 1; i < table.length; ++i) {
var row = table[i];
clickButton(waitForObject(names.addressBookUnnamedJButton));
type(waitForObject(names.addressBookAddForenameJTextField), row[0]);
type(waitForObject(names.addressBookAddSurnameJTextField), row[1]);
type(waitForObject(names.addressBookAddEmailJTextField), row[2]);
type(waitForObject(names.addressBookAddPhoneJTextField), row[3]);
clickButton(waitForObject(names.addressBookAddOKJButton));
}
});Step("I add new persons to address book", sub {
my $context = shift;
my $table = $context->{'table'};
# Drop initial row with column headers
shift(@{$table});
for my $row (@{$table}) {
my ($forename, $lastname, $email, $phone) = @{$row};
clickButton(waitForObject($Names::address_book_unnamed_jbutton));
type(waitForObject($Names::address_book_add_forename_jtextfield), $forename);
type(waitForObject($Names::address_book_add_surname_jtextfield), $lastname);
type(waitForObject($Names::address_book_add_email_jtextfield), $email);
type(waitForObject($Names::address_book_add_phone_jtextfield), $phone);
clickButton(waitForObject($Names::address_book_add_ok_jbutton));
}
});When("I add new persons to address book") do |context|
table = context.table
# Drop initial row with column headers
table.shift
for forename, lastname, email, phone in table do
clickButton(waitForObject(Names::Address_Book_Unnamed_JButton))
type(waitForObject(Names::Address_Book_Add_Forename_JTextField), forename)
type(waitForObject(Names::Address_Book_Add_Surname_JTextField), lastname)
type(waitForObject(Names::Address_Book_Add_Email_JTextField), email)
type(waitForObject(Names::Address_Book_Add_Phone_JTextField), phone)
clickButton(waitForObject(Names::Address_Book_Add_OK_JButton))
end
endWhen "I add new persons to address book" {context} {
set table [$context table]
# Drop initial row with column headers
foreach row [lreplace $table 0 0] {
foreach {forename surname email phone} $row break
invoke clickButton [waitForObject $names::Address_Book_Unnamed_JButton]
invoke type [waitForObject $names::Address_Book_Add_Forename_JTextField] $forename
invoke type [waitForObject $names::Address_Book_Add_Surname_JTextField] $surname
invoke type [waitForObject $names::Address_Book_Add_Email_JTextField] $email
invoke type [waitForObject $names::Address_Book_Add_Phone_JTextField] $phone
invoke clickButton [waitForObject $names::Address_Book_Add_OK_JButton]
}
}Sharing data between Steps and Scenarios
Let's add a new Scenario to the Feature file. This time we would like to check not the number of entries in address book list, but if this list contains proper data. Because we enter data into the address book in one step and verify it in another, we must share information about entered data between those steps in order to perform a verification.
Scenario: Forename and surname is added to table
    Given addressbook application is running
    When I create a new addressbook
    When I add a new person 'Bob','Doe','Bob@m.com','123321231' to address book
    Then previously entered forename and surname shall be at the top
To share this data, context.userData can be used. We modified our existing I add a new person step to store the values we want to save into a dictionary.
@Step("I add a new person '|word|','|word|','|any|','|any|' to address book")
def step(context, forename, lastname, email, phone):
    clickButton(waitForObject(names.address_Book_Unnamed_JButton))
    type(waitForObject(names.address_Book_Add_Forename_JTextField), forename)
    type(waitForObject(names.address_Book_Add_Surname_JTextField), lastname)
    type(waitForObject(names.address_Book_Add_Email_JTextField), email)
    type(waitForObject(names.address_Book_Add_Phone_JTextField), phone)
    clickButton(waitForObject(names.address_Book_Add_OK_JButton))
    context.userData = {}
    context.userData['forename'] = forename
    context.userData['lastname'] = lastname
Step("I add a new person '|word|','|word|','|any|','|any|' to address book") do |context, forename, lastname, email, phone|
clickButton(waitForObject(Names::Address_Book_Unnamed_JButton))
mouseClick(waitForObject(Names::Address_Book_Add_Forename_JTextField), 50, 8, 0, Button::BUTTON1)
type(waitForObject(Names::Address_Book_Add_Forename_JTextField), forename)
type(waitForObject(Names::Address_Book_Add_Surname_JTextField), lastname)
type(waitForObject(Names::Address_Book_Add_Email_JTextField), email)
type(waitForObject(Names::Address_Book_Add_Phone_JTextField), phone)
context.userData = Hash.new
context.userData[:forename] = forename
context.userData[:surname] = lastname
clickButton(waitForObject(Names::Address_Book_Add_OK_JButton))
endStep("I add a new person '|word|','|word|','|any|','|any|' to address book",
function(context, forename, lastname, email, phone) {
clickButton(waitForObject(names.addressBookUnnamedJButton));
mouseClick(waitForObject(names.addressBookAddForenameJTextField), 31, 14, 0, Button.Button1);
type(waitForObject(names.addressBookAddForenameJTextField), forename);
type(waitForObject(names.addressBookAddSurnameJTextField), lastname);
type(waitForObject(names.addressBookAddEmailJTextField), email);
type(waitForObject(names.addressBookAddPhoneJTextField), phone);
context.userData['forename'] = forename;
context.userData['lastname'] = lastname;
clickButton(waitForObject(names.addressBookAddOKJButton));
});Step("I add a new person '|word|','|word|','|any|','|any|' to address book", sub {
my ($context, $forename, $lastname, $email, $phone) = (@_);
clickButton(waitForObject($Names::address_book_unnamed_jbutton));
mouseClick(waitForObject($Names::address_book_add_forename_jtextfield), 45, 13, 0, Button->Button1);
type(waitForObject($Names::address_book_add_forename_jtextfield), $forename);
type(waitForObject($Names::address_book_add_surname_jtextfield), $lastname);
type(waitForObject($Names::address_book_add_email_jtextfield), $email);
type(waitForObject($Names::address_book_add_phone_jtextfield), $phone);
clickButton(waitForObject($Names::address_book_add_ok_jbutton));
$context->{userData}{'forename'} = $forename;
$context->{userData}{'lastname'} = $lastname;
});Step "I add a new person '|word|','|word|','|any|','|any|' to address book" {context forename surname email phone} {
invoke clickButton [waitForObject $names::Address_Book_Unnamed_JButton]
invoke mouseClick [waitForObject $names::Address_Book_Add_Forename_JTextField] 39 15 0 [enum Button Button1]
invoke type [waitForObject $names::Address_Book_Add_Forename_JTextField] $forename
invoke type [waitForObject $names::Address_Book_Add_Surname_JTextField] $surname
invoke type [waitForObject $names::Address_Book_Add_Email_JTextField] $email
invoke type [waitForObject $names::Address_Book_Add_Phone_JTextField] $phone
$context userData [dict create forename $forename surname $surname]
invoke clickButton [waitForObject $names::Address_Book_Add_OK_JButton]
}All data stored in context.userData can be accessed in all steps and Hooks in all Scenarios of the given Feature. Finally, we need to implement the step Then previously entered forename and lastname shall be at the top.
@Then("previously entered forename and surname shall be at the top")
def step(context):
    test.compare(waitForObjectItem(names.address_Book_Unnamed_JTable, '0/0').text, context.userData['forename'], "forename")
    test.compare(waitForObjectItem(names.address_Book_Unnamed_JTable, '0/1').text, context.userData['lastname'], "lastname")
Then("previously entered forename and surname shall be at the top") do |context|
Test.compare(waitForObjectItem(Names::Address_Book_Unnamed_JTable, '0/0').text, context.userData[:forename], "forename?");
Test.compare(waitForObjectItem(Names::Address_Book_Unnamed_JTable, '0/1').text, context.userData[:surname], "surname?")
endThen("previously entered forename and surname shall be at the top", function(context) {
test.compare(waitForObjectItem(names.addressBookUnnamedJTable, '0/0').text, context.userData['forename'], "forename?");
test.compare(waitForObjectItem(names.addressBookUnnamedJTable, '0/1').text, context.userData['lastname'], "lastname?");
});Then("previously entered forename and surname shall be at the top", sub {
my $context = shift;
test::compare(waitForObjectItem($Names::address_book_unnamed_jtable, '0/0')->text, $context->{userData}{'forename'}, "forename?");
test::compare(waitForObjectItem($Names::address_book_unnamed_jtable, '0/1')->text, $context->{userData}{'lastname'}, "lastname?");
});Then "previously entered forename and surname shall be at the top" {context} {
test compare [property get [waitForObjectItem $names::Address_Book_Unnamed_JTable "0/0"] text] [dict get [$context userData] forename]
test compare [property get [waitForObjectItem $names::Address_Book_Unnamed_JTable "0/1"] text] [dict get [$context userData] surname]
}Scenario Outline
Assume our Feature contains the following two Scenarios:
Scenario: State after adding one entry
    Given addressbook application is running
    When I create a new addressbook
    And I add a new person 'John','Doe','john@m.com','500600700' to address book
    Then '1' entries should be present

Scenario: State after adding one entry
    Given addressbook application is running
    When I create a new addressbook
    And I add a new person 'Bob','Koo','bob@m.com','500600800' to address book
    Then '1' entries should be present
As we can see, those Scenarios perform the same actions using different test data. The same can be achieved by using a Scenario Outline (a Scenario template with placeholders) and Examples (a table with parameters).
Scenario Outline: Adding single entries multiple time
    Given addressbook application is running
    When I create a new addressbook
    And I add a new person '<forename>','<lastname>','<email>','<phone>' to address book
    Then '1' entries should be present
    Examples:
        | forename | lastname | email       | phone     |
        | John     | Doe      | john@m.com  | 500600700 |
        | Bob      | Koo      | bob@m.com   | 500600800 |
Please note that the OnScenarioEnd hook will be executed at the end of each loop iteration in a Scenario Outline.
Test execution
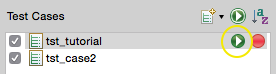
In the Squish IDE, users can execute all Scenarios in a Feature, or execute only one selected Scenario. In order to execute all Scenarios, the proper Test Case has to be executed by clicking on the Play button in the Test Suites view.
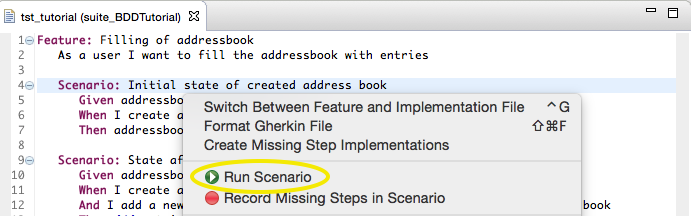
In order to execute only one Scenario, you need to open the Feature file, right-click on the given Scenario and choose Run Scenario. An alternative approach is to click on the Run Test Case ( ) button next to the respective
 Scenario in the Scenarios tab of Test Case Resources.
After a Scenario is executed, the Feature file is colored according to the execution results. More detailed information (like logs) can be found in the Test Results View.
Test debugging
Squish offers the possibility to pause an execution of a Test Case at any point in order to check script variables, spy application objects or run custom code in Squish Script Console. To do this, a breakpoint has to be placed before starting the execution, either in the Feature file at any line containing a step, or at any line of executed code (i.e., in the middle of step definition code).
When the breakpoint is reached, you can inspect all application objects and their properties. If the breakpoint is in a step definition or hook function, then you can add Verification Points or record code snippets there.
Re-using Step definitions
BDD test maintainability can be increased by reusing step definitions in test cases located in another directory. For more information, see collectStepDefinitions().
Tutorial: Migration of existing tests to BDD
This chapter is for users who have existing Squish tests and would like to introduce Behavior Driven Testing. The first section describes how to keep the existing tests and add new tests with the BDD approach. The second section describes how to convert existing suites to BDD.
Extend existing tests to BDD
The first option is to keep existing Squish tests and extend them by adding new BDD tests. It's possible to have a Test Suite containing both script-based Test Cases and BDD feature files. Simply open an existing Test Suite and choose the New BDD Test Case option from the drop-down list.
Assuming your existing script-based tests make use of a library and you are calling shared functions to interact with the AUT, those functions can also be used from BDD step implementations.
In the example below, a function is used from multiple script-based Test Cases:
def createNewAddressBook():
    clickButton(waitForObject(names.new_ToolbarItem))
function createNewAddressBook(){
clickButton(waitForObject(names.newToolbarItem));
}sub createNewAddressBook{
clickButton(waitForObject($Names::new_toolbaritem));
}def createNewAddressBook
clickButton(waitForObject(Names::New_ToolbarItem))
endproc createNewAddressBook {} {
invoke clickButton [waitForObject $names::New_ToolbarItem]
}New BDD Test Cases can easily use the same function:
@When("I create a new addressbook")
def step(context):
createNewAddressBook()When("I create a new addressbook", function(context){ createNewAddressBook() });
When("I create a new addressbook", sub {
    createNewAddressBook();
});
When("I create a new addressbook") do |context|
    createNewAddressBook
end
When "I create a new addressbook" {context} {
    createNewAddressBook
}
Convert existing tests to BDD
The second option is to convert an existing Test Suite that contains script-based Test Cases into behavior driven tests. Since a Test Suite can contain script-based and BDD Test Cases, migration can be done gradually. A Test Suite containing a mix of both Test Case types can be executed and results analyzed without any extra effort required.
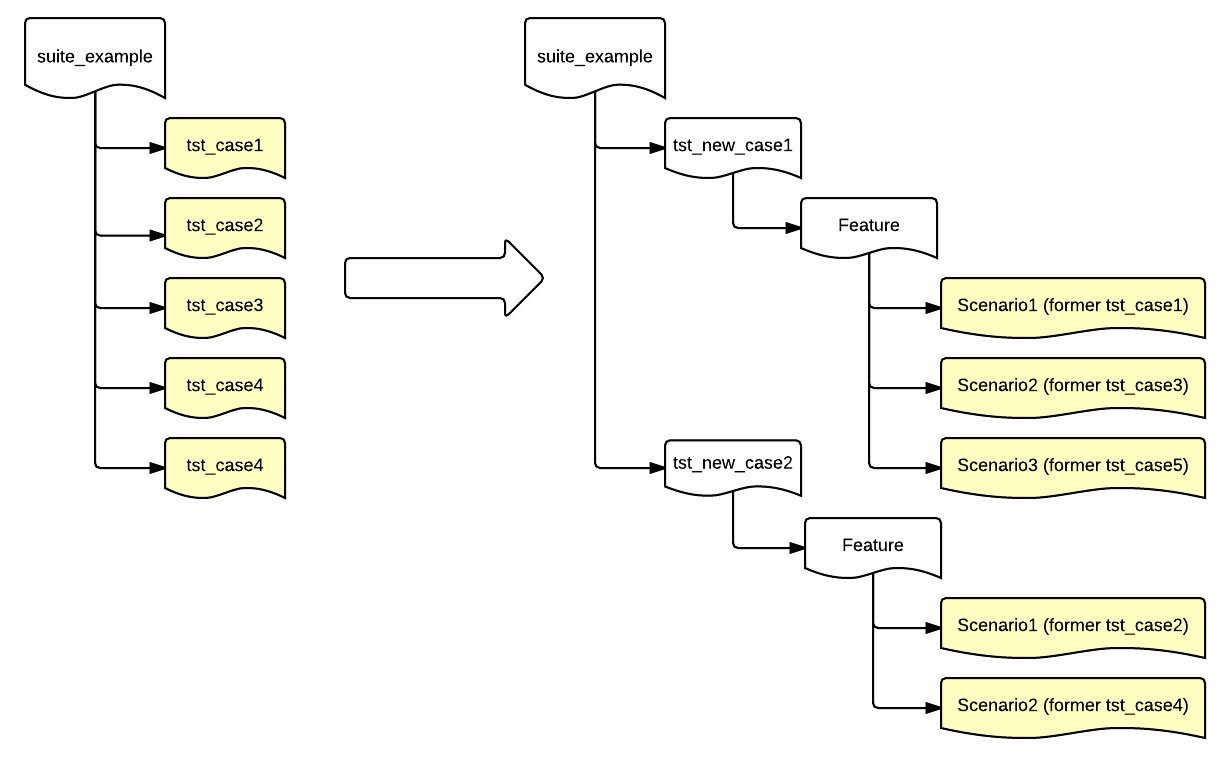
The first step is to review all Test Cases of the existing Test Suite and group them by the Feature they test. Each script-based Test Case will be transformed into a Scenario, which is a part of a Feature. For example, assume we have 5 script-based Test Cases. After review, we realize that those script-based Test Cases examine two Features. Therefore, when migration is completed, our Test Suite will contain two BDD Test Cases, each of them containing one Feature. Each Feature will contain multiple Scenarios. In our example, the first Feature contains three Scenarios and the second Feature contains two Scenarios.
At the beginning, open a Test Suite in the Squish IDE that contains script-based Squish tests that are planned to be migrated to BDD. Next, create a new Test Case by choosing New BDD Test Case option from the context menu to the right of New Script Test Case (). Each BDD Test Case corresponds to a test.feature file that contains one Feature, with one or more Scenarios. Next, open the test.feature file to describe the Features using the Gherkin language. Following the syntax from the template, edit the Feature name and optionally provide a short description. Next, decide which actions and verifications performed in the script-based Test Case should be migrated to steps.
This is how an example Test Case for the addressbook application might look:
def main():
    startApplication("Addressbook")
    test.log("Create new addressbook")
    clickButton(waitForObject(names.new_ToolbarItem))
    test.compare(waitForObjectExists(names.address_Book_Unnamed_Table).rowCount, 0)
function main() {
startApplication("Addressbook");
test.log("Create new addressbook");
clickButton(waitForObject(names.newToolbarItem));
test.compare(waitForObjectExists(names.addressBookUnnamedTable).rowCount, 0);
}sub main {
startApplication("Addressbook");
test::log("Create new addressbook");
clickButton(waitForObject($Names::new_toolbaritem));
test::compare(waitForObjectExists($Names::address_book_unnamed_table)->rowCount, 0);
}def main
startApplication("Addressbook")
Test.log("Create new addressbook")
clickButton(waitForObject(Names::New_ToolbarItem))
Test.compare(waitForObjectExists(Names::Address_Book_Unnamed_Table).rowCount, 0)
endproc main {} {
startApplication "Addressbook"
test log "Create new addressbook"
invoke clickButton [waitForObject $names::New_ToolbarItem]
test compare [property get [waitForObjectExists $names::Address_Book_Unnamed_Table] rowCount] 0
}After analyzing the above script-based Test Case we can create the following Scenario and add it to the test.feature file:
Scenario: Initial state of created address book
      Given addressbook application is running
      When I create a new addressbook
      Then addressbook should have zero entries
Next, right-click on the Scenario and choose the option Create Missing Step Implementations from the context menu. This will create a skeleton of step definitions:
@Given("addressbook application is running")
def step(context):
    test.warning("TODO implement addressbook application is running")

@When("I create a new addressbook")
def step(context):
    test.warning("TODO implement I create a new addressbook")

@Then("addressbook should have zero entries")
def step(context):
    test.warning("TODO implement addressbook should have zero entries")
Given("addressbook application is running", function(context) {
    test.warning("TODO implement addressbook application is running");
});

When("I create a new addressbook", function(context) {
    test.warning("TODO implement I create a new addressbook");
});

Then("addressbook should have zero entries", function(context) {
    test.warning("TODO implement addressbook should have zero entries");
});
Given("addressbook application is running", sub {
    my $context = shift;
    test::warning("TODO implement addressbook application is running");
});

When("I create a new addressbook", sub {
    my $context = shift;
    test::warning("TODO implement I create a new addressbook");
});

Then("addressbook should have zero entries", sub {
    my $context = shift;
    test::warning("TODO implement addressbook should have zero entries");
});
Given("addressbook application is running") do |context|
    Test.warning "TODO implement addressbook application is running"
end

When("I create a new addressbook") do |context|
    Test.warning "TODO implement I create a new addressbook"
end

Then("addressbook should have zero entries") do |context|
    Test.warning "TODO implement addressbook should have zero entries"
end
Given "addressbook application is running" {context} {
    test warning "TODO implement addressbook application is running"
}

When "I create a new addressbook" {context} {
    test warning "TODO implement I create a new addressbook"
}

Then "addressbook should have zero entries" {context} {
    test warning "TODO implement addressbook should have zero entries"
}
Now we put code snippets from the script-based Test Case into respective step definitions and remove the lines containing test.warning. If your script-based Test Cases makes use of shared scripts, you can call those functions from the step definitions as well. For example, the final result could look like this:
@Given("addressbook application is running")
def step(context):
    startApplication('"' + os.getenv("SQUISH_PREFIX") + '\\examples\\win\\Addressbook\\Addressbook.exe"')
    test.compare(waitForObjectExists(names.address_Book_Unnamed_Window).enabled, True)

@When("I create a new addressbook")
def step(context):
    mouseClick(waitForObject(names.new_ToolbarItem))

@Then("addressbook should have zero entries")
def step(context):
    test.compare(waitForObjectExists(names.address_Book_Unnamed_Table).rowCount, 0)
Given("addressbook application is running", function(context) {
startApplication('"' + OS.getenv("SQUISH_PREFIX") + '\\examples\\win\\Addressbook\\Addressbook.exe"');
test.compare(waitForObjectExists(names.addressBookUnnamedWindow).enabled, true);
});
When("I create a new addressbook", function(context) {
mouseClick(waitForObject(names.newToolbarItem));
});
Then("addressbook should have zero entries", function(context) {
test.compare(waitForObjectExists(names.addressBookUnnamedTable).rowCount, 0);
});Given("addressbook application is running", sub {
my $context = shift;
startApplication("\"$ENV{'SQUISH_PREFIX'}\\examples\\win\\Addressbook\\Addressbook.exe\"");
test::compare(waitForObjectExists($Names::address_book_unnamed_window)->enabled, 1);
});
When("I create a new addressbook", sub {
my $context = shift;
clickButton(waitForObject($Names::new_toolbaritem));
});
Then("addressbook should have zero entries", sub {
my $context = shift;
test::compare(waitForObjectExists($Names::address_book_unnamed_table)->rowCount, 0);
});Given("addressbook application is running") do |context|
startApplication("\"#{ENV['SQUISH_PREFIX']}\\examples\\win\\Addressbook\\Addressbook.exe\"")
Test.compare(waitForObjectExists(Names::Address_Book_Unnamed_Window).enabled, true)
end
When("I create a new addressbook") do |context|
clickButton(waitForObject(Names::New_ToolbarItem))
end
Then("addressbook should have zero entries") do |context|
Test.compare(waitForObjectExists(Names::Address_Book_Unnamed_Table).rowCount, 0)
endGiven "addressbook application is running" {context} {
startApplication "\"$::env(SQUISH_PREFIX)\\examples\\win\\Addressbook\\Addressbook.exe\""
test compare [property get [waitForObjectExists $names::Address_Book_Unnamed_Window] enabled] true
}
When "I create a new addressbook" {context} {
invoke mouseClick [waitForObject $names::New_ToolbarItem]
invoke mouseClick [waitForObject $names::New_ToolbarItem]
}
Then "addressbook should have zero entries" {context} {
test compare [property get [waitForObjectExists $names::Address_Book_Unnamed_Table] rowCount] 0
}Note that the test.log("Create new addressbook") was removed while migrating this script-based Test to BDD. Each step name is logged when executed, so it was redundant.
These test scripts could be shorter if we moved our common code into a shared location. Each script language has its own mechanism for creating and importing libraries, but in addition, Squish has Shared Scripts and Global Scripts that you can use to locate and access shared code.
Learning More
We have now completed the tutorial. Squish can do much more than we have shown here, but the aim has been to get you started with basic testing as quickly and easily as possible. The How to Create Test Scripts, and How to Test Applications - Specifics sections provide many more examples, including those that show how tests can interact with particular input elements, such as selects, select-ones, texts, and text-areas.
The API Reference and Tools Reference give full details of Squish's testing API and the numerous functions it offers to make testing as easy and efficient as possible. The time you invested will be repaid because you'll know what functionality Squish provides out of the box and can avoid reinventing things that are already available.
© 2025 The Qt Company Ltd.
Documentation contributions included herein are the copyrights of
their respective owners.
The documentation provided herein is licensed under the terms of the GNU Free Documentation License version 1.3 as published by the Free Software Foundation.
Qt and respective logos are trademarks of The Qt Company Ltd. in Finland and/or other countries worldwide. All other trademarks are property
of their respective owners.
